GenAI for customer support — Part 1: Building our proof of concept
.jpeg)

 Share on Twitter
Share on Twitter

 Share on LinkedIn
Share on LinkedIn

 Share on Facebook
Share on Facebook

 Share by Email
Share by email

 Print this page
Print
Table test
| Header 1 | Header 2 | Header 3 |
|---|---|---|
| lorem ipusm | lorem ipusm | lorem ipusm |
| lorem ipusm | lorem ipusm | lorem ipusm |
| lorem ipusm | lorem ipusm | lorem ipusm | lorem ipusm | lorem ipusmlorem ipusmlorem ipusmlorem ipusmlorem ipusmlorem ipusmlorem ipusmlorem ipusm |
| lorem ipusm | lorem ipusm | lorem ipusm | lorem ipusm | |
| lorem ipusm | lorem ipusm | lorem ipusm | lorem ipusm | |
| lorem ipusm | lorem ipusm | lorem ipusm | lorem ipusm |
| lorem ipsum | lorem ipsum | lorem ipsum | lorem ipsum | lorem ipsumlorem ipsumlorem ipsumlorem ipsumlorem ipsumlorem ipsumlorem ipsumlorem ipsumlorem ipsumlorem ipsum |
| lorem ipsum | lorem ipsum | lorem ipsum | lorem ipsum | |
| lorem ipsum | lorem ipsum | lorem ipsum | lorem ipsum | |
| lorem ipsumlorem ipsumlorem ipsumlorem ipsumlorem ipsumlorem ipsumlorem ipsumlorem ipsumlorem ipsumlorem ipsumlorem ipsumlorem ipsumlorem ipsumlorem ipsum | ||||
Blog v2 - modular block
This series is about how the Kibana team is componentizing the Kibana UI. In the last post in this series, I outlined how we've been applying this process to Kibana's CSS. But components are more than just CSS -- they're JavaScript, too. We went looking for a JS library to help us, and when we came upon React we found it to be a natural fit!
React is a library for building user interfaces with JavaScript, open-sourced by Facebook in 2015. In React everything is a component. This is the same fundamental principle which drives our componentization process.
According to the React documentation site, React allows you to “build encapsulated components that manage their own state, then compose them to make complex UIs.” Let’s explore these ideas in the context of our UI Framework.
Encapsulation lets us hide complexity
Engineers should be able to wield a UI Framework component like an artist wields a brush. You should be able to apply it to a medium and, with a little skill, expect a positive result.
As a corollary, an engineer who’s using a component shouldn’t have to worry about how the component works underneath the hood. Implementation details should be encapsulated, hidden from view. This includes JavaScripty things like state and performance optimizations, but it also means that entire layers of our stack become invisible. The very markup and CSS that make up our components become implementation details, which are encapsulated by our React components.
For example, take a look at how we converted our Button component to React (check out the pull request if you're interested in the details). Here’s what the component looked like originally:
<button class="kuiButton kuiButton--basic">
Basic button
</button>
We just wrapped this markup inside of a React component, like so:
const KuiButton = ({
className,
type,
children,
}) => {
return (
<button
className={getClassName({
className,
type,
})}
>
{children}
</button>
);
};
And now engineers can use this component like this:
<KuiButton
type="basic"
onClick={() => window.alert('Button clicked')}
>
Basic button
</KuiButton>
By relegating the actual CSS and markup to mere implementation details, we gain three big advantages:
- The code that represents a user interface becomes more readable and succinct.
- Engineers no longer need to remember class names and specific markup. Instead, they can focus on wiring the UI with event handlers and business logic to bring the UI to life. This means greater code consistency, fewer hacks and custom solutions, and a faster development cycle.
- Engineers who maintain the UI Framework gain a greater degree of freedom when refactoring components -- we can rename classes and restructure a component’s markup without worrying about disrupting someone else’s workflow.
Componentization means composition
Good components can be defined by many traits. They should be modular, reusable, and ideally adhere to the single responsibility principle. But great components are also composable.
This means that many components can be thought of as simple containers, into which any other component or number of components can be injected. In the previous blog post in this series, I raised the example of a Panel component. This component is just a box with a title. And like any box, it can contain literally anything: text, buttons, a table, or even other Panels. A component is composable when it exhibits this level of flexibility.
The process of componentizing our user interfaces largely consists of figuring out how to compose them out of components. When we look at a complex user interface that needs to be broken apart into components, we start by looking for the containers. And typically, these are the UI elements that become we can extract into components in our UI Framework. By following this simple process, we end up with an ecosystem of components which can be reused and composed together to create complex UIs.
React emphasizes composition as a first-class concept. It encourages component developers to design components to be stateless and functional. This results in components which accept dependencies, most notably the children dependency. React supports composition by allowing you to provide components as the children dependencies of other components. The React team has written a terrific article on how they designed React with composition in mind, entitled “Composition vs Inheritance”. If you’re getting started with React, I highly recommend you check it out.
I should mention that I also love stateless, functional React components because they’re so easy to demonstrate in the UI Framework. In fact, I copied the above KuiButton code snippet from our UI Framework documentation site. Unlike an AngularJS directive, which would require creating an Angular app, registering the directive to it, and creating a template in which to declare an instance of the directive, there’s very little overhead required to instantiate a React component. You just import it and instantiate it with whatever JavaScript dependencies it requires.
This also makes React components very easy to unit test. We use AirBnB’s Enzyme to render an HTML string of the component, and then we use Facebook's Jest to save this string as a snapshot, and compare it against subsequent renders.
Here’s what a test would look like:
import React from 'react';
import { render } from 'enzyme';
import { KuiButton } from './button';
describe('KuiButton is rendered', () => {
const $button = render(
<KuiButton>
Hello
</KuiButton>
);
expect($button)
.toMatchSnapshot();
});
This would render a snapshot which looks like this:
exports[`KuiButton Baseline is rendered 1`] = `
<button
class="kuiButton"
>
<span
class="kuiButton__inner"
>
<span>
Hello
</span>
</span>
</button>
`;
This snapshot is committed to the repo. During subsequent executions of our UI Framework test suite, Jest will detect that the snapshot exists and compare Enzyme’s output against it. If the output doesn’t match the snapshot, we’ll see a diff in the terminal with some helpful error messages. When this happens, we can either decide that our changes to the component are ones we want to preserve, in which case we’ll update the snapshot with the latest output, or we’ll realize we made a mistake and fix the component so that the test’s pass.
Looking ahead
We’re just getting started with the transition to React. If you’d like to follow our progress, drop in on our React-related GitHub Issues and see what’s in the works. We also created an open-source React Design Workshop to help ourselves and others get started with React. Feel free to run through it and make suggestions on ways we can make it better!
Next up: Designing systems
In the next and final post, I’ll share the thrilling secret of how we’ve applied componentization to our actual design process, so that we end up creating design systems instead of just static mockups.
Interested in joining our team? Well, we’re interested in you, too. Come say hi!
Meet our users: Sheldon, Missy, Georgie, and Paige. Sheldon, Missy, and Georgie are new and enthusiastic security analysts, eager to explore and contribute. Paige, on the other hand, is a seasoned admin and subject matter expert with a strong focus on process and standardization, and a clear dislike for digital clutter. Together, they work aboard the Starship Enterprise.
Monday – Sheldon:
Sheldon is poking around in Kibana, specifically interested in the zeek logs. He notices there's no existing data view for them, so he creates one called Zeek, setting the index pattern to zeek-*. Kibana assigns it a random data view IDs like e4f6268b-9c4a-4f36-8a56-49ef18fbd147. He starts building dashboards and visualizations and, impressed with the results, considers them production-ready. His team starts using them. They’re loving it. Stamp of approval.
Tuesday – Missy:
Missy logs into Kibana for the first time. She knows Zeek data has been ingested but doesn’t realize Sheldon already made a data view. Eager to dive in, she creates her own called Zeek Logs — again pointing to zeek-*. Kibana assigns it a different data view ID like 04851901-723f-41fe-bdc7-3917b41aa1f7. She starts exploring in Discover, builds some visualizations, and leaves them in place for future refinement.
Wednesday – Georgie:
Georgie logs in and is new to Kibana, too. Excited by the UI, he jumps right in. You guessed it — he creates another data view for zeek-*, this time naming it Dem Zeeky Zeek Logs, with yet another randomly generated data view ID like b331a8a5-d7e1-412d-b83f-c5d9672ab0c1. And off he goes, building his own visualizations.
Thursday – Paige:
Paige, the team SME, notices multiple data views for the same Zeek index. She assumes they’re redundant and starts cleaning house, deleting Sheldon’s and Georgie’s data views. From her perspective, she’s just tidying things up.
Friday – Chaos:
Sheldon and Georgie log back in, only to find their dashboards are broken. The visualizations are no longer functional. Why? Because the visualizations in the dashboards were tied to the now-deleted data views associated with unique, randomly generated data view IDs. Meanwhile, Missy’s dashboards still work just fine.
Why did this happen?
This all boils down to how Kibana handles saved objects like data views.
When a user creates visualizations, dashboards, data views, etc., they are saved in Kibana as saved objects. These objects have relationships. In this case, the visualizations are directly tied to the data view ID of the data view used to create them. So when Paige deleted the data views, she unknowingly broke the relationship between the visualizations and the specific custom data view IDs they relied on.
Now here’s the kicker — and why I believe assigning custom data view IDs should be considered a best practice.
As previously stated, by default, Kibana assigns long, randomly generated data view IDs to data views. These values are arbitrary and difficult for most users to remember for reuse. The problem? When a data view is deleted, any visualizations that were built using it continue to reference that now-missing data view IDs.
Technically, a user could recreate the deleted data view and manually assign it the same randomly generated data view ID — if they had saved it somewhere. Doing so would restore the broken visualizations. But notice: Even in that recovery scenario, the solution requires assigning a custom data view ID.
So why not start there?
By creating an intuitive custom data view ID naming standard from the beginning, like zeek, you significantly improve the workflow. Here’s how:
-
Avoid duplicate data views: Kibana won’t allow multiple data views to use the same custom data view ID. If someone tries to create a new one with the same ID, they’ll be alerted that it already exists.
-
Simplify recovery: If a data view is accidentally deleted, a user can quickly recreate it using the same custom data view ID (e.g., zeek) instead of trying to remember a complex value like b331a8a5-d7e1-412d-b83f-c5d9672ab0c1.
-
Enable better scalability: When your environment grows and you’re managing hundreds of visualizations, this small practice makes a huge difference. Without it, users may unknowingly create multiple Zeek-related data views with different data view IDs and spread them across dashboards. If some of those get deleted, the affected visualizations break — leading to confusion and wasted time.
This may seem like a small detail you can ignore, but I’ve seen teams get tripped up by this exact issue more times than I can count. Things get messy fast. Assigning custom data view IDs from the start brings order to that chaos.
Embark on a technical journey from zero to hero as we explore the development of a GenAI app for customer support. The Inside Elastic blog series showcases Elastic's internal operations solving real-world business challenges. This specific series will shed light on our journey to integrate generative AI into our customer success and support operations, providing you with a behind-the-scenes look at our process. We’re blogging about this capability as we’re building it, and we’re excited for you to join the ride!
Generative AI: The Next Frontier
The launch of OpenAI's generative AI tools in late 2022 opened a world of possibilities for AI-generated content. Business leaders quickly sought ways to harness this technology for their unique challenges. This is especially true of our Customer Success and Support teams’ operations, after hearing questions from our leaders at Elastic like:
How can generative AI improve customer support efficiency and effectiveness?
How can generative AI enhance the customer experience and satisfaction?
How can generative AI be integrated with existing customer support systems and processes?
How can generative AI assist in automating repetitive tasks and free up support agents' time for more complex and strategic activities?
The Field Engineering team, responsible for custom internal tooling, started to investigate generative AI and met at an offsite to brainstorm potential applications. Given we are Elastic, we were aware of our product’s search capabilities and how we integrate into the larger AI technology stack. However, technology alone doesn’t answer any of the questions above.
While discussing the possibilities of generative AI, we landed on two support workflows that we thought could benefit our internal teams and, as a result, our customers:
Automated case summaries: Our support engineers spend a significant amount of time providing case summaries for escalation or transitioning a case from one engineer to another. Our hypothesis was that we could use generative AI to automate this process and increase our support team’s efficiency and effectiveness, improve issue resolution, and boost customer satisfaction overall.
Drafting an initial reply: Service level agreements are a key benefit of our support offering, and ensuring timely response is paramount. We were unsure if the large language model (LLM) was smart enough to offer an accurate, relevant response, but we were convinced that our learnings from this process would be critical in deciding the next use case.
Armed with this decision, we decided to build a scalable proof of concept that would allow us to operationalize these workflows for a subset of our users while including a feedback mechanism to rate and improve quality.
Building a proof of concept for feedback
For context, our Field Engineering team has built our system’s infrastructure on top of Google Cloud Platform, with Salesforce Service Cloud powering our case management. This existing setup made it straightforward to integrate our initial proof of concept with Vertex AI, which was already enabled internally and compliant with our security and privacy policies.
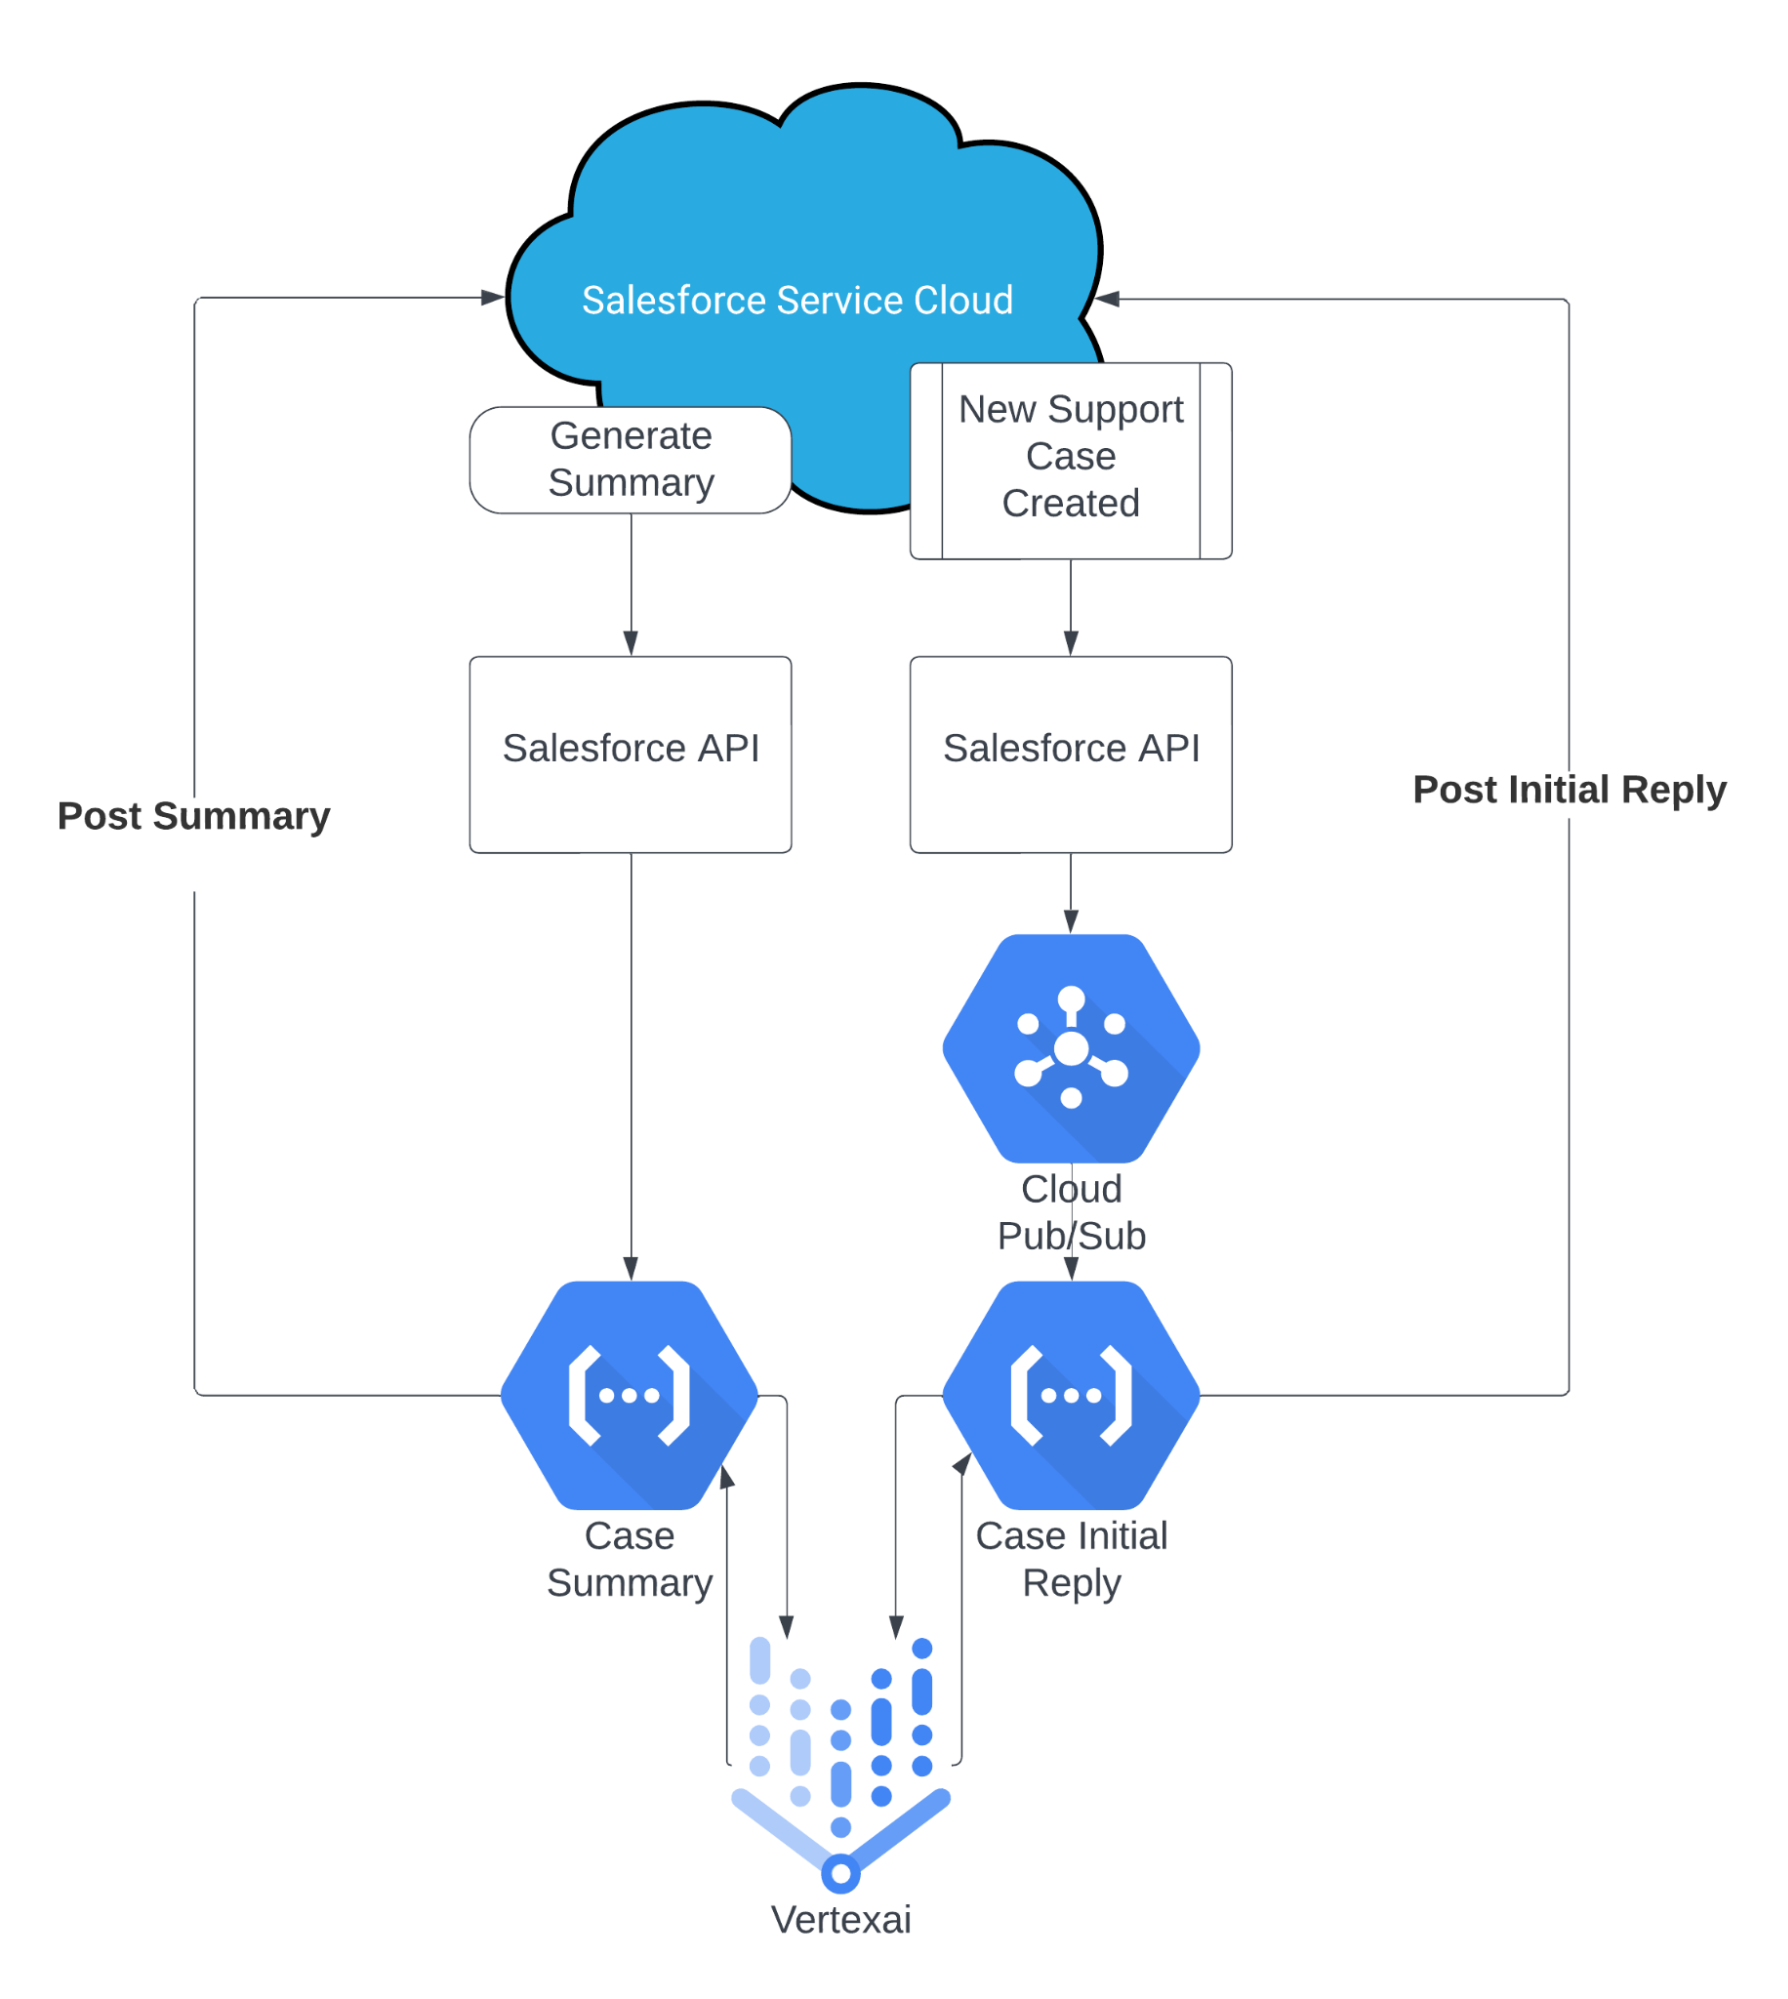
Of course, we knew Elastic would play a role in our design (and subsequent blogs will speak to that), but at this initial stage we were focused on the LLM itself and applying generative text to the outlined workflow. The very first architecture looked like this:

GUIDE
Implementing search and GenAI for your knowledge base
Creating a case summary
At a high level, we wanted to keep the automation simple. We asked our CRM team to add a custom button on all cases that would call an external endpoint. That external endpoint was a Google Cloud Function that did the following:
1. The function accepted the Salesforce unique case ID as input and retrieved the case details as text.
2. The retrieved text would then be automatically sent to Vertex AI combined with the following engineered prompt:
Write the summary of the following customer agent conversation in a paragraph? \
Considering the conversation below, what are the pending actions by the Agent? Keep the response short.\
Use only the information from the conversation below:
"""
${text}
"""
Provide the answers in the dictionary format : {Summary:[], Pending Actions:[]}`;
3. The AI-generated response was posted to the case via a Salesforce Chatter Post.
That was basically it! The lone exception was for long-running cases, where we had to break down the text into summaries of summaries. Once we landed on a design, we had this up and running in a week.
Automating a draft initial reply
While a little more complex than case summaries, automating a reply for our support engineers to review was relatively straightforward. We leveraged an existing automation for all newly created cases and called a new Google Pub/Sub queue to handle all the incoming requests separately. The Pub/Sub performed the following tasks:
1. It stored the Case ID in the queue for when resources were available.
2. On execution, it passed the Case ID to a different Google Cloud Function that would extract only the customer’s initial request as text.
3. The retrieved text would then be automatically sent to Vertex AI combined with the following engineered prompt:
You are an expert Elastic Support Engineer, using only Elastic products, provide a \
response with resolution to this email by a customer:
"""
${text}
"""`;
4. The AI-generated response was posted to the case via a Salesforce Chatter Post.
Again, a simple approach to capturing an initial draft reply that was scalable for the subset of cases we were looking at. This took us a few extra days to modify our existing code and the additional Pub/Sub functionality and took us roughly two weeks to complete.
Using Vertex AI as our LLM for this proof of concept was an easy decision. We knew we would have plenty to think about related to LLM accuracy (see below), but the ease of connecting it with our existing infrastructure made this process much quicker. Much like search, the relevance of an AI-generated response is a deeper conversation and something we knew we would tackle next.
Capturing user feedback
An example of the previously mentioned Salesforce Chatter post:
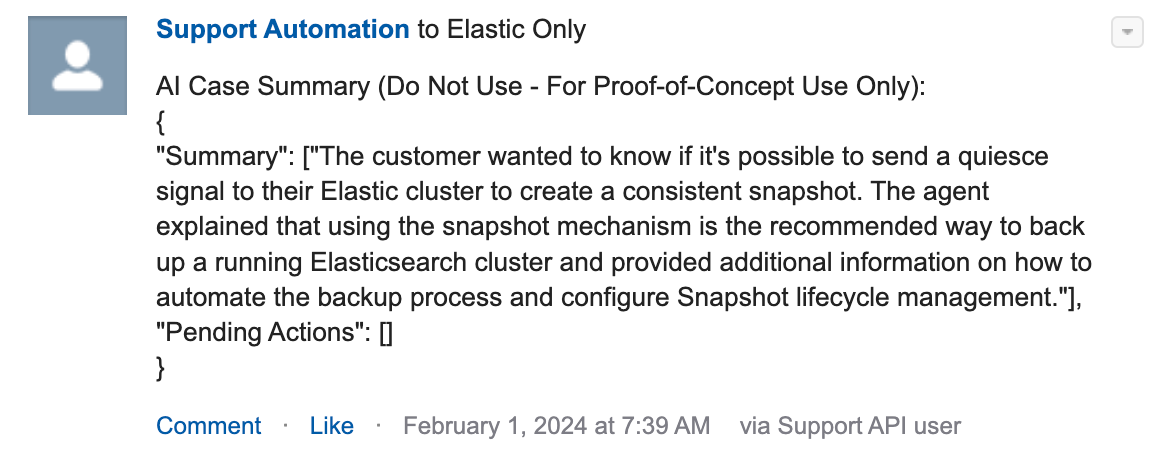
In both use cases, draft reply and case summary, the decision to use Salesforce Chatter to deliver the AI-generated text was based on the idea that we could use standard Chatter features for "likes" to identify positive sentiment and threaded responses to capture subjective feedback. This was a critical step in the process and reduced friction in the feedback loop as users could work cases and provide their feedback in the same operational system.
There are much more sophisticated techniques for evaluating LLM accuracy, especially when Elasticsearch provides context. Still, we intentionally avoided that for the proof of concept as our data population was manageable, and we wanted to review every comment.
Objectively evaluating results and making decisions
| Days Open | 44 |
| Generated Content | 940 |
| Feedback | 217 |
| Positive Sentiment | 15.67% |
The initial user feedback yielded a ~16% positive response rate, which was lower than expected. Reviewing subjective feedback revealed that the LLM lacked in-depth knowledge of our products, which hindered its ability to address technical support queries. The model performed much better with generic summaries and responses that didn't require specific product knowledge. This highlighted a content gap, as the LLM was trained on public data and lacked access to key data sources like our product documentation and internal knowledge base articles.
Based on this data, we decided to add two new design principles:
Refine the input data: We recognized the need for a more explicit input experience to provide clearer, more direct questions to the LLM for improved responses. This is equivalent to the “garbage in, garbage out” statement in data engineering.
Set a higher accuracy/sentiment threshold: Technical support requires high accuracy, so we aimed for a >80% benchmark and developed systems to measure and enhance accuracy at various stages.
Guided by these principles, we decided that the optimal experience would be to consolidate these and all other potential functions into a unified chat interface. That should help curate the inputs in a consistent way for better workflow and responses. Furthermore, we knew the next evolution would need to include Elasticsearch for improved response accuracy via a retrieval augmented generation architecture. This should allow us to evaluate accuracy at scale and significantly improve the precision of our responses.
Solving business problems
Armed with this data-backed understanding of how a large language model responds to our specific workflows and our decision to integrate the solution into a chatbot, we revisited the questions from our business leaders:
How can generative AI improve customer support efficiency and effectiveness?
We believe we can build a self-service chatbot experience that will answer support related product questions. Support agents’ use of the chatbot will speed up their analysis and investigation, reducing mean time to resolution. In addition, new joiners can learn from the chatbot rather than other members of the team. This can reduce onboarding time and create capacity in existing team members who are fielding these questions today.
How can generative AI enhance the customer experience and satisfaction?
The Technology Services Industry Association (TSIA), which works with thousands of support organizations, has years of research supporting the fact that customers prefer self-service over assisted support. Exposing a similar self-service chatbot can increase both user experience and customer satisfaction as real-time, relevant responses can reduce customer response times to milliseconds and don’t require reading through vast pages of documentation.
How can generative AI be integrated with existing customer support systems and processes?
Our talented team of developers can easily integrate a chat experience into our custom Support Portal at the point where customers are asking these questions and leverage Elasticsearch for knowledge content search.
How can generative AI assist in automating repetitive tasks and free up support agents' time for more complex and strategic activities?
Support agents consistently search for product documentation, internal enablement content, and knowledge articles for an answer. Natural language chat is an evolution of these search activities that deliver contextual, relevant responses rather than recommending information to read. The efficiencies gained in search time alone will free up support agent time for other value-add, strategic activities.
After a few months of gathering data, we presented our findings, designs, and plans for a chat-based Support AI Assistant to our stakeholders, aligned on the above outcomes, and moved from proof of concept to an approved project.
Our customers and our community are at the heart of everything we do. When building any internal or external experience, we keep our Customers, 1st. Investing in this process allowed us to build an informed plan to execute against, keeping our customers front of mind.
What's next?
Our Field Engineering team is now focused on developing a scalable, secure, and accurate Support AI Chat Assistant. This blog series will continue with regular updates, each installment highlighting a different aspect of our build process. Stay tuned for more insights and inspiration for your own generative AI projects.
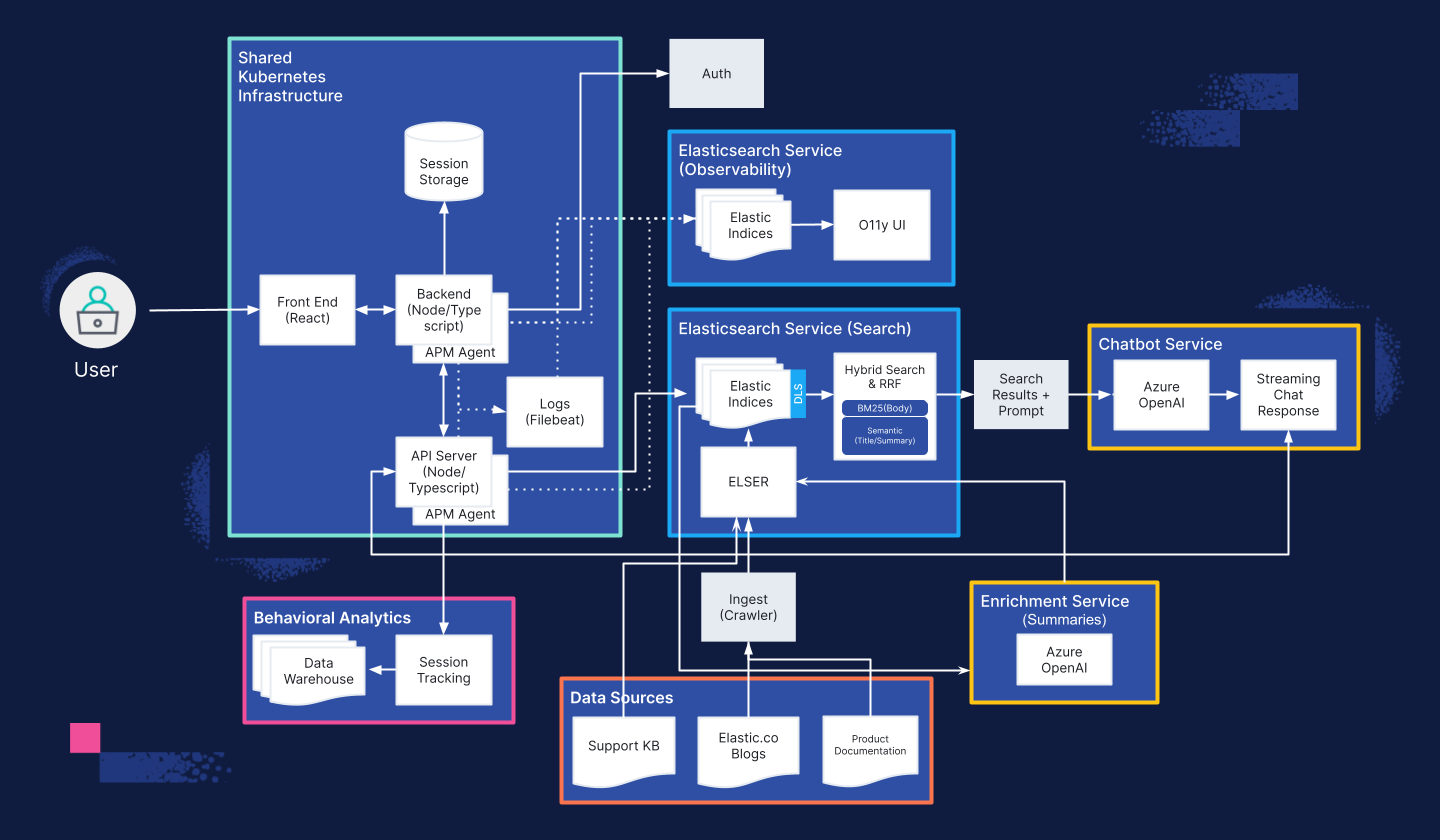
Take a sneak peek at our current architecture:
Check out what's next in the series
Part 2: GenAI for Customer Support — Building a Knowledge Library
Part 3: GenAI for Customer Support — Designing a chat interface for chatbots... for humans
Part 4: GenAI for Customer Support — Tuning RAG search for relevance
Launch blog: GenAI for customer support - Explore the Elastic Support Assistant
Originally published June 27, 2024; updated March 13, 2025.
The release and timing of any features or functionality described in this post remain at Elastic's sole discretion. Any features or functionality not currently available may not be delivered on time or at all.
In this blog post, we may have used or referred to third party generative AI tools, which are owned and operated by their respective owners. Elastic does not have any control over the third party tools and we have no responsibility or liability for their content, operation or use, nor for any loss or damage that may arise from your use of such tools. Please exercise caution when using AI tools with personal, sensitive or confidential information. Any data you submit may be used for AI training or other purposes. There is no guarantee that information you provide will be kept secure or confidential. You should familiarize yourself with the privacy practices and terms of use of any generative AI tools prior to use.
Elastic, Elasticsearch, ESRE, Elasticsearch Relevance Engine and associated marks are trademarks, logos or registered trademarks of Elasticsearch N.V. in the United States and other countries. All other company and product names are trademarks, logos or registered trademarks of their respective owners.
Share
- Share on Twitter
Share on Twitter
- Share on LinkedIn
Share on LinkedIn
- Share on Facebook
Share on Facebook
- Share by Email
Share by email
- Print this page
Print

