With Elastic Open Web Crawler and its CLI-driven architecture, having versioned crawler configurations and a CI/CD pipeline with local testing is now pretty straightforward to achieve.
Traditionally, managing crawlers was a manual, error-prone process. It involved editing configurations directly in the UI and struggling with cloning crawl configurations, rolling back, versioning, and more. Treating crawler configurations as code resolves this by providing the same benefits we expect in software development: repeatability, traceability, and automation.
This workflow makes it easier to bring the Open Web Crawler into your CI/CD pipeline for rollbacks, backups, and migrations—tasks that were much trickier with earlier Elastic Crawlers, such as the Elastic Web Crawler or App Search Crawler.
In this article, we are going to learn how to:
- Manage our crawl configs using GitHub
- Having a local setup to test pipelines before deploying
- Create a production setup to run the web crawler with new settings every time we push changes to our main branch
You can find the project repository here. As per writing, I’m using Elasticsearch 9.1.3 and Open Web Crawler 0.4.2.
Prerequisites
- Docker Desktop
- Elasticsearch instance
- Virtual machine with SSH access (e.g, AWS EC2) and Docker installed
Steps
- Folder structure
- Crawler configuration
- Docker-compose file (local environment)
- Github Actions
- Testing locally
- Deploying to prod
- Making changes and re-deploying
Folder structure
For this project, we will have the following file structure:
├── docker-compose.yml # Local elasticsearch + crawler
├── config/crawler-config.yml # Crawler config
├── .github/workflows/deploy.yml # GH Action to deploy changes
├── local.sh # Script to run our local crawler
Crawler configuration
Under crawler-config.yml, we will put the following:
output_sink: elasticsearch
output_index: web-crawl-index
max_crawl_depth: 1

elasticsearch:
  host: ${ES_HOST}
  api_key: ${ES_API_KEY}

domains:
  - url: https://web-scraping.dev
    seed_urls:
      - https://web-scraping.dev/product/1
      - https://web-scraping.dev/product/2
      - https://web-scraping.dev/product/3
This will crawl from https://web-scraping.dev/products, a mock site for products. We will only crawl the first three product pages. The max_crawl_depth setting will prevent the crawler from discovering more pages than the ones defined as seed_urls by not opening the links within them.
Elasticsearch host and api_key will be populated dynamically depending on the environment in which we are running the script.

Docker-compose file (local environment)
For the local docker-compose.yml, we will deploy the crawler and a single Elasticsearch cluster + Kibana, so we can easily visualize our crawling results before deploying to production.
services:
  es01:
    image: docker.elastic.co/elasticsearch/elasticsearch:9.1.3
    environment:
      - discovery.type=single-node
      - xpack.security.enabled=false
      - ES_JAVA_OPTS=-Xms1g -Xmx1g
    ports:
      - "9200:9200"
    networks: [esnet]
    healthcheck:
      test: ["CMD", "curl", "-f", "http://localhost:9200"]
      interval: 5s
      timeout: 5s
      retries: 10

  kibana:
    image: docker.elastic.co/kibana/kibana:9.1.3
    environment:
      - ELASTICSEARCH_HOSTS=http://es01:9200
    ports:
      - "5601:5601"
    networks: [esnet]
    depends_on: [es01]

  crawler:
    image: docker.elastic.co/integrations/crawler:0.4.2
    environment:
      - ES_HOST=http://es01:9200
      - CRAWLER_JRUBY_OPTS=--server
    container_name: crawler
    volumes:
      - ./config:/home/app/config
    networks: [esnet]
    entrypoint: ["/home/app/bin/crawler", "crawl", "/home/app/config/crawl-config-final.yml"]
    stdin_open: true
    tty: true

networks:
  esnet:
    driver: bridge
Note how the crawler waits until Elasticsearch is ready to run.
Github Actions
Now we need to create a GitHub Action that will copy the new settings and run the crawler in our virtual machine on every push to main. This ensures we always have the latest configuration deployed, without having to manually enter into the virtual machine to update files and run the crawler. We are going to use AWS EC2 as the virtual machine provider.
The first step is to add the host (VM_HOST), machine user (VM_USER), SSH RSA key (VM_KEY), Elasticsearch host (ES_HOST), and Elasticsearch API Key (ES_API_KEY) to the GitHub Action secrets:
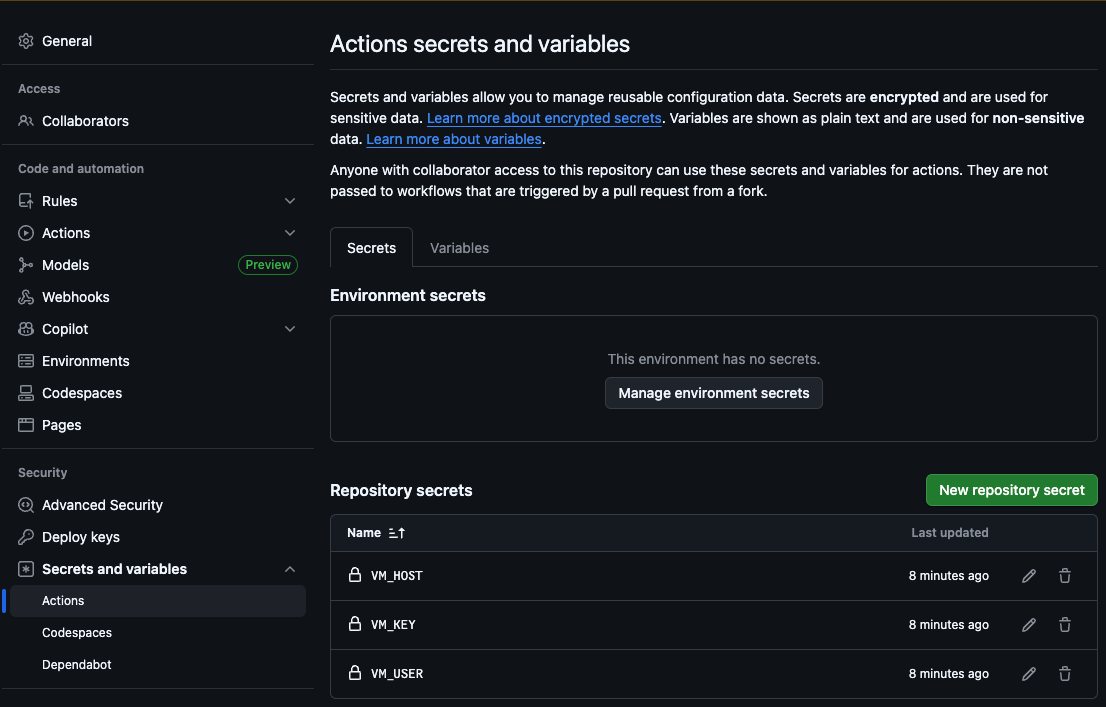
This way, the action will be able to access our server to copy the new files over and run the crawl.
Now, let’s create our .github/workflows/deploy.yml file:
name: Deploy

on:
  push:
    branches: [main]

jobs:
  Deploy:
    name: Deploy to EC2
    runs-on: ubuntu-latest

    steps:
      - uses: actions/checkout@v5

      - name: Deploy crawler
        env:
          HOSTNAME: ${{ secrets.VM_HOST }}
          USER_NAME: ${{ secrets.VM_USER }}
          PRIVATE_KEY: ${{ secrets.VM_KEY }}
          ES_HOST: ${{ secrets.ES_HOST }}
          ES_API_KEY: ${{ secrets.ES_API_KEY }}
        run: |
          # Save private key
          echo "$PRIVATE_KEY" > private_key
          chmod 600 private_key

          # Generate final config locally
          envsubst < config/crawler-config.yml > config/crawl-config-final.yml

          # Copy the config folder to VM
          scp -o StrictHostKeyChecking=no -i private_key -r config ${USER_NAME}@${HOSTNAME}:~/config

          # SSH into VM and run crawler
          ssh -o StrictHostKeyChecking=no -i private_key ${USER_NAME}@${HOSTNAME} << EOF
            docker run --rm \
              -v ~/config:/config \
              docker.elastic.co/integrations/crawler:latest jruby \
              bin/crawler crawl /config/crawl-config-final.yml
          EOF
This action will execute the following steps every time we push changes to the crawler configuration file:
- Populate Elasticsearch host and API Key in the yml config
- Copy the config folder to our VM
- Connect via SSH to our VM
- Run the crawl with the config we just copied from the repo
Testing locally
To test our crawler locally, we created a bash script that populates the Elasticsearch host with the local one from Docker and starts a crawl. You can run ./local.sh to execute it.
#!/bin/bash
# Exit on any error
set -e
# Load environment variables
export ES_HOST="http://es01:9200"
# Generate final crawler config
envsubst < ./config/crawler-config.yml > ./config/crawl-config-final.yml
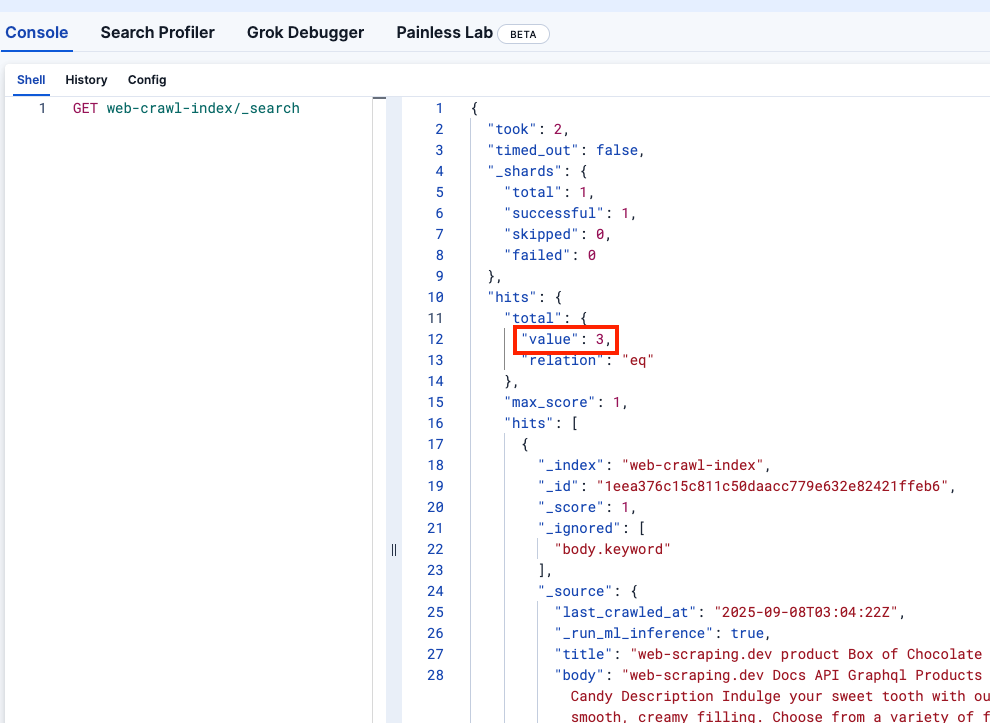
# Bring everything up
docker compose up --buildLet’s look at Kibana DevTools to confirm the web-crawler-index was populated correctly:
Deploying to prod
Now we are ready to push to the main branch, which will deploy the crawler in your virtual machine and start sending logs to your Serverless Elasticsearch instance.
git add .
git commit -m "First commit"
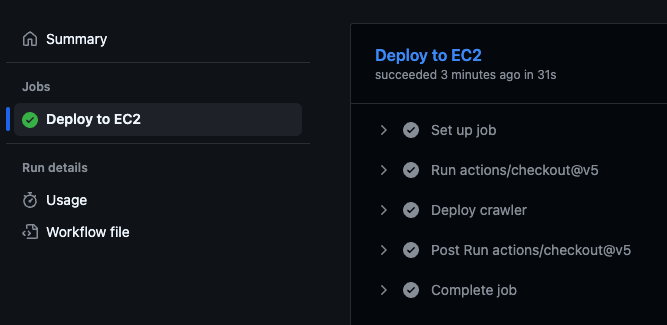
git pushThis will trigger the GitHub Action, which will execute the deploy script within the virtual machine and start crawling.
You can confirm the action was executed by going to the GitHub repository and visiting the “Actions” tab:
Making changes and re-deploying
Something you may have noticed is that the price of each product is part of the document’s body field. It would be ideal to store the price in a separate field so we can run filters against it.
Let’s add this change to the crawler.yml file to use extraction rules to extract the price from the product-price CSS class:
output_sink: elasticsearch
output_index: web-crawl-index
max_crawl_depth: 1

elasticsearch:
  host: ${ES_HOST}
  api_key: ${ES_API_KEY}

  # Index ingest pipeline to process documents before indexing
  pipeline_enabled: true
  pipeline: pricing-pipeline

domains:
  - url: https://web-scraping.dev
    seed_urls:
      - https://web-scraping.dev/product/1
      - https://web-scraping.dev/product/2
      - https://web-scraping.dev/product/3
    extraction_rulesets:
      - url_filters:
          - type: ends
            pattern: /product/*
        rules:
          - action: extract
            field_name: price
            selector: .product-price
            join_as: string
            source: html
We also see that the price includes a dollar sign ($), which we must remove if we want to run range queries. We can use an ingest pipeline for that. Note that we are referencing it in our new crawler config file above:
PUT _ingest/pipeline/pricing-pipeline
{
  "processors": [
    {
      "script": {
        "source": """
                ctx['price'] = ctx['price'].replace("$","")
            """
      }
    }
  ]
}
We can run that command in our production Elasticsearch cluster. For the development one, as it is ephemeral, we can make the pipeline creation part of the docker-compose.yml file by adding the following service. Note that we also added a depends_on to the crawler service so it starts after the pipeline is successfully created.
crawler:
image: docker.elastic.co/integrations/crawler:0.4.2
environment:
- ES_HOST=http://es01:9200
- CRAWLER_JRUBY_OPTS=--server
container_name: crawler
volumes:
- ./config:/home/app/config
networks: [esnet]
entrypoint: ["/home/app/bin/crawler", "crawl", "/home/app/config/crawl-config-final.yml"]
depends_on:
pipeline-init:
condition: service_completed_successfully
stdin_open: true
tty: true
pipeline-init:
image: curlimages/curl:latest
depends_on:
es01:
condition: service_healthy
networks: [esnet]
entrypoint: >
sh -c "
echo 'Creating ingest pipeline...';
curl -s -X PUT http://es01:9200/_ingest/pipeline/pricing-pipeline \\
-H 'Content-Type: application/json' \\
-d '{\"processors\":[{\"script\":{\"source\":\"ctx.price = ctx.price.replace(\\\"$\\\", \\\"\\\")\"}}]}';
echo 'Pipeline created!';
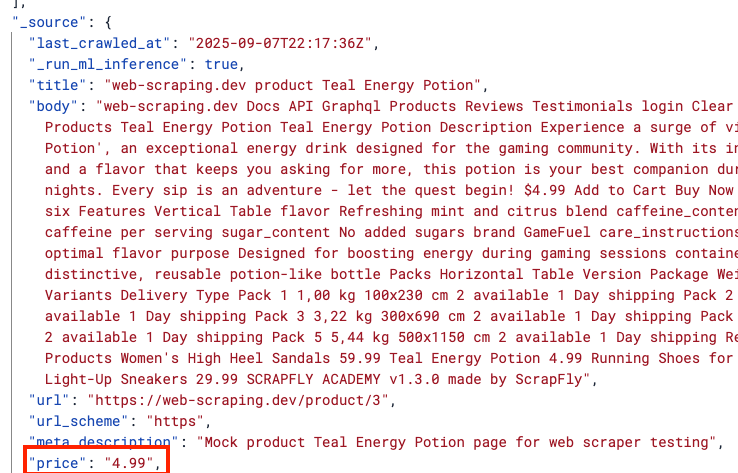
"Now let’s run `./local.sh` to see the change locally:
Great! Let’s now push the change:
git add crawler-config.yml
git commit -m "added price CSS selector"
git push
To confirm everything works, you can check your production Kibana, which should reflect the changes and show price as a new field without the dollar sign.
Conclusion
The Elastic Open Web Crawler allows you to manage your crawler as code, meaning you can automate the full pipeline—from development to deployment—and add ephemeral local environments and testing against the crawled data programmatically, to name a few examples.
You are invited to clone the official repository and start indexing your own data using this workflow. You can also read this article to learn how to run semantic search on indices produced by the crawler.
Ready to try this out on your own? Start a free trial.
Want to get Elastic certified? Find out when the next Elasticsearch Engineer training is running!
Related content

August 6, 2025
How to display fields of an Elasticsearch index
Learn how to display fields of an Elasticsearch index using the _mapping and _search APIs, sub-fields, synthetic _source, and runtime fields.

July 14, 2025
Run Elastic Open Crawler in Windows with Docker
Learn how to use Docker to get Open Crawler working in a Windows environment.

June 24, 2025
Ruby scripting in Logstash
Learn about the Logstash Ruby filter plugin for advanced data transformation in your Logstash pipeline.

June 4, 2025
3 ingestion tips to change your search game forever
Get your Elasticsearch ingestion game to the next level by following these tips: data pre-processing, data enrichment and picking the right field types.

May 26, 2025
Displaying fields in an Elasticsearch index
Exploring techniques for displaying fields in an Elasticsearch index.