
This blog will walk through implementing RAG using two approaches.
- Elastic, Llamaindex, Llama 3 (8B) version running locally using Ollama.
- Elastic, Langchain, ELSER v2, Llama 3 (8B) version running locally using Ollama.
The notebooks are available at this GitHub location.
Before we get started, let's take a quick dive into Llama 3.
Llama 3 overview
Llama 3 is an open source large language model recently launched by Meta. This is a successor to Llama 2 and based on published metrics, is a significant improvement. It has good evaluation metrics, when compared to some of the recently published models such as Gemma 7B Instruct, Mistral 7B Instruct, etc. The model has two variants, which are the 8 billion and 70 billion parameter. An interesting thing to note is that at the time of writing this blog, Meta was still in the process of training 400B+ variant of Llama 3.
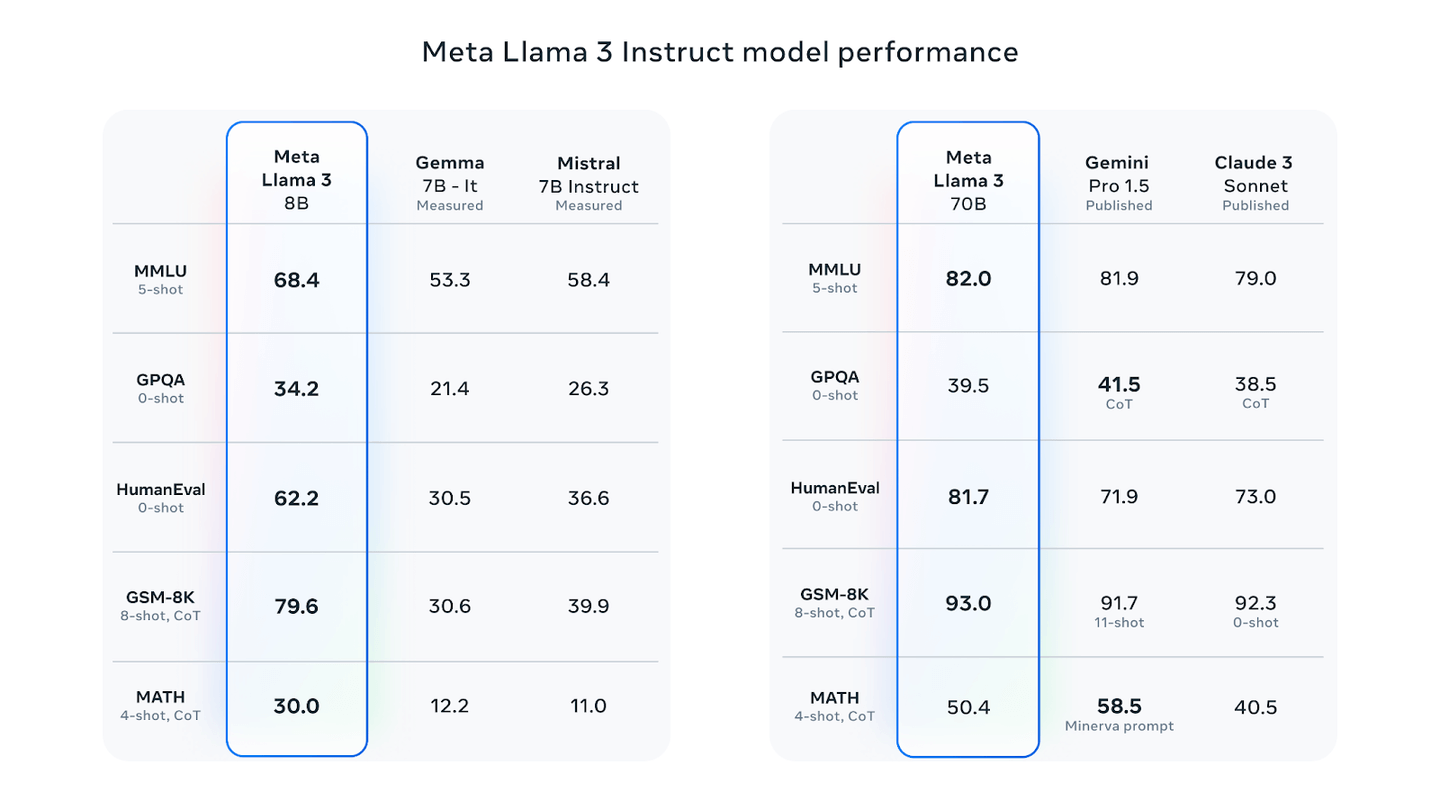
Meta Llama 3 Instruct Model Performance. (from https://ai.meta.com/blog/meta-llama-3/)
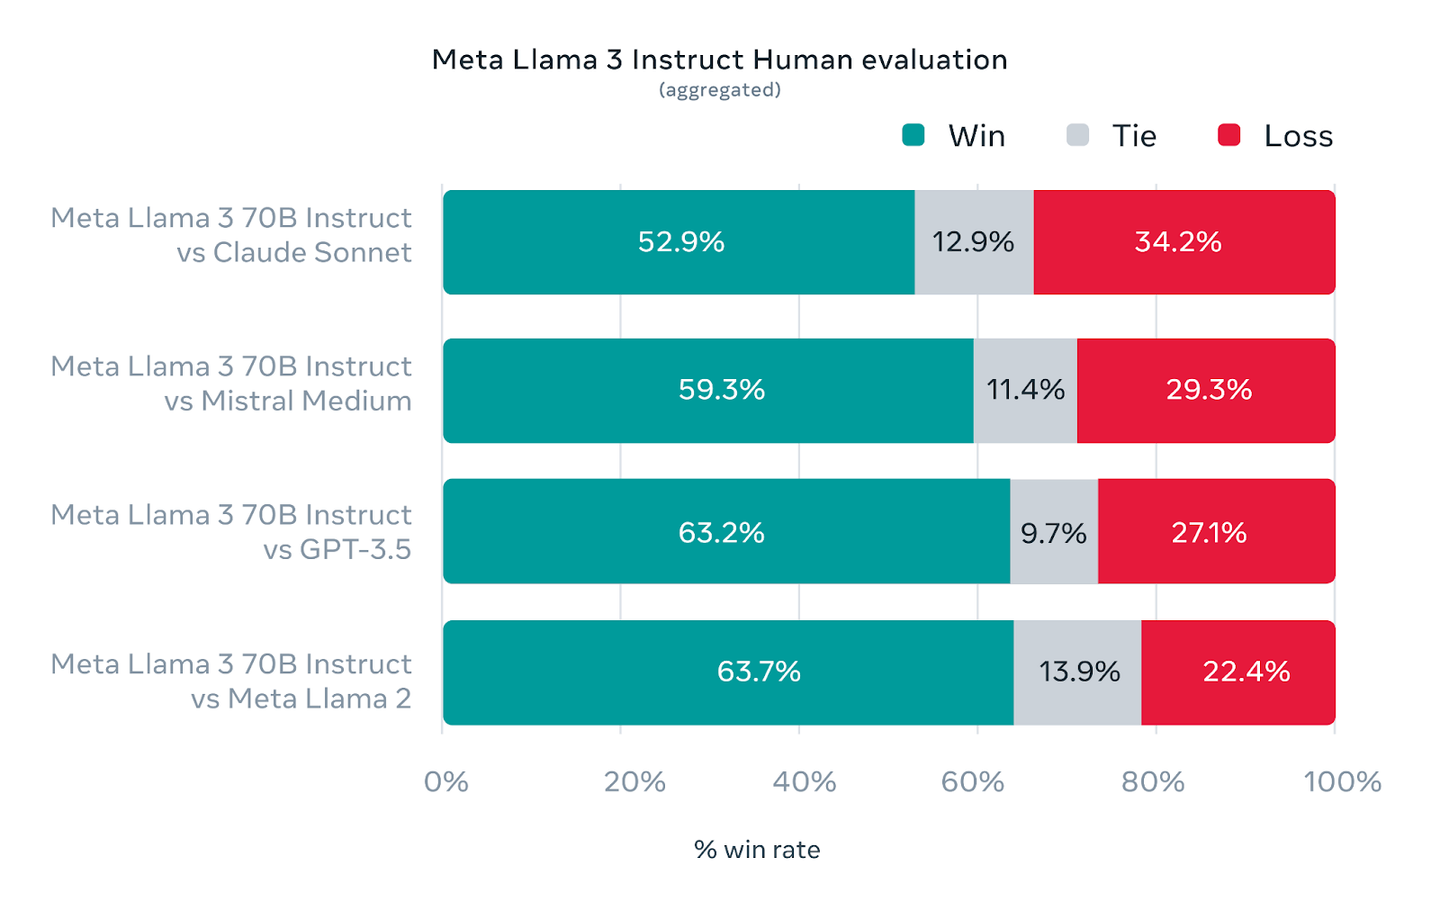
The above figure shows data on Llama3 performance across different datasets as compared to other models. In order to be optimized for performance for real world scenarios, Llama3 was also evaluated on a high quality human evaluation set.
Aggregated results of Human Evaluations across multiple categories and prompts (from https://ai.meta.com/blog/meta-llama-3/)
How to build RAG with Llama 3 open-source and Elastic
Dataset
For the dataset, we will use a fictional organization policy document in json format, available at this location.
Configure Ollama and Llama3
As we are using the Llama 3 8B parameter size model, we will be running that using Ollama. Follow the steps below to install Ollama.
- Browse to the URL https://ollama.com/download to download the Ollama installer based on your platform.
Note: The Windows version is in preview at the moment.
- Follow the instructions to install and run Ollama for your OS.
- Once installed, follow the commands below to download the Llama3 model.
ollama run llama3This should take some time depending upon your network bandwidth. Once the run completes, you should end with the interface below.
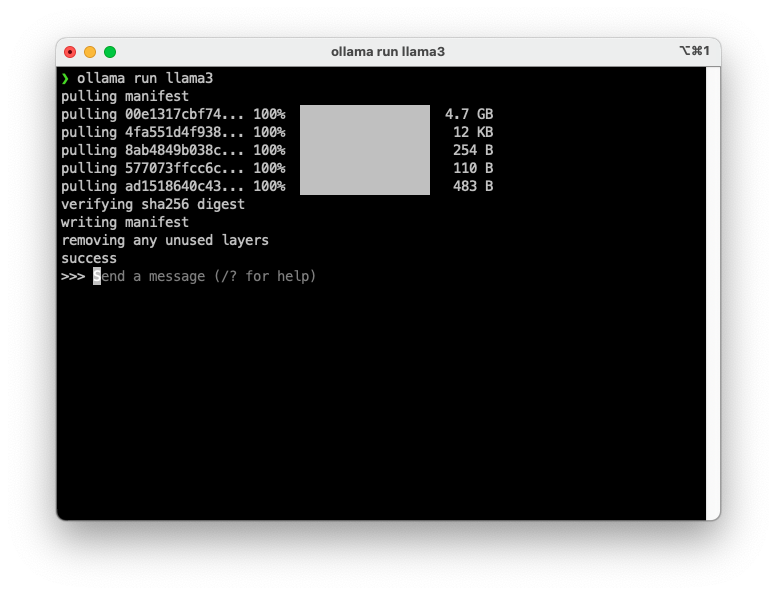
To test Llama3, run the following command from a new terminal or enter the text at the prompt itself.
curl -X POST http://localhost:11434/api/generate -d '{ "model": "llama3", "prompt":"Why is the sky blue?" }'At the prompt, the output looks like below.
    ❯ ollama run llama3
    >>> Why is the sky blue?
    The color of the sky appears blue to our eyes because of a fascinating combination of scientific factors. Here's the short answer:

    **Scattering of Light**: When sunlight enters Earth's atmosphere, it encounters tiny molecules of gases like nitrogen (N2) and oxygen (O2).
    These molecules scatter the light in all directions, but they do so more efficiently for shorter wavelengths (like blue and violet light) than
    longer wavelengths (like red and orange light).

    **Rayleigh Scattering**: This scattering effect is known as Rayleigh scattering, named after the British physicist Lord Rayleigh, who first
    described it in the late 19th century. It's responsible for the blue color we see in the sky.

    **Atmospheric Composition**: The Earth's atmosphere is composed of approximately 78% nitrogen, 21% oxygen, and small amounts of other gases.
    These gases are more abundant at lower altitudes, where they scatter shorter wavelengths (like blue light) more effectively than longer
    wavelengths (like red light).

    **Sunlight's Wavelengths**: When sunlight enters the Earth's atmosphere, it contains a broad spectrum of wavelengths, including visible light
    with colors like red, orange, yellow, green, blue, indigo, and violet. The shorter wavelengths (blue and violet) are scattered more than the
    longer wavelengths (red and orange), due to Rayleigh scattering.

    **What We See**: As our eyes look up at the sky, we see the combined effect of these factors: the shorter wavelengths (blue light) being
    scattered in all directions by the atmospheric gases, while the longer wavelengths (red and orange light) continue to travel in a more direct
    path to our eyes. This results in the blue color we perceive as the sky.

    So, to summarize: the sky appears blue because of the scattering of sunlight's shorter wavelengths (blue light) by the tiny molecules in the
    Earth's atmosphere, combined with the atmospheric composition and the original wavelengths present in sunlight.

    Now, go enjoy that blue sky!

    >>> Send a message (/? for help)
We now have Llama3 running locally using Ollama.
Elasticsearch setup
We will use Elastic cloud setup for this. Please follow the instructions here. Once successfully deployed, note the API Key and the Cloud ID, we will require them as part of our setup.
Application setup
There are two notebooks, one for RAG implemented using Llamaindex and Llama3, the other one with Langchain, ELSER v2 and Llama3. In the first notebook, we use Llama3 as a local LLM as well as provide embeddings. For the second notebook, we use ELSER v2 for the embeddings and Llama3 as the local LLM.
Method 1: Elastic, Llamaindex, Llama 3 (8B) version running locally using Ollama.
Step 1 : Install required dependencies
    !pip install llama-index
    !pip install llama-index-cli
    !pip install llama-index-core
    !pip install llama-index-embeddings-elasticsearch
    !pip install llama-index-embeddings-ollama
    !pip install llama-index-legacy
    !pip install llama-index-llms-ollama
    !pip install llama-index-readers-elasticsearch
    !pip install llama-index-readers-file
    !pip install llama-index-vector-stores-elasticsearch
    !pip install llamaindex-py-client
The above section installs the required llamaindex packages.
Step 2: Import required dependencies
We start with importing the required packages and classes for the app.
    from llama_index.core.node_parser import SentenceSplitter
    from llama_index.core.ingestion import IngestionPipeline
    from llama_index.embeddings.ollama import OllamaEmbedding
    from llama_index.vector_stores.elasticsearch import ElasticsearchStore
    from llama_index.core import VectorStoreIndex, QueryBundle
    from llama_index.llms.ollama import Ollama
    from llama_index.core import Document, Settings
    from getpass import getpass
    from urllib.request import urlopen
    import json
We start with providing a prompt to the user to capture the Cloud ID and API Key values.
    #https://www.elastic.co/search-labs/tutorials/install-elasticsearch/elastic-cloud#finding-your-cloud-id
    ELASTIC_CLOUD_ID = getpass("Elastic Cloud ID: ")

    #https://www.elastic.co/search-labs/tutorials/install-elasticsearch/elastic-cloud#creating-an-api-key
    ELASTIC_API_KEY = getpass("Elastic Api Key: ")
If you are not familiar with obtaining the Cloud ID and API Key, please follow the links in the code snippet above to guide you with the process.
Step 3: document processing
We start with downloading the json document and building out Document objects with the payload.
    url = "https://raw.githubusercontent.com/elastic/elasticsearch-labs/main/datasets/workplace-documents.json"
    response = urlopen(url)
    workplace_docs = json.loads(response.read())
    documents = [Document(text=doc['content'],
                              metadata={"name": doc['name'],"summary": doc['summary'],"rolePermissions": doc['rolePermissions']})
                     for doc in workplace_docs]
We now define the Elasticsearch vector store (ElasticsearchStore), the embedding created using Llama3 and a pipeline to help process the payload constructed above and ingest into Elasticsearch.
The ingestion pipeline allows us to compose pipelines using different components, one of which allows us to generate embeddings using Llama3.
    es_vector_store = ElasticsearchStore(index_name="workplace_index",
                                         vector_field='content_vector',
                                         text_field='content',
                                         es_cloud_id=ELASTIC_CLOUD_ID,
                                         es_api_key=ELASTIC_API_KEY)

    # Embedding Model to do local embedding using Ollama.
    ollama_embedding = OllamaEmbedding("llama3")
    # LlamaIndex Pipeline configured to take care of chunking, embedding
    # and storing the embeddings in the vector store.
    pipeline = IngestionPipeline(
        transformations=[
            SentenceSplitter(chunk_size=512, chunk_overlap=100),
            ollama_embedding
        ], vector_store=es_vector_store
    )
ElasticsearchStore is defined with the name of the index to be created, the vector field and the content field. And this index is created when we run the pipeline.
The index mapping created is as below:
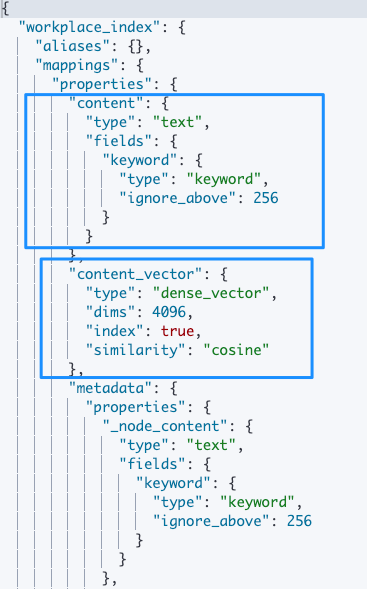
The pipeline is executed using the step below. Once this pipeline run completes, the index workplace_index is now available for querying. Do note that the vector field content_vector is created as a dense vector with dimension 4096. The dimension size comes from the size of the embeddings generated from Llama3.
pipeline.run(show_progress=True,documents=documents)Step 4: LLM configuration
We now setup Llamaindex to use the Llama3 as the LLM. This as we covered before is done with the help of Ollama.
    Settings.embed_model = ollama_embedding
    local_llm = Ollama(model="llama3")
Step 5: Semantic search
We now configure Elasticsearch as the vector store for the Llamaindex query engine. The query engine is then used to answer your questions with contextually relevant data from Elasticsearch.
    index = VectorStoreIndex.from_vector_store(es_vector_store)
    query_engine = index.as_query_engine(local_llm, similarity_top_k=10)

    # Customer Query
    query = "What are the organizations sales goals?"
    bundle = QueryBundle(query_str=query,
    embedding=Settings.embed_model.get_query_embedding(query=query))

    response = query_engine.query(bundle)

    print(response.response)
The response I received with Llama3 as the LLM and Elasticsearch as the Vector database is below.
    According to the "Fy2024 Company Sales Strategy" document, the organization's primary goal is to:

    * Increase revenue by 20% compared to fiscal year 2023.
    * Expand market share in key segments by 15%.
    * Retain 95% of existing customers and increase customer satisfaction ratings.
    * Launch at least two new products or services in high-demand market segments.
This concludes the RAG setup based on using Llama3 as a local LLM and to generate embeddings.
Let's now move to the second method, which uses Llama3 as a local LLM, but we use Elastic’s ELSER v2 to generate embeddings and for semantic search.
Method 2: Elastic, Langchain, ELSER v2, Llama 3 (8B) version running locally using Ollama.
Step 1: Install required dependencies
    !pip install langchain
    !pip install langchain-elasticsearch
    !pip install langchain-community
    !pip install tiktoken
The above section installs the required langchain packages.
Step 2: Import required dependencies
We start with importing the required packages and classes for the app. This step is similar to Step 2 in Method 1 above.
    from langchain.text_splitter import RecursiveCharacterTextSplitter
    from langchain_elasticsearch import ElasticsearchStore
    from langchain_community.llms import Ollama
    from langchain.prompts import ChatPromptTemplate
    from langchain.schema.output_parser import StrOutputParser
    from langchain.schema.runnable import RunnablePassthrough
    from langchain_elasticsearch import ElasticsearchStore
    from langchain_elasticsearch import SparseVectorStrategy
    from getpass import getpass
    from urllib.request import urlopen
    import json
Next, provide a prompt to the user to capture the Cloud ID and API Key values.
    #https://www.elastic.co/search-labs/tutorials/install-elasticsearch/elastic-cloud#finding-your-cloud-id
    ELASTIC_CLOUD_ID = getpass("Elastic Cloud ID: ")

    #https://www.elastic.co/search-labs/tutorials/install-elasticsearch/elastic-cloud#creating-an-api-key
    ELASTIC_API_KEY = getpass("Elastic Api Key: ")
Step 3: Document processing
Next, we move to downloading the json document and building the payload.
    url = "https://raw.githubusercontent.com/elastic/elasticsearch-labs/main/datasets/workplace-documents.json"

    response = urlopen(url)
    workplace_docs = json.loads(response.read())
    metadata = []
    content = []
    for doc in workplace_docs:
        content.append(doc["content"])
        metadata.append(
            {
                "name": doc["name"],
                "summary": doc["summary"],
                "rolePermissions": doc["rolePermissions"],
            }
        )
    text_splitter = RecursiveCharacterTextSplitter.from_tiktoken_encoder(
        chunk_size=512, chunk_overlap=256
    )
    docs = text_splitter.create_documents(content, metadatas=metadata)
This step differs from the Method 1 approach, from how we use the LlamaIndex provided pipeline to process the document. Here we use the RecursiveCharacterTextSplitter to generate the chunks.
We now define the Elasticsearch vector store ElasticsearchStore.
    es_vector_store = ElasticsearchStore(
        es_cloud_id=ELASTIC_CLOUD_ID,
        es_api_key=ELASTIC_API_KEY,
        index_name="workplace_index_elser",
        strategy=SparseVectorStrategy(
            model_id=".elser_model_2_linux-x86_64"
        )
    )
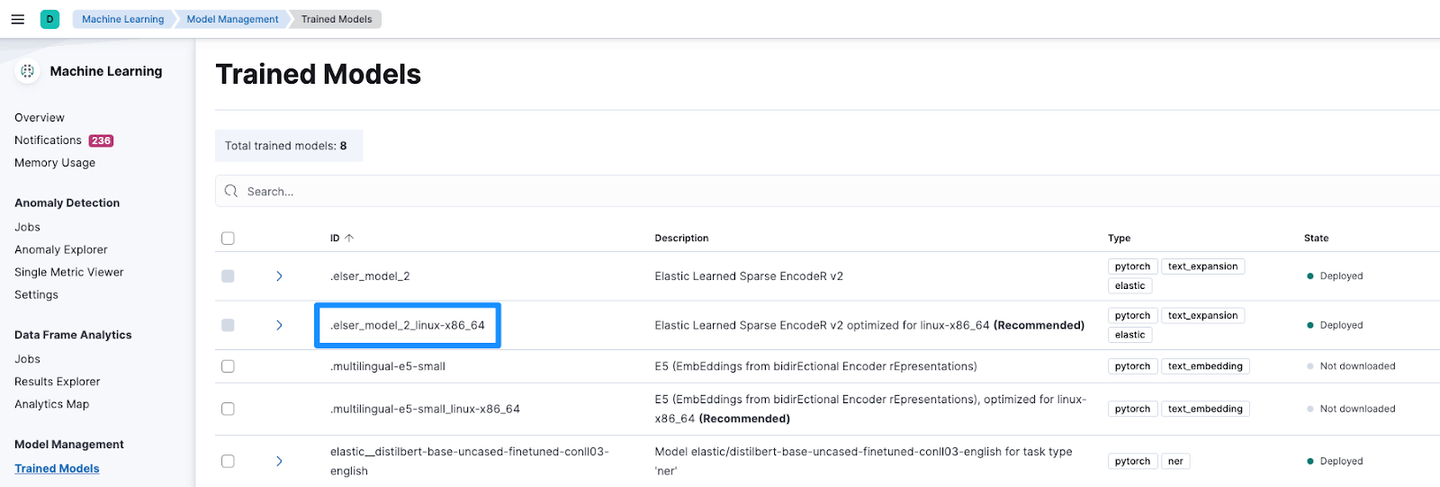
The vector store is defined with the index to be created and the model to be used for embedding and retrieval. You can retrieve the model_id by navigating to Trained Models under Machine Learning.
This also results in the creation of an ingest pipeline in Elastic, which generates and stores the embeddings as the documents are ingested into Elastic.
We now add the documents processed above.
es_vector_store.add_documents(documents=docs)Step 4: LLM configuration
We set up the LLM to be used with the following. This is again different from method 1, where we used Llama3 for embeddings too.
llm = Ollama(model="llama3")Step 5: Semantic search
The necessary building blocks are all in place now. We tie them up together to perform semantic search using ELSER v2 and Llama3 as the LLM. Essentially, Elasticsearch ELSER v2 provides the contextually relevant response to the users question using its semantic search capabilities. The user's question is then enriched with the response from ELSER and structured using a template. This is then processed with Llama3 to generate relevant responses.
    def format_docs(docs):
        return "\n\n".join(doc.page_content for doc in docs)

    retriever = es_vector_store.as_retriever()
    template = """Answer the question based only on the following context:\n

                    {context}

                    Question: {question}
                   """
    prompt = ChatPromptTemplate.from_template(template)
    chain = (
        {"context": retriever | format_docs, "question": RunnablePassthrough()}
        | prompt
        | llm
        | StrOutputParser()
    )

    chain.invoke("What are the organizations sales goals?")
The response with Llama3 as the LLM and ELSER v2 for semantic search is as below:
    According to the provided context, the organization's sales goals for Fiscal Year 2024 are:

    1. Increase revenue by 20% compared to fiscal year 2023.
    2. Expand market share in key segments by 15%.
    3. Retain 95% of existing customers and increase customer satisfaction ratings.

    These goals are outlined under "Objectives for Fiscal Year 2024" in the provided document.
This concludes the RAG setup based on using Llama3 as a local LLM and ELSER v2 for semantic search.
Conclusion
In this blog we looked at two approaches to RAG with Llama3 and Elastic. We explored Llama3 as an LLM and to generate embeddings. Next we used Llama3 as the local LLM and ELSER for embeddings and semantic search. We utilized two different frameworks, LlamaIndex and Langchain. You could implement the two methods using either of these frameworks. The notebooks were tested with the Llama3 8B parameter version. Both the notebooks are available at this GitHub location.
Ready to try this out on your own? Start a free trial.
Want to get Elastic certified? Find out when the next Elasticsearch Engineer training is running!
Related content

October 30, 2025
Context engineering using Mistral Chat completions in Elasticsearch
Learn how to utilize context engineering with Mistral Chat completions in Elasticsearch to ground LLM responses in domain-specific knowledge for accurate outputs.
October 27, 2025
Building agentic applications with Elasticsearch and Microsoft’s Agent Framework
Learn how to use Microsoft Agent Framework with Elasticsearch to build an agentic application that extracts ecommerce data from Elasticsearch client libraries using ES|QL.
October 21, 2025
Introducing Elastic’s Agent Builder
Introducing Elastic Agent Builder, a framework to easily build reliable, context-driven AI agents in Elasticsearch with your data.

October 20, 2025
Elastic MCP server: Expose Agent Builder tools to any AI agent
Discover how to use the built-in Elastic MCP server in Agent Builder to securely extend any AI agent with access to your private data and custom tools.
How to use the Synonyms UI to upload and manage Elasticsearch synonyms
Learn how to use the Synonyms UI in Kibana to create synonym sets and assign them to indices.