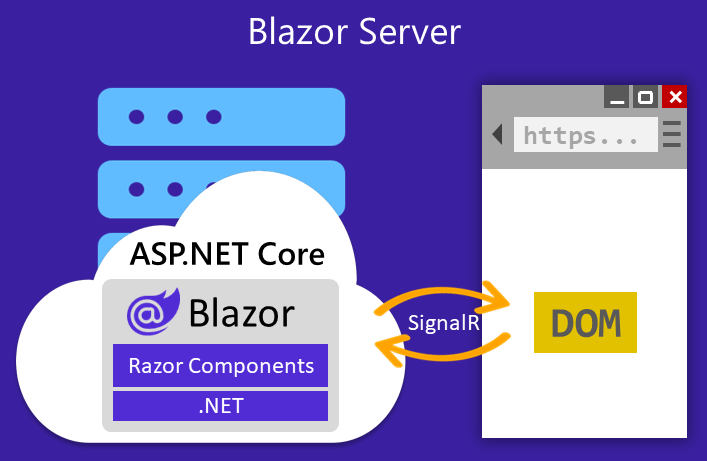
In this article, you will learn how to leverage your C# skills to build a search application using Blazor and Elasticsearch. We are going to use the Elasticsearch .NET client to run full text, semantic and hybrid search queries.
NOTE If you are familiar with the older version of the Elasticsearch C# client NEST, read this blog post about NEST client deprecation and new features. NEST was the previous generation of the .NET client which was replaced with the Elastic.Clients.Elasticsearch package
What is Blazor?
Blazor is an open source HTML, CSS, and C# based web framework created by Microsoft to allow developers to build web applications that run on the client or the server. Blazor also allows you to make reusable components to build applications faster; it enables developers to build the HTML view and actions in C# within the same file, which helps maintain readable and clean code. Additionally, with Blazor Hybrid you can build native mobile apps accessing the native platform capabilities via .NET code.
Some of the features that makes Blazor a great framework to work with:
- Server-side and client-side rendering options
- Reusable UI components
- Real-time updates with SignalR
- Built-in state management
- Built-in routing system
- Strong typing and compile-time checks
Why Blazor?
Blazor offers several advantages over others frameworks and libraries: it allows developers to use C# for both client and server code, providing strong typing and compile-time checking which enhances reliability. It integrates seamlessly with the .NET ecosystem, enabling the reuse of .NET libraries and tools, and offers robust debugging support.
What is ESRE?
Elasticsearch Relevance Engine™ (ESRE) is a set of tools to build search applications using machine learning and and artificial intelligence on top of the powerful Elasticsearch search engine.

To learn more about ESRE, you can read our insightful blog post located here
Configuring ELSER
To leverage Elastic's ESRE capabilities, we are going to use ELSER as our model provider.
Note to use the ELSER models of Elasticsearch, you must to have a Platinum or Enterprise license, and have a minimum dedicated Machine Lerning (ML) node of 4GB of size. Read more about here.
Start by creating the inference endpoint:
PUT _inference/sparse_embedding/my-elser-model
{
  "service": "elser",
  "service_settings": {
    "num_allocations": 1,
    "num_threads": 1
  }
}
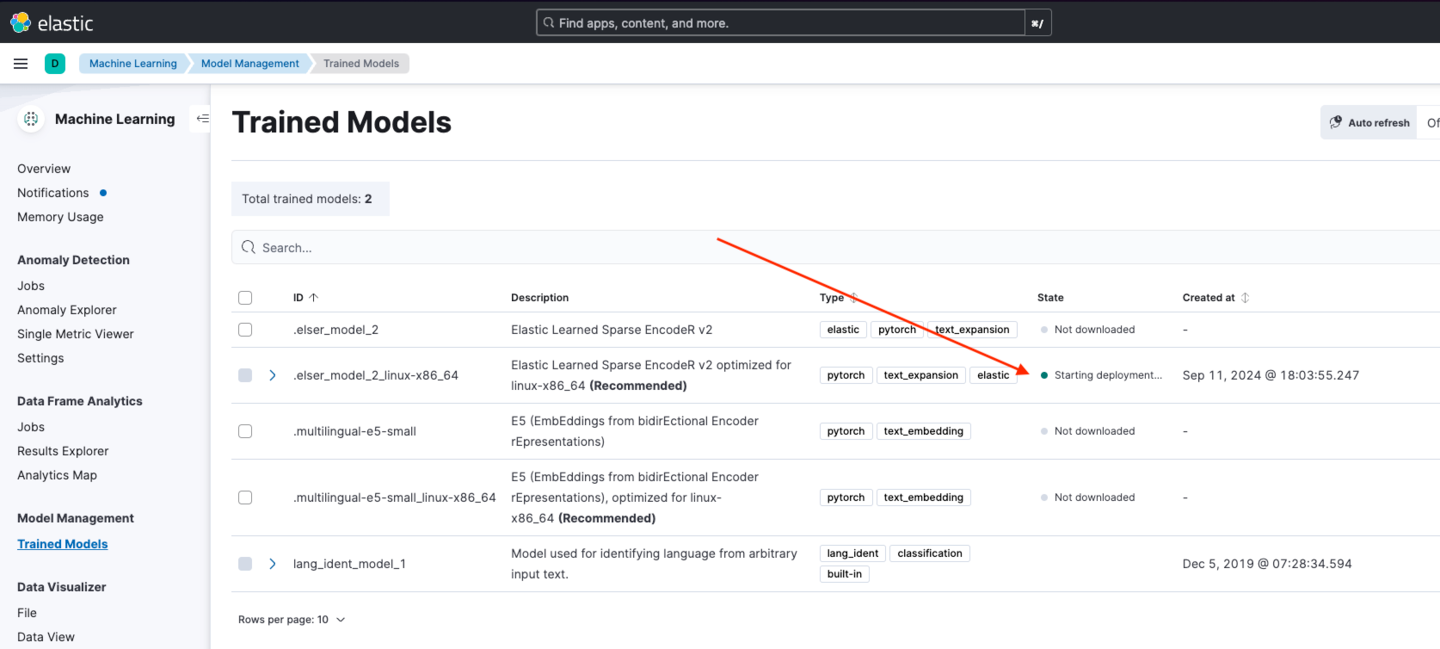
If this is your first time using ELSER, you may encounter a 502 Bad Gateway error as the model loads in the background. You can check the model's status in Machine Learning > Trained Models in Kibana. Once it is deployed, you can proceed to the next step.
Indexing data
You can download the dataset here and then import the data using Kibana. To do this, go to the homepage and click "Upload data". Then, upload the file and click Import. Finally, go to the Advanced tab and paste the following mappings:
{
   "properties":{
      "authors":{
         "type":"keyword"
      },
      "categories":{
         "type":"keyword"
      },
      "longDescription":{
         "type":"semantic_text",
         "inference_id":"my-elser-model",
         "model_settings":{
            "task_type":"sparse_embedding"
         }
      },
      "pageCount":{
         "type":"integer"
      },
      "publishedDate":{
         "type":"date"
      },
      "shortDescription":{
         "type":"text"
      },
      "status":{
         "type":"keyword"
      },
      "thumbnailUrl":{
         "type":"keyword"
      },
      "title":{
         "type":"text"
      }
   }
}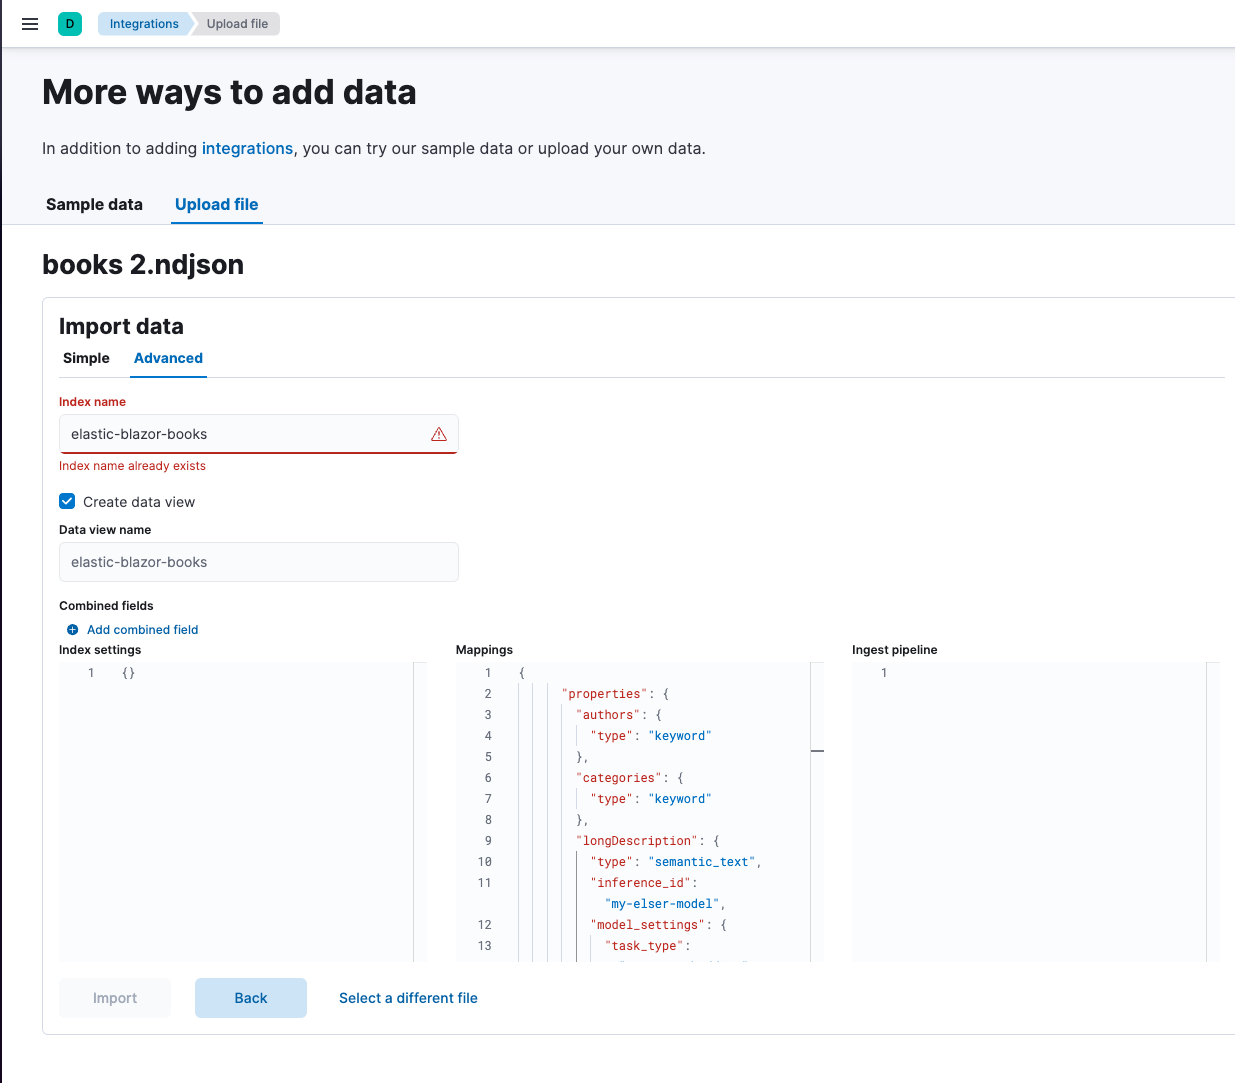
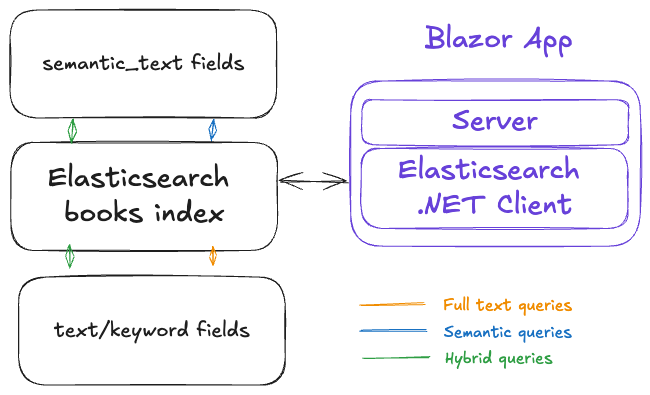
We are going to create an index capable of running semantic and full text queries. The semantic_text field type will take care of data chunking and embedding. Note we are indexing longDescription as semantic_text, you can use copy_to if you want to index a field as both semantic_text and text`.
Building the app with Blazor & Elasticsearch
API key
The first thing we need to do is create an API key to authenticate our requests to Elasticsearch. The API key should be read-only and allowed only to query the books-blazor index.
POST /_security/api_key
{
  "name": "books-blazor-key",
  "role_descriptors": {
    "books-blazor-reader": {
      "indices": [
        {
          "names": ["books-blazor"],
          "privileges": ["read"]
        }
      ]
    }
  }
}
You will see something like this:
{
  "id": "XXXXXXXXXXXXXXXXXXXXXXXX",
  "name": "books-blazor-key",
  "api_key": "XXXXXXXXXXXXXXXXXXXXXXXXXXXXXXXXXXXXXXXXXXXXXXXX",
  "encoded": "XXXXXXXXXXXXXXXXXXXXXXXX=="
}
Save the value of the encoded response field as it's needed later. If you are running on Elastic Cloud, you will also need your Cloud ID. (You can find it here).
Creating the Blazor project
Start by installing Blazor and creating a sample project following the official instructions.
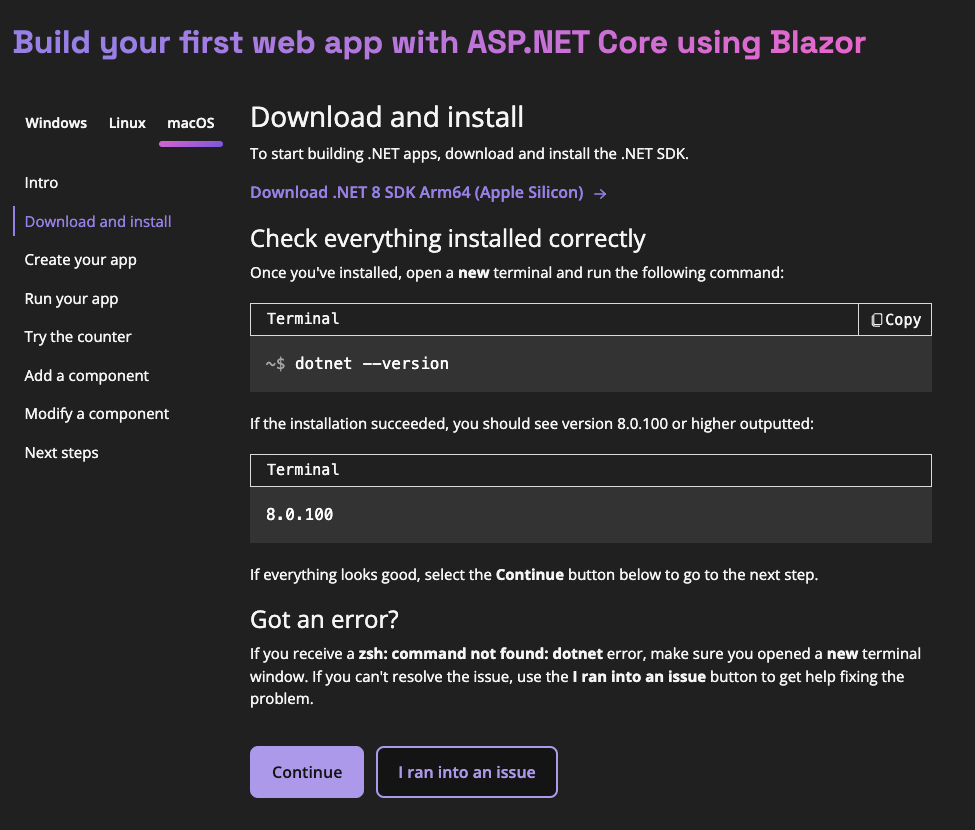
One you have the project created, the folder structure and files should look like this:
BlazorApp/
|-- BlazorApp.csproj
|-- BlazorApp.sln
|-- Program.cs
|-- appsettings.Development.json
|-- appsettings.json
|-- Properties/
|   `-- launchSettings.json
|-- Components/
|   |-- App.razor
|   |-- Routes.razor
|   |-- _Imports.razor
|   |-- Layout/
|   |   |-- MainLayout.razor
|   |   |-- MainLayout.razor.css
|   |   |-- NavMenu.razor
|   |   `-- NavMenu.razor.css
|   `-- Pages/
|       |-- Counter.razor
|       |-- Error.razor
|       |-- Home.razor
|       `-- Weather.razor
|-- wwwroot/
|-- bin/
`-- obj/
The template application includes Bootstrap v5.1.0 for styling.
Finish the project setup by installing Elasticsearch .NET client:
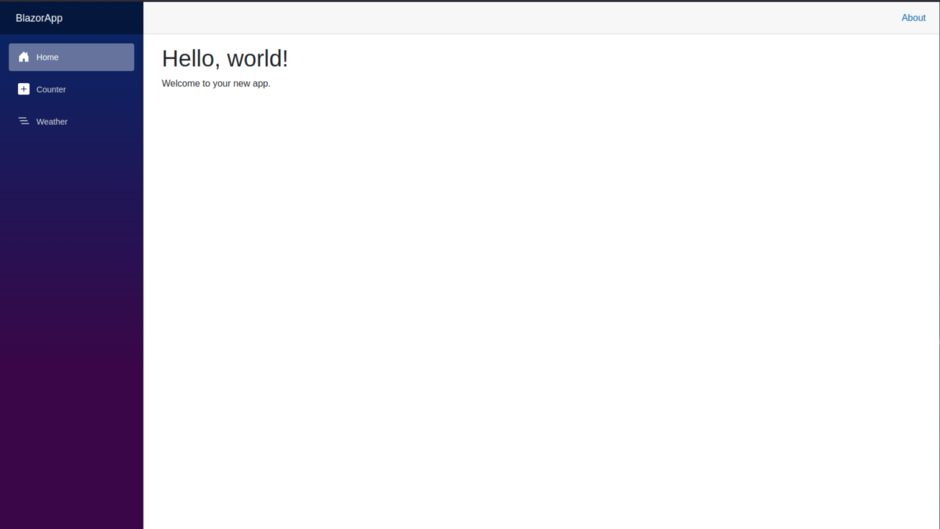
dotnet add package Elastic.Clients.ElasticsearchOnce you finish this step, your page should look like this:
Folders structure
Now, we are going to organize our folders as follows:
BlazorApp/
|-- Components/
|   |-- Pages/
|   |   |-- Search.razor
|   |   `-- Search.razor.css
|   `-- Elasticsearch/
|       |-- SearchBar.razor
|       |-- Results.razor
|       `-- Facet.razor
|-- Models/
|   |-- Book.cs
|   `-- Response.cs
`-- Services/
    `-- ElasticsearchService.cs
Files explained:
- Components/Pages/Search.razor: main page containing the search bar, the results, and the filters.
- Components/Pages/Search.razor.css: page styles.
- Components/Elasticsearch/SearchBar.razor: search bar component.
- Components/Elasticsearch/Results.razor: results component.
- Components/Elasticsearch/Facet.razor: filters component.
- Components/Svg/GlassIcon.razor: search icon.
- Components/_Imports.razor: this will import all the components.
- Models/Book.cs: this will store the book field schema.
- Models/Response.cs: this will store the response schema, including the search results, facets and total hits.
- Services/ElasticsearchService.cs: Elasticsearch service. It will handle the connection and queries to Elasticsearch.
Initial Configuration
Let's start with some clean-up.
Delete the files:
- Components/Pages/Counter.razor
- Components/Pages/Weather.razor
- Components/Pages/Home.razor
- Components/Layout/NavMenu.razor
- Components/Layout/NavMenu.razor.css
Check the /Components/_Imports.razor file. You should have the following imports:
@using System.Net.Http
@using System.Net.Http.Json
@using Microsoft.AspNetCore.Components.Forms
@using Microsoft.AspNetCore.Components.Routing
@using Microsoft.AspNetCore.Components.Web
@using static Microsoft.AspNetCore.Components.Web.RenderMode
@using Microsoft.AspNetCore.Components.Web.Virtualization
@using Microsoft.JSInterop
@using BlazorApp
@using BlazorApp.Components
Integrating Elastic into the project
Now, let’s import the Elasticsearch components:
@using System.Net.Http
@using System.Net.Http.Json
@using Microsoft.AspNetCore.Components.Forms
@using Microsoft.AspNetCore.Components.Routing
@using Microsoft.AspNetCore.Components.Web
@using static Microsoft.AspNetCore.Components.Web.RenderMode
@using Microsoft.AspNetCore.Components.Web.Virtualization
@using Microsoft.JSInterop
@using BlazorApp
@using BlazorApp.Components
@using BlazorApp.Components.Elasticsearch @* <--- Add this line *@
We are going to remove the default sidebar to have more space for our application by removing it from the /Components/Layout/MainLayout.razor file:
@inherits LayoutComponentBase

<div class="page">
    <main>
        <article class="content">
            @Body
        </article>
    </main>
</div>

<div id="blazor-error-ui">
    An unhandled error has occurred.
    <a href="" class="reload">Reload</a>
    <a class="dismiss">🗙</a>
</div>
Now let's enter the Elasticsearch credentials for the user secrets:
dotnet user-secrets init
dotnet user-secrets set ElasticsearchCloudId "your Cloud ID"
dotnet user-secrets set ElasticsearchApiKey "your API Key"
Using this approach, .Net 8 stores sensitive data in a separate location, outside of the project folder and makes it accessible using the IConfiguration interface. These variables will be available to any .Net project that uses the same user secrets.
Then, let's modify the Program.cs file to read the secrets and mount the Elasticsearch client:
First, import the necessary libraries:
using BlazorApp.Services;
using Elastic.Clients.Elasticsearch;
using Elastic.Transport;- BlazorApp.Services: contains the Elasticsearch service.
- Elastic.Clients.Elasticsearch: imports the Elasticsearch client .Net 8 library.
- Elastic.Transport: imports the Elasticsearch transport library, which allows us to use the ApiKey class to authenticate our requests.
Second, insert the following code before the var app = builder.Build() line:
// Initialize the Elasticsearch client.
builder.Services.AddScoped(sp =>
{
    // Getting access to the configuration service to read the Elasticsearch credentials.
    var configuration = sp.GetRequiredService<IConfiguration>();
    var cloudId = configuration["ElasticsearchCloudId"];
    var apiKey = configuration["ElasticsearchApiKey"];

    if (string.IsNullOrEmpty(cloudId) || string.IsNullOrEmpty(apiKey))
    {
        throw new InvalidOperationException(
            "Elasticsearch credentials are missing in configuration."
        );
    }

    var settings = new ElasticsearchClientSettings(cloudId, new ApiKey(apiKey)).EnableDebugMode();
    return new ElasticsearchClient(settings);
});
This code will read the Elasticsearch credentials from the user secrets and create an Elasticsearch client instance.
After the ElasticSearch client initialization, add the following line to register the Elasticsearch service:
builder.Services.AddScoped<ElasticsearchService>();The next step will be to build the search logic in the /Services/ElasticsearchService.cs file:
First, import the necessary libraries and models:
using BlazorApp.Models;
using Elastic.Clients.Elasticsearch;
using Elastic.Clients.Elasticsearch.QueryDsl;
Second, add the class ElasticsearchService, constructor and variables:
namespace BlazorApp.Services
{
    public class ElasticsearchService
    {
        private readonly ElasticsearchClient _client;

        // The logger is used to log information, warnings and errors about the Elasticsearch service and requests.
        private readonly ILogger<ElasticsearchService> _logger;

        public ElasticsearchService(
            ElasticsearchClient client,
            ILogger<ElasticsearchService> logger
        )
        {
            _client = client ?? throw new ArgumentNullException(nameof(client));
            _logger = logger;
        }
    }
}
Configuring search
Now, let's build our search logic:
private static Action<RetrieverDescriptor<BookDoc>> BuildHybridQuery(
    string searchTerm,
    Dictionary<string, List<string>> selectedFacets
)
{
    var filters = BuildFilters(selectedFacets);

    return retrievers =>
        retrievers.Rrf(rrf =>
            rrf.RankWindowSize(50)
                .RankConstant(20)
                .Retrievers(
                    retrievers =>
                        retrievers.Standard(std =>
                            std.Query(q =>
                                q.Bool(b =>
                                    b.Must(m =>
                                            m.MultiMatch(mm =>
                                                mm.Query(searchTerm)
                                                    .Fields(
                                                        new[]
                                                        {
                                                            "title",
                                                            "shortDescription",
                                                        }
                                                    )
                                            )
                                        )
                                        .Filter(filters.ToArray())
                                )
                            )
                        ),
                    retrievers =>
                        retrievers.Standard(std =>
                            std.Query(q =>
                                q.Bool(b =>
                                    b.Must(m =>
                                            m.Semantic(sem =>
                                                sem.Field("longDescription")
                                                    .Query(searchTerm)
                                            )
                                        )
                                        .Filter(filters.ToArray())
                                )
                            )
                        )
                )
        );
}

public static List<Action<QueryDescriptor<BookDoc>>> BuildFilters(
    Dictionary<string, List<string>> selectedFacets
)
{
    var filters = new List<Action<QueryDescriptor<BookDoc>>>();

    if (selectedFacets != null)
    {
        foreach (var facet in selectedFacets)
        {
            foreach (var value in facet.Value)
            {
                var field = facet.Key.ToLower();
                if (!string.IsNullOrEmpty(field))
                {
                    filters.Add(m => m.Term(t => t.Field(new Field(field)).Value(value)));
                }
            }
        }
    }

    return filters;
}BuildFilterswill build the filters for the search query using the selected facets by the user.BuildHybridQuerywill build a hybrid search query that combines full text and semantic search.
Next, add the search method:
public async Task<ElasticResponse> SearchBooksAsync(
    string searchTerm,
    Dictionary<string, List<string>> selectedFacets
)
{
    try
    {
        _logger.LogInformation($"Performing search for: {searchTerm}");

        // Retrieve the hybrid query with filters applied.
        var retrieverQuery = BuildHybridQuery(searchTerm, selectedFacets);

        var response = await _client.SearchAsync<BookDoc>(s =>
            s.Index("elastic-blazor-books")
                .Retriever(retrieverQuery)
                .Aggregations(aggs =>
                    aggs.Add("Authors", agg => agg.Terms(t => t.Field(p => p.Authors)))
                        .Add(
                            "Categories",
                            agg => agg.Terms(t => t.Field(p => p.Categories))
                        )
                        .Add("Status", agg => agg.Terms(t => t.Field(p => p.Status)))
                )
        );

        if (response.IsValidResponse)
        {
            _logger.LogInformation($"Found {response.Documents.Count} documents");

            var hits = response.Total;
            var facets =
                response.Aggregations != null
                    ? FormatFacets(response.Aggregations)
                    : new Dictionary<string, Dictionary<string, long>>();

            var elasticResponse = new ElasticResponse
            {
                TotalHits = hits,
                Documents = response.Documents.ToList(),
                Facets = facets,
            };

            return elasticResponse;
        }
        else
        {
            _logger.LogWarning($"Invalid response: {response.DebugInformation}");
            return new ElasticResponse();
        }
    }
    catch (Exception ex)
    {
        _logger.LogError(ex, "Error performing search");
        return new ElasticResponse();
    }
}

public static Dictionary<string, Dictionary<string, long>> FormatFacets(
    Elastic.Clients.Elasticsearch.Aggregations.AggregateDictionary aggregations
)
{
    var facets = new Dictionary<string, Dictionary<string, long>>();

    foreach (var aggregation in aggregations)
    {
        if (
            aggregation.Value
            is Elastic.Clients.Elasticsearch.Aggregations.StringTermsAggregate termsAggregate
        )
        {
            var facetName = aggregation.Key;
            var facetDictionary = ConvertFacetDictionary(
                termsAggregate.Buckets.ToDictionary(b => b.Key, b => b.DocCount)
            );
            facets[facetName] = facetDictionary;
        }
    }

    return facets;
}

private static Dictionary<string, long> ConvertFacetDictionary(
    Dictionary<Elastic.Clients.Elasticsearch.FieldValue, long> original
)
{
    var result = new Dictionary<string, long>();
    foreach (var kvp in original)
    {
        result[kvp.Key.ToString()] = kvp.Value;
    }
    return result;
}SearchBooksAsync: will perform the search using the hybrid query and return the results included aggregations for building the facets.FormatFacets: will format the aggregations response into a dictionary.ConvertFacetDictionary: will convert the facet dictionary into a more readable format.
The next step is to create the models that will represent the data returned in the hits of the Elasticsearch query that will be printed as the results in our search page.
We start by creating the file /Models/Book.cs and adding the following:
namespace BlazorApp.Models
{
    public class BookDoc
    {
        public string? Title { get; set; }
        public int? PageCount { get; set; }
        public string? PublishedDate { get; set; }
        public string? ThumbnailUrl { get; set; }
        public string? ShortDescription { get; set; }
        public LongDescription? LongDescription { get; set; }
        public string? Status { get; set; }
        public List<string>? Authors { get; set; }
        public List<string>? Categories { get; set; }
    }

    public class LongDescription
    {
        public string? Text { get; set; }
    }
}
Then, setting up the Elastic response in the /Models/Response.cs file and adding the following:
namespace BlazorApp.Models
{
    public class ElasticResponse
    {
        public ElasticResponse()
        {
            Documents = new List<BookDoc>();
            Facets = new Dictionary<string, Dictionary<string, long>>();
        }

        public long TotalHits { get; set; }
        public List<BookDoc> Documents { get; set; }
        public Dictionary<string, Dictionary<string, long>> Facets { get; set; }
    }
}
Configuring a basic UI
Next, add the SearchBar component. In the file /Components/Elasticsearch/SearchBar.razor and add the following:
@using System.Threading.Tasks

<form @onsubmit="SubmitSearch">
  <div class="input-group mb-3">
    <input type="text" @bind-value="searchTerm" class="form-control" placeholder="Enter search term..." />
    <button type="submit" class="btn btn-primary input-btn">
      <span class="input-group-svg">
        Search
      </span>
    </button>
  </div>
</form>

@code {
  [Parameter]
  public EventCallback<string> OnSearch { get; set; }

  private string searchTerm = "";

  private async Task SubmitSearch()
  {
    await OnSearch.InvokeAsync(searchTerm);
  }
}
This component contains a search bar and a button to perform the search.
Blazor provides great flexibility by allowing generating HTML dynamically using C# code within the same file.
Afterwards, in the file /Components/Elasticsearch/Results.razor we will build the results component that will display the search results:
@using BlazorApp.Models

@if (SearchResults != null && SearchResults.Any())
{
  <div class="row">
  @foreach (var result in SearchResults)
    {
      <div class="col-12 mb-3">
        <div class="card">
          <div class="row g-0">
            <div class="col-md-3 image-container">
              @if (!string.IsNullOrEmpty(result?.ThumbnailUrl))
              {
                <img src="@result?.ThumbnailUrl" class="img-fluid rounded-start" alt="Thumbnail">
              }
              else
              {
                <div class="placeholder">
                  @result?.Title
                </div>
              }
            </div>

            <div class="col-md-9"> <!-- Adjusted to use the remaining 75% -->
              <div class="card-body">
                <h4 class="card-title">
                  @result?.Title
                </h4>

                <div class="details-container">
                  <div class="">

                    @if (result?.Authors?.Any() == true)
                    {
                      <p class="card-text p-first">
                        Authors: <small class="text-muted">@string.Join(", ", result.Authors)</small>
                      </p>
                    }

                    @if (result?.Categories?.Any() == true)
                    {
                      <p class="card-text p-second">
                        Categories: <small class="text-muted">@string.Join(", ", result.Categories)</small>
                      </p>
                    }
                  </div>
                  <div class="numPages-status">
                    @if (result?.PageCount != null)
                    {
                      <p class="card-text p-first">
                        Pages: <small class="text-muted">@result.PageCount</small>
                      </p>
                    }

                    @if (result?.Status != null)
                    {
                      <p class="card-text p-second">
                        Status: <small class="text-muted">@result.Status</small>
                      </p>
                    }
                  </div>
                </div>

                <div class="long-text-container">
                  <p class="card-text"><small class="text-muted">@result?.LongDescription?.Text</small></p>
                </div>
                @if (!string.IsNullOrEmpty(result?.PublishedDate))
                {
                  <div class="date-container">
                    <p class="card-text">
                      Published Date: <small class="text-muted small-date">@FormatDate(result.PublishedDate)</small>
                    </p>
                  </div>
                }
              </div>
            </div>
          </div>
        </div>
      </div>
    }
  </div>
}
else if (SearchResults != null)
{
  <p>No results found.</p>
}

@code {
  [Parameter]
  public List<BookDoc> SearchResults { get; set; } = new List<BookDoc>();

  private string FormatDate(string? date)
  {
    if (DateTime.TryParse(date, out DateTime parsedDate))
    {
      return parsedDate.ToString("MMMM dd, yyyy");
    }
    return "";
  }
}
Finally, we will need to create facets to filter the search results.
Note: Facets are filters that allow users to narrow down search results based on specific attributes or categories, such as product type, price range, or brand. These filters are typically presented as clickable options, often in the form of checkboxes, to help users refine their search and find relevant results more easily. In Elasticsearch context, facets are created using aggregations.
We set up facets by putting the following code In the file /Components/Elasticsearch/Facet.razor:
@if (Facets != null)
{
  <div class="facets-container">
  @foreach (var facet in Facets)
    {
      <h3>@facet.Key</h3>
      @foreach (var option in facet.Value)
      {
        <div>
          <input type="checkbox" checked="@IsFacetSelected(facet.Key, option.Key)"
            @onclick="() => ToggleFacet(facet.Key, option.Key)" />
          @option.Key (@option.Value)
        </div>
      }
    }
  </div>
}


@code {
  [Parameter]
  public Dictionary<string, Dictionary<string, long>>? Facets { get; set; }

  [Parameter]
  public EventCallback<Dictionary<string, List<string>>> OnFacetChanged { get; set; }

  private Dictionary<string, List<string>> selectedFacets = new();

  private void ToggleFacet(string facetName, string facetValue)
  {
    if (!selectedFacets.TryGetValue(facetName, out var facetValues))
    {
      facetValues = selectedFacets[facetName] = new List<string>();
    }

    if (!facetValues.Remove(facetValue))
    {
      facetValues.Add(facetValue);
    }

    OnFacetChanged.InvokeAsync(selectedFacets);
  }

  private bool IsFacetSelected(string facetName, string facetValue)
  {
    return selectedFacets.ContainsKey(facetName) && selectedFacets[facetName].Contains(facetValue);
  }
}
This component reads from a terms aggregation on the author, categories, and status fields, and then produces a list of filters to send back to Elasticsearch.
Now, let's put everything together.
In /Components/Pages/Search.razor file:
@page "/"
@rendermode InteractiveServer
@using BlazorApp.Models
@using BlazorApp.Services
@inject ElasticsearchService ElasticsearchService
@inject ILogger<Search> Logger

<PageTitle>Search</PageTitle>

<div class="top-row px-4 ">

    <div class="searchbar-container">
        <h4>Semantic Search with Elasticsearch and Blazor</h4>

        <SearchBar OnSearch="PerformSearch" />
    </div>

    <a href="https://www.elastic.co/search-labs/esre-with-blazor" target="_blank">About</a>
</div>

<div class="px-4">

    <div class="search-details-container">
        <p role="status">Current search term: @currentSearchTerm</p>
        <p role="status">Total results: @totalResults</p>
    </div>

    <div class="results-facet-container">
        <div class="facets-container">
            <Facet Facets="facets" OnFacetChanged="OnFacetChanged" />
        </div>
        <div class="results-container">
            <Results SearchResults="searchResults" />
        </div>
    </div>
</div>

@code {
    private string currentSearchTerm = "";
    private long totalResults = 0;
    private List<BookDoc> searchResults = new List<BookDoc>();
    private Dictionary<string, Dictionary<string, long>> facets = new Dictionary<string, Dictionary<string, long>>();
    private Dictionary<string, List<string>> selectedFacets = new Dictionary<string, List<string>>();

    protected override async Task OnInitializedAsync()
    {
        await PerformSearch();
    }

    private async Task PerformSearch(string searchTerm = "")
    {
        try
        {
            currentSearchTerm = searchTerm;

            var response = await ElasticsearchService.SearchBooksAsync(currentSearchTerm, selectedFacets);
            if (response != null)
            {
                searchResults = response.Documents;
                facets = response.Facets;
                totalResults = response.TotalHits;
            }
            else
            {
                Logger.LogWarning("Search response is null.");
            }

            StateHasChanged();
        }
        catch (Exception ex)
        {
            Logger.LogError(ex, "Error performing search.");
        }
    }

    private async Task OnFacetChanged(Dictionary<string, List<string>> newSelectedFacets)
    {
        selectedFacets = newSelectedFacets;
        await PerformSearch(currentSearchTerm);
    }
}
Our page is working!
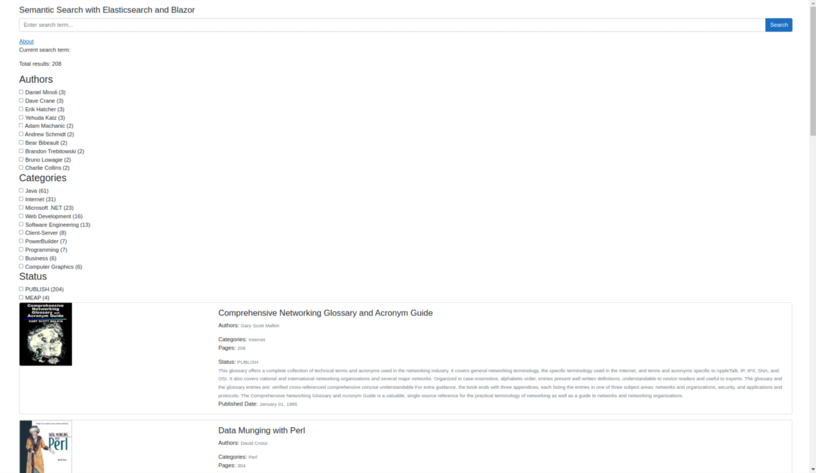
As you can see, the page is functional but lacks styles. Let's add some CSS to make it look more organized and responsive.
Let's start replacing the layout styles. In the Components/Layout/MainLayout.razor.css file:
.page {
  position: relative;
  display: flex;
  flex-direction: column;
}

main {
  flex: 1;
}

#blazor-error-ui {
  background: lightyellow;
  bottom: 0;
  box-shadow: 0 -1px 2px rgba(0, 0, 0, 0.2);
  display: none;
  left: 0;
  padding: 0.6rem 1.25rem 0.7rem 1.25rem;
  position: fixed;
  width: 100%;
  z-index: 1000;
}

#blazor-error-ui .dismiss {
  cursor: pointer;
  position: absolute;
  right: 0.75rem;
  top: 0.5rem;
}
Add the styles for the search page in the Components/Pages/Search.razor.css file:
.input-group .input-group-svg {
  background: transparent;
  border: transparent;
  pointer-events: none;
}

.results-facet-container {
  display: flex;
  margin-top: 1rem;
  overflow-x: auto;
}

.search-details-container {
  display: flex;
  justify-content: space-between;
  margin-top: 1rem;
}

.searchbar-container {
  padding-top: 2rem;
  display: flex;
  flex-direction: column;
  flex-grow: 1;
  height: 100%;
  max-width: 100%;
}

.searchbar-container h4 {
  margin: 0;
}

.top-row {
  margin-top: -1.1rem;
  position: relative;
  background-color: hsl(216, 29%, 67%);
  border-bottom: 1px solid #d6d5d5;
  display: flex;
  align-items: center;
  height: 100%;
  padding: 0 1rem;
}

.top-row a {
  margin-left: auto;
  margin-top: -4rem;
  color: #000000;
  text-decoration: none;
}

.top-row a:hover {
  text-decoration: underline;
}

@media (max-width: 640.98px) {
  .top-row {
    justify-content: space-between;
  }

  .top-row ::deep a,
  .top-row ::deep .btn-link {
    margin-left: 0;
  }
}

@media (min-width: 641px) {
  .top-row.auth ::deep a:first-child {
    flex: 1;
    text-align: right;
    width: 0;
  }

  .top-row,
  article {
    padding-left: 2rem !important;
    padding-right: 1.5rem !important;
  }
}
Our page starts to look better:
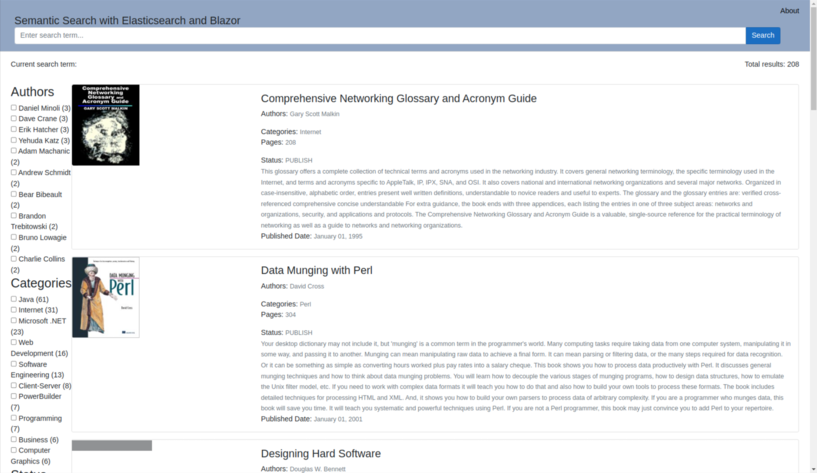
Let's give it the final touches:
Create the following files:
- Components/Elasticsearch/Facet.razor.css
- Components/Elasticsearch/Results.razor.css
And add the styles for Facet.razor.css:
.facets-container {
  font-size: 15px;
  margin-right: 4rem;
  overflow-x: auto;
  white-space: nowrap;
  max-width: 300px;
}

.results-facet-container {
  display: flex;
  margin-top: 1rem;
  overflow-x: auto;
}

.results-facet-container > * {
  flex-shrink: 0;
}
For Results.razor.css:
.image-container {
  display: flex;
  justify-content: center;
  align-items: center;
  height: 100%;
  padding: 1rem;
  box-sizing: border-box;
}

.image-container img {
  max-width: 100%;
  height: auto;
  border-radius: 0.5rem;
}

.placeholder {
  display: flex;
  justify-content: center;
  align-items: center;
  height: 100%;
  width: 100%;
  background-color: #f0f0f0;
  border: 1px solid #ccc;
  font-size: 0.9rem;
  color: #888;
  text-align: center;
  padding: 1rem;
  border-radius: 0.5rem;
}

.card-body {
  padding: 1rem;
}

.details-container {
  display: flex;
  justify-content: space-between;
  padding: 1.5rem 0;
}

.date-container {
  margin-top: 1rem;
  display: flex;
  justify-content: flex-end;
}

.date-container .small-date {
  font-weight: bold;
}
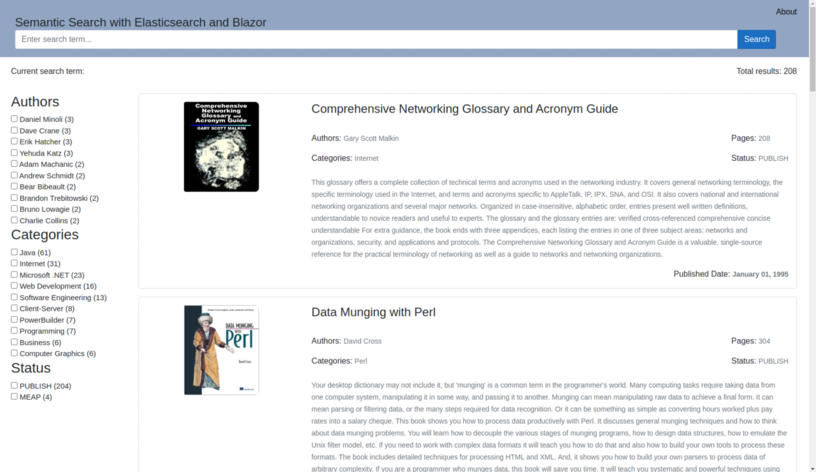
Final result:
To run the application you can use the following command:
dotnet watch
You did it! Now you can search for books in your Elasticsearch index by using the search bar and filter the results by author, category, and status.
Performing full text and semantic search
By default our app will perform a hybrid search using both full text and semantic search. You can change the search logic by creating two separate methods, one for full text and another for semantic search, and then selecting one method to build the query based on the user's input.
Add the following methods to the ElasticsearchService class in the /Services/ElasticsearchService.cs file:
private static Action<QueryDescriptor<BookDoc>> BuildSemanticQuery(
    string searchTerm,
    Dictionary<string, List<string>> selectedFacets
)
{
    var filters = BuildFilters(selectedFacets);

    return query =>
        query.Bool(b =>
            b.Must(m => m.Semantic(sem => sem.Field("longDescription").Query(searchTerm)))
                .Filter(filters.ToArray())
        );
}

private static Action<QueryDescriptor<BookDoc>> BuildMultiMatchQuery(
    string searchTerm,
    Dictionary<string, List<string>> selectedFacets
)
{
    var filters = BuildFilters(selectedFacets);

    if (string.IsNullOrEmpty(searchTerm))
    {
        return query => query.Bool(b => b.Filter(filters.ToArray()));
    }

    return query =>
        query.Bool(b =>
            b.Should(m =>
                    m.MultiMatch(mm =>
                        mm.Query(searchTerm).Fields(new[] { "title", "shortDescription" })
                    )
                )
                .Filter(filters.ToArray())
        );
}
Both methods work similarly to the BuildHybridQuery method, but they only perform full text or semantic search.
You can modify the SearchBooksAsync method to use the selected search method:
public async Task<ElasticResponse> SearchBooksAsync(
    string searchTerm,
    Dictionary<string, List<string>> selectedFacets
)
{
    try
    {
        _logger.LogInformation($"Performing search for: {searchTerm}");

        // Modify the query builder to use the selected search method.
        var multiMatchQuery = BuildMultiMatchQuery(searchTerm, selectedFacets); // For full text search
        var semanticQuery = BuildSemanticQuery(searchTerm, selectedFacets); // For semantic search

        // In this case we will not use retrievers, but you can add them if you want to use them.
        var response = await _client.SearchAsync<BookDoc>(s =>
            s.Index("elastic-blazor-books")
                .Query(multiMatchQuery) // Change this line to use different search methods, for example: .Query(semanticQuery) for semantic search
                .Aggregations(aggs =>
                    aggs.Add("Authors", agg => agg.Terms(t => t.Field(p => p.Authors)))
                        .Add(
                            "Categories",
                            agg => agg.Terms(t => t.Field(p => p.Categories))
                        )
                        .Add("Status", agg => agg.Terms(t => t.Field(p => p.Status)))
                )
        );

        if (response.IsValidResponse)
        {
            _logger.LogInformation($"Found {response.Documents.Count} documents");

            var hits = response.Total;
            var facets =
                response.Aggregations != null
                    ? FormatFacets(response.Aggregations)
                    : new Dictionary<string, Dictionary<string, long>>();

            var elasticResponse = new ElasticResponse
            {
                TotalHits = hits,
                Documents = response.Documents.ToList(),
                Facets = facets,
            };

            return elasticResponse;
        }
        else
        {
            _logger.LogWarning($"Invalid response: {response.DebugInformation}");
            return new ElasticResponse();
        }
    }
    catch (Exception ex)
    {
        _logger.LogError(ex, "Error performing search");
        return new ElasticResponse();
    }
}
You can find the complete application here
Conclusion
Blazor is an effective framework that allows you to build web applications using C#. Elasticsearch is a powerful search engine that allows you to build search applications. Combining both, you can easily build robust search applications, leveraging the power of ESRE to create a semantic search experience in a short time.
Ready to try this out on your own? Start a free trial.
Elasticsearch has integrations for tools from LangChain, Cohere and more. Join our advanced semantic search webinar to build your next GenAI app!
Related content

October 23, 2025
Low-memory benchmarking in DiskBBQ and HNSW BBQ
Benchmarking Elasticsearch latency, indexing speed, and memory usage for DiskBBQ and HNSW BBQ in low-memory environments.

October 22, 2025
Deploying a multilingual embedding model in Elasticsearch
Learn how to deploy an e5 multilingual embedding model for vector search and cross-lingual retrieval in Elasticsearch.

October 23, 2025
Introducing a new vector storage format: DiskBBQ
Introducing DiskBBQ, an alternative to HNSW, and exploring when and why to use it.
September 19, 2025
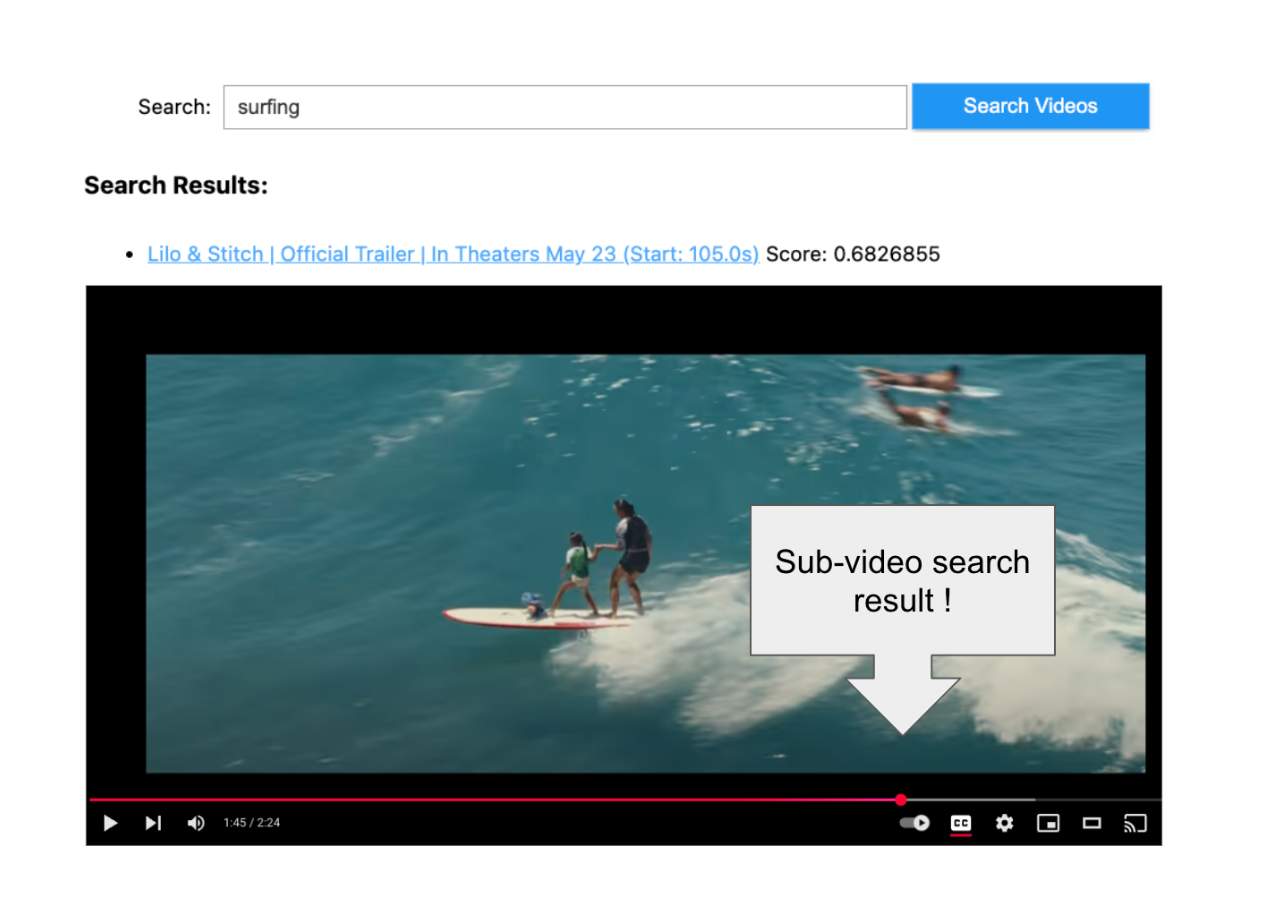
Using TwelveLabs’ Marengo video embedding model with Amazon Bedrock and Elasticsearch
Creating a small app to search video embeddings from TwelveLabs' Marengo model.
September 15, 2025
Balancing the scales: Making reciprocal rank fusion (RRF) smarter with weights
Exploring weighted reciprocal rank fusion (RRF) in Elasticsearch and how it works through practical examples.
