Elasticsearch reduce number of shards – explanation and code examples
When you have too many shards in your cluster, there are a few steps you can take to reduce the number of shards. Deleting or closing indices and reindexing into larger indices are covered in this guide. Below, we will review how to reduce the number of shards of newly created indices, how to reduce the number of shards of already existing indices, how to reduce the number of primary shards, and how to reduce the number of shards for time-based indices.
How to reduce the number of shards for newly created indices
When creating new indices, you should make sure to configure the number of newly created shards to the smallest possible number.
To demonstrate this option, consider a common log storage scenario. Since Elasticsearch 7.0, the default is 1 primary shard per index, which is already a significant improvement. However, even with this more conservative configuration, you can still optimize based on your actual data volume. A shard can easily hold 10 to 50GB of data with good performance, so if you consistently generate less data than that, you can keep the default of 1 shard. For larger volumes, consider the general rule of 1 shard for every 10-30GB of data, adjusting according to your search and indexing performance needs.
The easiest way to achieve this is to create an index template and store it in your cluster state. This request will create an index template called "template_1". It will be applied to all newly created index names that start with "log" and will set the number of primary shards per index to 1.
PUT _index_template/template_1
{
  "index_patterns": ["log*"],
  "template": {
    "settings": {
      "index.number_of_shards": 1,
      "index.number_of_replicas": 1  // Default is 1 if not specified
    }
  }
}
Note: If you don't specify number_of_replicas in the template, Elasticsearch uses the default value of 1 replica per primary shard. You can adjust this based on your fault tolerance and performance requirements.
The exact code syntax may vary depending on the Elasticsearch version you are using. Please refer to the creating index templates documentation.
How to reduce the number of shards for your existing indices
Reduce the number of replica shards
An easy way to reduce the number of shards is to decrease the number of replicas. Changing the number of replicas can be done dynamically with a single request and takes only a few seconds.
It is generally recommended to have 1 replica shard per index, i.e., one copy of each shard that will be allocated on another node (unless you have many search requests running in parallel). Replicas are used for failover security and to improve search performance. If a node containing a primary shard goes down, one of its replicas will be promoted to primary, ensuring your data remains available for both searching and new indexing operations. They increase cluster resilience and distribute the load more evenly.
However, the approach to replicas depends on your cluster's bottleneck. If your cluster is overloaded due to heavy indexing operations, reducing replicas to zero can provide quick relief. On the other hand, if your cluster is struggling with search query performance and has sufficient capacity, adding replicas can actually help by distributing the search load across more nodes. Be aware that setting replicas to zero removes fault tolerance and should not be maintained for extended periods.
Remember that the number of replicas can also be configured in the index template shown earlier.
This request will set the number of replica shards to 0 for all index names that start with "log":
PUT log*/_settings
{
  "index" : {
    "number_of_replicas" : 0
  }
}
Reduce the number of primary shards
The number of primary shards per index cannot be changed dynamically – it's immutable. The routing algorithm used to distribute new documents among multiple shards depends on the total number of primary shards. That's why it's a bit more difficult to reduce the number of primary shards for an existing index.
Basically, you need to create a new index and copy all the data. There are 2 APIs you can use for this: the Shrink API and the Reindex API. Each API has its pros and cons, of course, but one will generally be more ideal based on your configuration and requirements. The Shrink API is faster but can only be used for read-only indices (i.e., indices where you don't update or insert documents). The Reindex API can be used for active indices.
Reduce the number of shards with the Shrink API
You can shrink over-sharded indices to a lower shard count, depending on your index size – see this sizing documentation for guidance. There are fairly strict requirements about the number of shards you can shrink your index to. Please read the documentation to make sure this option is suitable for you.
Keep in mind that some maintenance time is expected when shrinking indices. First, all primary shards of an index need to be allocated on the same node. Please make sure there is enough storage space on that node (if there isn't, consider using the Reindex API as shown below). Then, the index needs to be marked as read-only.
The request below will set to read-only all indices whose names start with "log" and move all shards to the node identified by “shrink_node_name”.
**Warning:** Do not run this command on indices currently being written to. Setting an index to read-only will immediately block all write operations, causing indexing failures. This approach should only be used for indices that are no longer receiving new data.
PUT log*/_settings
{
  "settings": {
    "index.blocks.write": true,
    "index.routing.allocation.require._name": "shrink_node_name"
  }
}
You will need to shrink your indices one at a time with the next command below. The shard allocation will revert to default, and the index will be writable again.
POST log-1/_shrink/log-shrink-1
{
  "settings": {
    "index.routing.allocation.require._name": null,
    "index.blocks.write": null
  }
}
The exact syntax may vary depending on the Elasticsearch version you are using. Please refer to the Shrink index API documentation.
Reduce the number of shards with the Reindex API
If the index you're trying to shrink is still being actively written to, you can use the Reindex API instead.
The Reindex API can be used to copy documents in batches from one index to another. In this case, all the work that needs to be performed at indexing time needs to be repeated. This makes using the Reindex API slower than copying entire shards, but it's still a relatively fast process.
The Reindex API creates a point-in-time view of the source index memorized in a temporary search context and then copies all the documents from that context. Documents that are created during the reindexing process are ignored since they are not present in that context. There are two ways to go about this. The first approach only necessitates a single reindexing operation, and the second one requires two operations. Let’s see how both approaches work.
In the first approach, you first need to redirect all indexing traffic to the new index before starting the reindexing operation. The steps are the following:
1. Create the new index with fewer shards
2. Create an alias that searches over both old and new indices
3. Redirect all indexing traffic to the new index
4. Start the reindexing process from the old to the new index
5. When complete, remove the alias and delete the old index
This approach ensures zero data loss while avoiding the complexity of dual writes or multiple reindex iterations.
Step 1: Create the destination index with the desired number of shards:
PUT log-shrink-1
{
  "settings": {
    "index.number_of_shards": 1,
    "index.number_of_replicas": 1
  }
}
Step 2: Create an alias that allows searching both indices:
POST _aliases
{
  "actions": [
    {
      "add": {
        "index": "log-1",
        "alias": "logs-search"
      }
    },
    {
      "add": {
        "index": "log-shrink-1",
        "alias": "logs-search"
      }
    }
  ]
}
Step 3: Redirect all indexing traffic to the new index
Note: This is done in your application by changing the target index from "log-1" to "log-shrink-1"
Step 4: Copy all documents from the old to the new index:
POST _reindex
{
  "source": {
    "index": "log-1"
  },
  "dest": {
    "index": "log-shrink-1",
    "op_type": "index"
  }
}
Step 5: After the reindex completes, remove the alias and delete the old index:
POST _aliases
{
  "actions": [
    {
      "remove": {
        "index": "log-1",
        "alias": "logs-search"
      }
    }
  ]
}

DELETE log-1
The second approach is slightly different in the sense that the indexing traffic is only redirected to the new index after the reindexing operation completes, which requires running a second reindexing operation to copy all the new documents that will be indexed in the old index while the first reindexing operation is running. The steps are the following:
1. Create the new index with fewer shards (same as step 1 above)
2. Start the reindexing process from the old to the new index (same as step 4 above). Keep note of the timestamp at which you start this step.
3. When complete, redirect all indexing traffic to the new index (same as step 3 above)
4. Create an alias that allows searching both indices (same as step 2 above). Note that this allows documents newly indexed in the old index to be searchable while we reindex them in the next step, though some may temporarily appear twice in search results.
5. Run a second reindexing operation to copy the newly indexed documents, using the command below and the timestamp you noted in step 2:
POST _reindex
{
  "source": {
    "index": "log-1",
    "query": {
      "range": {
        "@timestamp": {
          "gte": "2025-01-28T10:00:00"
        }
      }
    }
  },
  "dest": {
    "index": "log-shrink-1",
    "op_type": "index"
  }
}
6. When the second reindexing operation terminates, you can delete the old index and the alias (same as step 5 above).
Reducing the number of shards for your time-based indices
If you're using time-based index names, for example, daily indices for logging, and don't have enough data, a good way to reduce the number of shards would be to switch to a weekly or monthly pattern.
You can also group old read-only indices by month, quarter, or year. The easiest way to do this is to use the Reindex API.
Reducing the number of shards for multi-tenant indices
When you have a multi-tenant use case with one index per customer, reducing shards seems much more difficult.
In multi-tenant situations, you might have some large customers with one or more shards per index, and the size seems appropriate. At the same time, you'll also have many customers with smaller indices.
If you need to reduce shards in such a configuration while still needing one index per customer, you can use Filtered Aliases.
Reducing the number of shards with Filtered Aliases
Filtered Aliases aren't as well-known as "normal" index aliases, but they allow you to create multiple views of an index.
Instead of creating one index per tenant or customer, you create one index for all smaller tenants that are too small to merit their own index. Then you add a keyword or numeric field to distinguish these tenants (customer name or customer ID).
After creating the index, you can simply create a filtered alias on that index and provide the tenant name as the alias name.
Applications won't notice that you're using a filtered alias in the background. They can simply use the alias name. But you can store many different tenants in one index and avoid excess shards.
Important consideration: This approach can be sensitive to "noisy neighbors" - when different tenants share the same shard, more active tenants can impact the performance of quieter tenants. Monitor your tenants' activity patterns and consider grouping tenants with similar usage characteristics.
All this assumes you're using a compatible data model for all customers.
The next request shows how to create a filtered alias on an index:
POST _aliases
{
  "actions":[
    {
      "add":{
        "index":"small-customers",
        "alias":"customer-1",
        "filter":{
          "term":{
            "customer-id":"1"
          }
        }
      }
    }
  ]
}
To reduce the number of shards in a multi-tenant environment, you can create a new index for all small tenants and simply copy the data with the Reindex API. If you need to add a new field to distinguish tenants, like "customer-id", you can use an ingest pipeline to add a new field.
Don't want to worry about shards? If managing shard counts, sizing, and optimization seems too complicated for you, consider Elasticsearch Serverless - our managed offering where you can focus on your business logic while we handle all the infrastructure complexity, including optimized shard management and autoscaling for you.
Read more about shards
- Elasticsearch shards and replicas: A practical guide
- Nodes, Clusters & Shards - Elasticsearch 101 Course, Episode 2
Ready to try this out on your own? Start a free trial.
Want to get Elastic certified? Find out when the next Elasticsearch Engineer training is running!
Related content
October 3, 2025
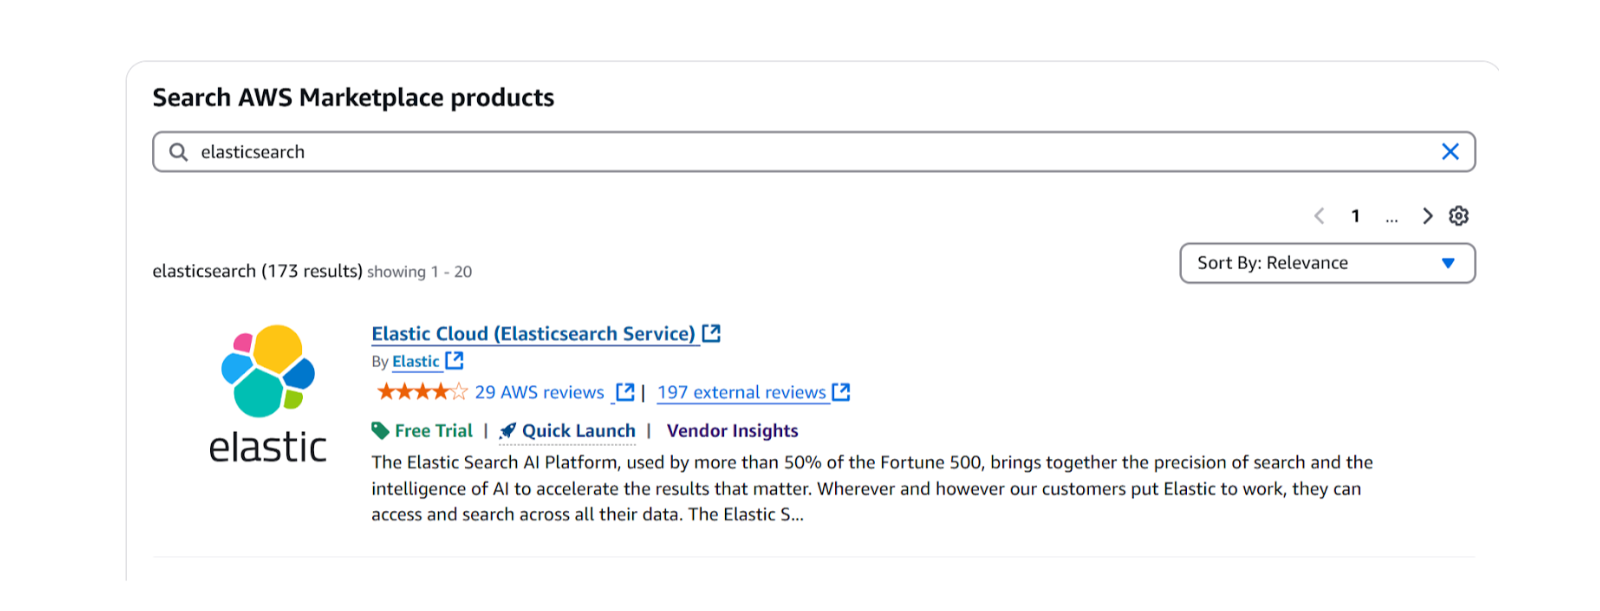
How to deploy Elasticsearch on AWS Marketplace
Learn how to set up and run Elasticsearch using Elastic Cloud Service on AWS Marketplace in this step-by-step guide.

September 29, 2025
HNSW graph: How to improve Elasticsearch performance
Learn how to use the HNSW graph M and ef_construction parameters to improve search performance.
September 26, 2025
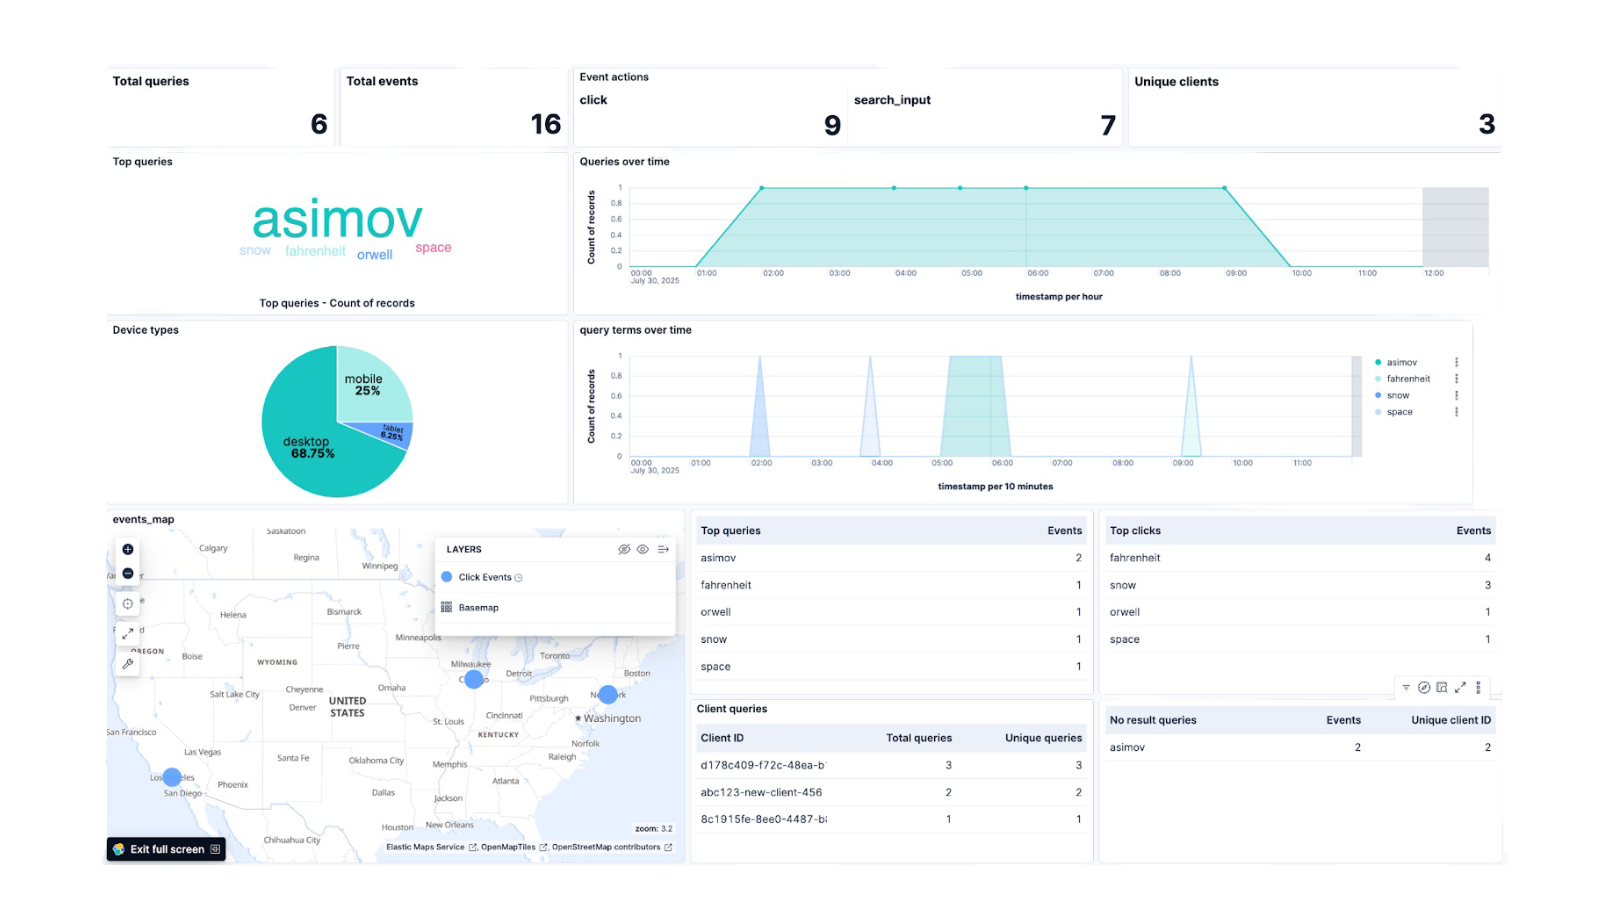
Elasticsearch plugin for UBI: Analyze user data in Kibana
Discover how to capture user behavior data using the Elasticsearch plugin for UBI and build a custom dashboard in Kibana to analyze it.
September 23, 2025
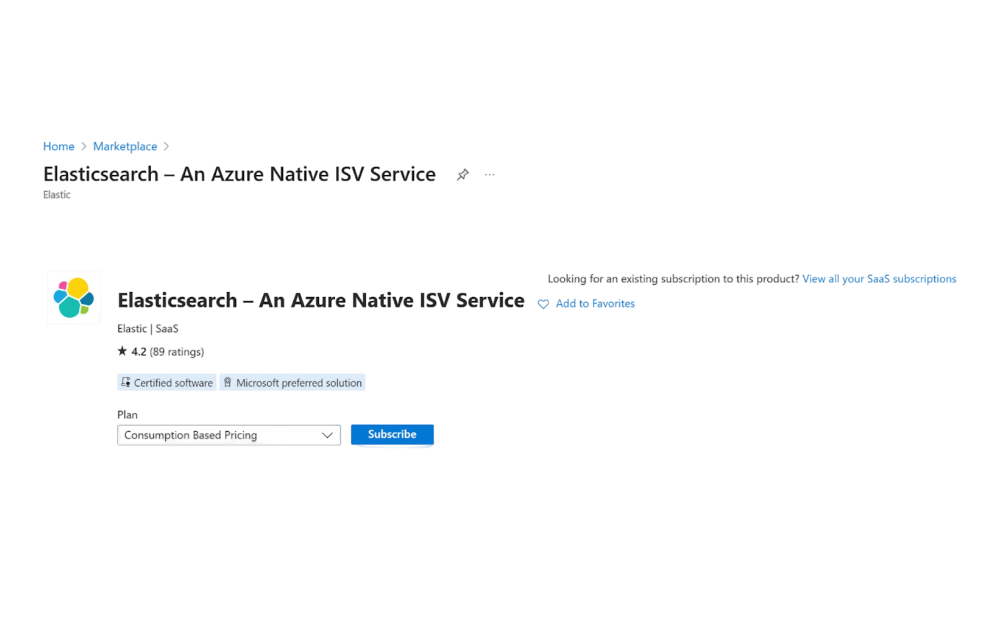
How to set up and deploy Elasticsearch via Azure Marketplace
Learn how to set up and deploy Elasticsearch using Azure Native ISV Service.
September 5, 2025
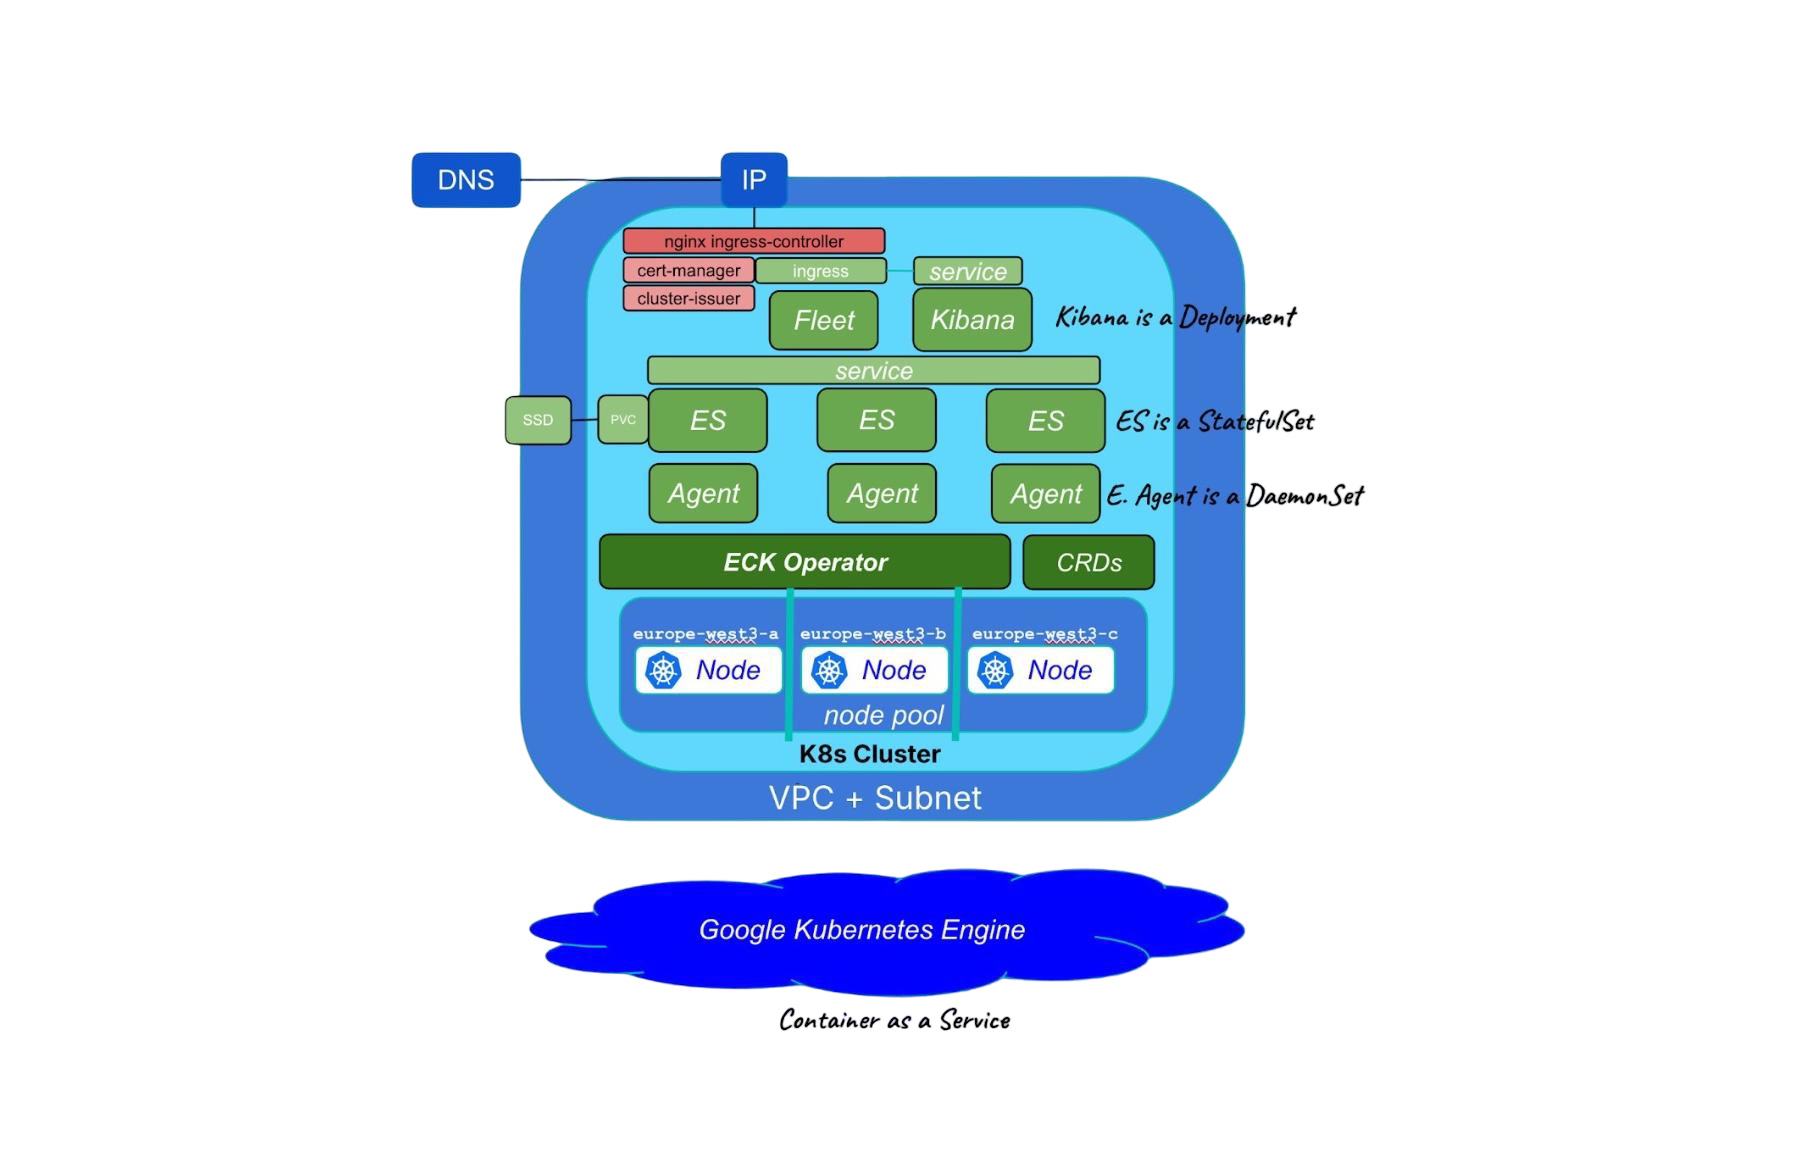
Running cloud-native Elasticsearch with ECK
Learn how to provision a GKE cluster with Terraform and run the Elastic Stack on Kubernetes using ECK.