From the Elasticsearch in JavaScript article, we learned that you should not expose your Elasticsearch instance to the internet but build an API layer instead. Exposing your cluster’s URL, index names, or API keys makes it easier for attackers to target your data and unnecessarily expands your attack surface. Even if you sanitize requests, attackers can send heavy or complex queries to overload your cluster. That’s why it’s best to hide not only the cluster, but also the query logic — let the user control only what’s needed, like the search keyword and never the full query.
Node.js is the alternative for JavaScript developers, and FastAPI is the alternative for Python developers. FastAPI has become popular due to its simplicity and out-of-the-box performance.
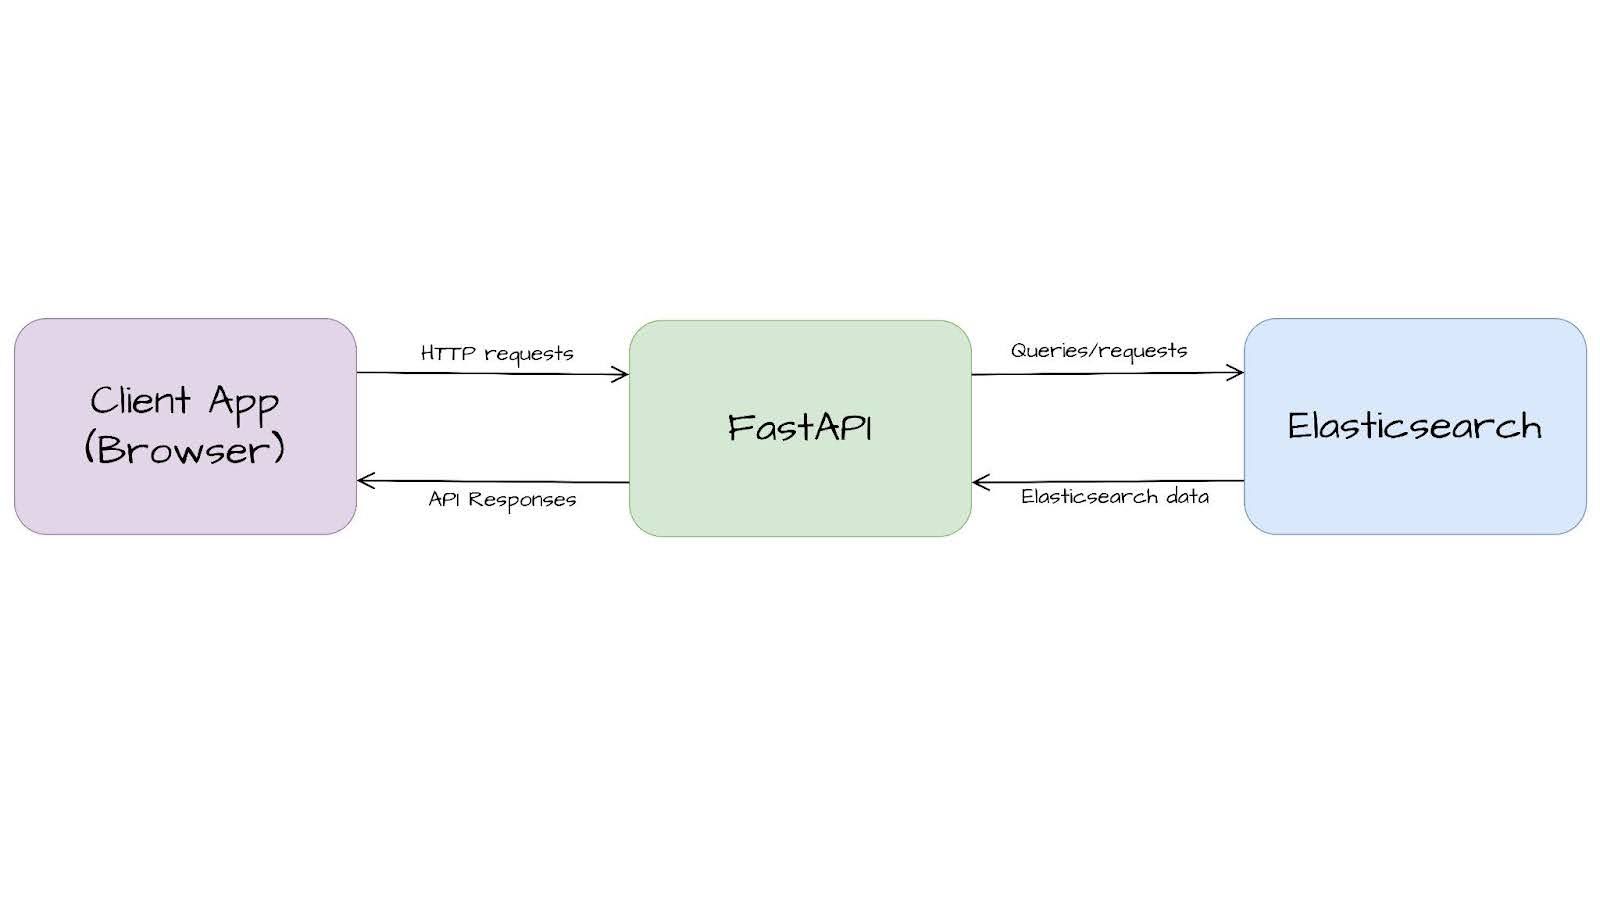
In this article, we will build the API layer between Elasticsearch and the client application (commonly a web browser) using FastAPI. Then, we’ll explore some common use cases that can be covered using FastAPI’s native capabilities.
You can find the notebook for this application here.
Preparing data
For this article, we will use a dataset with details of veterinary visits. Below is a sample document:
{
    "owner_name": "Marco Rivera",
    "pet_name": "Milo",
    "species": "Cat",
    "breed": "Siamese",
    "vaccination_history": [
        "Rabies",
        "Feline Leukemia"
    ],
    "visit_details": "Slight eye irritation, prescribed eye drops."
}
First, we need to install the Elasticsearch client to be able to query our cluster:
pip install elasticsearchNow, we import the Elasticsearch client, helpers, and getpass to capture environment variables from the terminal.
from elasticsearch import Elasticsearch, helpers
from getpass import getpass

os.environ["ELASTICSEARCH_ENDPOINT"] = getpass("Elasticsearch endpoint: ")
os.environ["ELASTICSEARCH_API_KEY"] = getpass("Elasticsearch api-key: ")
We define the index name and initialize the Elasticsearch client with the Elasticsearch endpoint and API Key.
ES_INDEX = "vet-visits"

es_client = Elasticsearch(
    hosts=[os.environ["ELASTICSEARCH_ENDPOINT"]],
    api_key=os.environ["ELASTICSEARCH_API_KEY"],
)
And let's create mappings:
es_client.indices.create(
        index=ES_INDEX,
        body={
            "mappings": {
                "properties": {
                    "breed": {"type": "keyword"},
                    "owner_name": {
                        "type": "text",
                        "fields": {"keyword": {"type": "keyword"}},
                    },
                    "pet_name": {
                        "type": "text",
                        "fields": {"keyword": {"type": "keyword"}},
                    },
                    "species": {"type": "keyword"},
                    "vaccination_history": {"type": "keyword"},
                    "visit_details": {"type": "text"},
                }
            }
        },
    )
Finally, download the dataset and put it in the same folder where the script is located. With it, we can ingest the data into Elasticsearch using the Bulk API:
def build_data(ndjson_file, index_name):
    with open(ndjson_file, "r") as f:
        for line in f:
            doc = json.loads(line)
            yield {"_index": index_name, "_source": doc}


try:
    success, errors = helpers.bulk(es_client, build_data("vet-visits.ndjson", ES_INDEX))
    print(f"{success} documents indexed successfully")

    if errors:
        print("Errors during indexing:", errors)
except Exception as e:
    print(f"Error: {str(e)}")
If everything goes well, you should see the following message:
10 documents indexed successfullyNow, the data is available in Elasticsearch and ready to use. In the next steps, we’ll build the API to showcase FastAPI’s features.
Hello, world!
To get started, we just need to install FastAPI and Uvicorn for the server creation, Pydantic for schema handling, and Elasticsearch to store and search data.
pip install fastapi uvicorn elasticsearch pydantic -qWe start by importing the libraries and creating our FastAPI server instance.
import asyncio
import json
import os
from typing import List

import uvicorn
from fastapi import BackgroundTasks, Body, FastAPI, HTTPException, Response
from pydantic import BaseModel


app = FastAPI()
Then, we can create a ping endpoint to check the status of our server.
@app.get("/ping")
async def ping():
    try:
        health = await es_client.cluster.health()

        return {
            "status": "success",
            "message": "Connected to Elasticsearch",
            "cluster_status": health["status"],
            "number_of_nodes": health["number_of_nodes"],
            "active_shards": health["active_shards"],
        }
    except Exception as e:
        status_code = getattr(e, "status_code", 500)

        raise HTTPException(
            status_code=status_code,
            detail=f"Error connecting to Elasticsearch: {str(e)}",
        )
Request:
curl -XGET "http://localhost:8000/ping"Response:
{"status":"success","message":"Connected to Elasticsearch","cluster_status":"green","number_of_nodes":4,"active_shards":172}Now, let’s create a search endpoint for the sake of protecting our Elasticsearch instance by just receiving the Elasticsearch query body as is and returning the response body as is too.
@app.post("/search")
async def search(query: dict = Body(...)):
    try:
        result = await es_client.search(index=ES_INDEX, body=query)

        return result
    except Exception as e:
        status_code = getattr(e, "status_code", 500)

        raise HTTPException(status_code=status_code, detail=str(e))
We are going to try by searching for dental cleaning visits using match_phrase:
Request:
curl -X POST "http://localhost:8000/search" \
  -H "Content-Type: application/json" \
  -d '{
    "query": {
      "match_phrase": {
        "visit_details": "dental cleaning"
      }
    },
    "size": 10
  }'
Response:
{
    "took": 1,
    "timed_out": false,
    "_shards": {
        "total": 1,
        "successful": 1,
        "skipped": 0,
        "failed": 0
    },
    "hits": {
        "total": {
            "value": 1,
            "relation": "eq"
        },
        "max_score": 3.5869093,
        "hits": [
            {
                "_index": "vet-visits",
                "_id": "VUjqWZYB8Z9CzAyMLmyB",
                "_score": 3.5869093,
                "_source": {
                    "owner_name": "Leo Martínez",
                    "pet_name": "Simba",
                    "species": "Cat",
                    "breed": "Maine Coon",
                    "vaccination_history": [
                        "Rabies",
                        "Feline Panleukopenia"
                    ],
                    "visit_details": "Dental cleaning. Minor tartar buildup removed."
                }
            }
        ]
    }
}
Typed request and response
One of FastAPI’s key features is its integration with Pydantic for data schema handling, allowing you to define classes with type annotations and benefit from automatic data validation. In most cases, typing your data is essential for building robust and stable applications. It also enables model reuse, making the code easier to read, maintain, and document.
However, strict typing and schema enforcement can be limiting in scenarios where you need to handle highly dynamic or unpredictable data structures.
Let’s convert our request and response for the search endpoint.
We can create classes to validate field types, set default values, define enums, lists, etc. We are going to create classes for the user request and the Elasticsearch response by applying some of these concepts.
Now, the user just needs to send the search term, and optionally the results limit, and it will get back a list of hits with owner_name and visit_details.
# Pydantic classes

# Pydantic class for the request
class SearchRequest(BaseModel):
    term: str
    size: int = 10

# Pydantic class for the response
class SearchResponse(BaseModel):
    hits: List[SearchHit]
    total: int

# Class to format for hits
class SearchHit(BaseModel):
    owner_name: str = ""
    visit_details: str = ""
Now the endpoint is much simpler for the user, and more secure for us because the user can only control a portion of the query and not all of it.
@app.post("/search", response_model=SearchResponse)
async def search_v3(request: SearchRequest):
    try:
        query = {
            "query": {"match_phrase": {"visit_details": request.term}},
            "size": request.size,
        }

        result = await es_client.search(index=ES_INDEX, body=query)
        hits = result["hits"]["hits"]
        results = []

        for hit in hits:
            source = hit.get("_source", {})
            results.append(
                SearchHit(
                    owner_name=source["owner_name"],
                    visit_details=source["visit_details"],
                )
            )

        return SearchResponse(hits=results, total=len(results))
    except Exception as e:
        status_code = getattr(e, "status_code", 500)

        raise HTTPException(status_code=status_code, detail=str(e))
Giving the user total access to the _search query body is considered a security risk because a malicious user could produce a query that overwhelms the cluster. With this approach, the user can only set what’s inside the match phrase clause, making the endpoint more secure.
Same with the response. We can send a cleaner version of the result, hiding fields like _id, _score, _index, etc.
Request:
curl -X POST "http://localhost:8000/search" \
  -H "Content-Type: application/json" \
  -d '{"term": "dental cleaning"}'
Response:
{"hits":[{"owner_name":"Leo Martínez","visit_details":"Dental cleaning. Minor tartar buildup removed."}],"total":1}Background tasks
Another FastAPI feature we can leverage with Elasticsearch is background tasks. With background tasks, you can return something instantly to the user while continuing to execute the task in the background. This feature is especially useful for long-running tasks.
In Elasticsearch, we use the wait_for_completion=false parameter to get the task ID and close the connection instead of waiting for the task to finish. We can use the tasks API to check the task status. Some examples are _reindex, _update_by_query, and _delete_by_query.
Imagine you want to give your users a way to trigger a delete operation of a couple of million documents based on a field value and notify them when it finishes. You can achieve this by using FastAPI background tasks and Elasticsearch’s wait_for_completion.
We start by creating a function to check the tasks API every 2 seconds.
async def check_task(es_client, task_id):
    try:
        while True:
            status = await es_client.tasks.get(task_id=task_id)
            if status.get("completed", False):
                print(f"Task {task_id} completed.")
                # Here you can add the logic to send the notification
                break
            await asyncio.sleep(2)
    except Exception as e:
        print(f"Error checking task {task_id}: {e}")
Now, we can create the endpoint that receives the value we want to use as a filter to delete the documents. Call the _delete_by_query API with wait_for_completion=false and use the task id we get back to create a background task that calls our check_task method.
The first parameter of background_tasks.add_task is the function we want to execute, and the rest of the parameters are the ones that the invoked function uses.
# Background task endpoint
@app.post("/delete-by-query")
async def delete_by_query(
    request: SearchRequest = Body(...), background_tasks: BackgroundTasks = None
):
    try:
        body = {"query": {"term": {"pet_name.keyword": request.term}}}

        response = await es_client.delete_by_query(
            index=ES_INDEX, body=body, wait_for_completion=False
        )

        task_id = response.get("task")
        if task_id:
            background_tasks.add_task(check_task, es_async_client, task_id)

        return Response(
            status_code=200,
            content=json.dumps(
                {
                    "message": "Delete by query. The response will be send by email when the task is completed.",
                    "task_id": task_id,
                }
            ),
            media_type="application/json",
        )
    except Exception as e:
        status_code = getattr(e, "status_code", 500)

        raise HTTPException(status_code=status_code, detail=str(e))
This is how you remove all the documents containing “Buddy” in the pet_name.keyword field:
curl -X POST "http://localhost:8000/delete-by-query" \
  -H "Content-Type: application/json" \
  -d '{"term": "Buddy"}'
Response:
{"message": "Delete by query. The response will be send by email when the task is completed.", "task_id": "191ALShERbucSkcFTGpOCg:34822095"}Backend logs:
INFO:     127.0.0.1:58804 - "POST /delete-by-query HTTP/1.1" 200 OK
Task 191ALShERbucSkcFTGpOCg:34822095 completed.
Run API
Add the following block to expose the server to port 8000:
if __name__ == "__main__":
    uvicorn.run(app, host="0.0.0.0", port=8000)
Run the FastAPI application with the following command:
uvicorn app:app --reloadConclusion
FastAPI makes it simple to build a safe and clean API layer for Elasticsearch. With type checks, async support, and background tasks out of the box, you can handle common use cases without much overhead.
These examples are just a starting point—expand them with auth, pagination, or even websockets as needed. The key is to keep your cluster safe and your API clear and easy to maintain.
Ready to try this out on your own? Start a free trial.
Want to get Elastic certified? Find out when the next Elasticsearch Engineer training is running!
Related content

October 15, 2025
Training LTR models in Elasticsearch with judgement lists based on user behavior data
Learn how to use UBI data to create judgment lists to automate the training of your Learning to Rank (LTR) models in Elasticsearch.

September 19, 2025
Using TwelveLabs’ Marengo video embedding model with Amazon Bedrock and Elasticsearch
Creating a small app to search video embeddings from TwelveLabs' Marengo model.
Using LangExtract and Elasticsearch
Learn how to extract structured data from free-form text using LangExtract and store it as fields in Elasticsearch.

Introducing the ES|QL query builder for the Python Elasticsearch Client
Learn how to use the ES|QL query builder, a new Python Elasticsearch client feature that makes it easier to construct ES|QL queries using a familiar Python syntax.
Evaluating your Elasticsearch LLM applications with Ragas
Assessing the quality of a RAG solution using Ragas metrics and Elasticsearch.