WebSockets is a simultaneous bi-directional communication protocol. The idea is that the client and server can maintain a connection open while sending messages to each other, keeping latency as low as possible. This approach is common in real-time applications like chats, activity notifications, or trading platforms, where latency is key and there is a constant exchange of information.
Imagine that you created a messaging app and want to notify users when they receive a new message. You could poll the server by sending an HTTP request every 5 or 10 seconds until there are new messages, or you could keep a WebSockets connection open and let the server push an event that the client listens for, displaying a notifications badge as soon as the message arrives.
In this scenario, Elasticsearch enables fast and flexible search across datasets, making it ideal for real-time applications where users need immediate results.
In this article, we will create a real-time application using FastAPI's WebSockets feature and Elasticsearch.
Prerequisites
- Python version 3.x
- An Elasticsearch instance (self-hosted or on Elastic Cloud)
- An Elasticsearch API key with write permissions
All the code used for this blog post can be found here.
Use case
To show you how to use WebSockets with FastAPI and Elasticsearch, we’ll use a use case where you, as a store owner, want to notify all your users when a certain query is executed to capture their attention. This simulates real-time engagement in search-driven applications, such as promotional campaigns or product interest alerts.
For this use case, we’ll build an application where a customer can search for products and receive notifications when other users perform searches included on a watchlist.
User A searches for “Kindle,” and user B receives a notification in real time.
Ingesting data
In this section, we’ll create the index mappings and ingest the necessary data using a Python script. You can find the following script in the blog post repository.
Ingest script
Create a new file named ingest_data.py that will contain the Python logic for handling data ingestion.
Install the Elasticsearch library to handle requests to Elasticsearch:
pip install elasticsearch -qNow import the dependencies and initialize the Elasticsearch client using an API key and an Elasticsearch endpoint URL.
import json
import os

from elasticsearch import Elasticsearch

es_client = Elasticsearch(
    hosts=[os.environ["ELASTICSEARCH_ENDPOINT"]],
    api_key=os.environ["ELASTICSEARCH_API_KEY"],
)
Create a method to set up the index mappings under the name “products”.
PRODUCTS_INDEX = "products"

def create_products_index():
    try:
        mapping = {
            "mappings": {
                "properties": {
                    "product_name": {"type": "text"},
                    "price": {"type": "float"},
                    "description": {"type": "text"},
                }
            }
        }

        es_client.indices.create(index=PRODUCTS_INDEX, body=mapping)
        print(f"Index {PRODUCTS_INDEX} created successfully")
    except Exception as e:
        print(f"Error creating index: {e}")
Now load the product documents using the bulk API to push them into Elasticsearch. The data will be in an NDJSON file located in the project repository.
def load_products_from_ndjson():
    try:
        if not os.path.exists("products.ndjson"):
            print("Error: products.ndjson file not found!")
            return

        products_loaded = 0
        with open("products.ndjson", "r") as f:
            for line in f:
                if line.strip():
                    product_data = json.loads(line.strip())
                    es_client.index(index=PRODUCTS_INDEX, body=product_data)
                    products_loaded += 1

        print(f"Successfully loaded {products_loaded} products into Elasticsearch")

    except Exception as e:
        print(f"Error loading products: {e}")
Finally, call the methods created.
if __name__ == "__main__":
    create_products_index()
    load_products_from_ndjson()
Run the script using the following command in your terminal.
python ingest_data.pyWith that done, let’s continue building the app.
Index products created successfully
Successfully loaded 25 products into Elasticsearch
WebSockets app
The application's aesthetic will be simplified to improve readability. The full application repository is available here.

The diagram shows a high-level overview of how the WebSocket app interacts with Elasticsearch and multiple users.
App structure
|-- websockets_elasticsearch_app
|-- inegst_data.py
|-- index.html
|-- main.py
Install and import dependencies
Install FastAPI and WebSocket support. Uvicorn will serve as the local server, Pydantic is used to define data models, and the Elasticsearch client allows the script to connect to the cluster and send data.
pip install websockets fastapi pydantic uvicorn -qFastAPI provides easy-to-use, lightweight, and high-performance tools to build a web application, while Uvicorn serves as the ASGI server to run it. Pydantic is used internally by FastAPI for data validation and parsing, making it easier to define structured data. WebSockets provides the low-level protocol support needed to enable real-time, bidirectional communication between the server and clients. The Elasticsearch Python library was installed earlier and will be used in this application to handle data retrieval.
Now, import the necessary libraries to build the backend.
import json
import os
import uvicorn
from datetime import datetime
from typing import Dict, List

from elasticsearch import Elasticsearch
from fastapi import FastAPI, HTTPException, WebSocket, WebSocketDisconnect
from fastapi.responses import FileResponse
from pydantic import BaseModel, Field
Elasticsearch client
Define the environment variables for the Elasticsearch endpoint and API key, and instantiate an Elasticsearch client to handle the connection to your Elasticsearch cluster.
os.environ["ELASTICSEARCH_ENDPOINT"] = getpass(
    "Insert the Elasticsearch endpoint here: "
)
os.environ["ELASTICSEARCH_API_KEY"] = getpass("Insert the Elasticsearch API key here: ")


es_client = Elasticsearch(
    hosts=[os.environ["ELASTICSEARCH_ENDPOINT"]],
    api_key=os.environ["ELASTICSEARCH_API_KEY"],
)

PRODUCTS_INDEX = "products"
Data models and app setup
Now it’s time to create the FastAPI instance, which will handle both REST API and WebSocket routes. Then, we’ll define a few data models using Pydantic.
- The
Productmodel describes what each product looks like. - The
SearchNotificationmodel shapes the message we’ll send to other users. - The
SearchResponsedefines how the Elasticsearch results will be returned.
These models help keep things consistent and readable across the app and provide data validation, default values, and autocomplete in our code IDE.
app = FastAPI(title="Elasticsearch - FastAPI with websockets")

class Product(BaseModel):
    product_name: str
    price: float
    description: str


class SearchNotification(BaseModel):
    session_id: str
    query: str
    timestamp: datetime = Field(default_factory=datetime.now)


class SearchResponse(BaseModel):
    query: str
    results: List[Dict]
    total: int
WebSockets endpoint setup
When a user connects to the /ws endpoint, the WebSocket connection is kept open and added to a global list. This allows the server to broadcast messages to all connected clients instantly. If a user disconnects, their connection is removed.
# Store active WebSocket connections
connections: List[WebSocket] = []


@app.websocket("/ws")
async def websocket_endpoint(websocket: WebSocket):
    await websocket.accept()
    connections.append(websocket)
    print(f"Client connected. Total connections: {len(connections)}")

    try:
        while True:
            await websocket.receive_text()

    except WebSocketDisconnect:
        connections.remove(websocket)
        print(f"Client disconnected. Total connections: {len(connections)}")
Search endpoint
Now let's review the code where the real-time interaction happens.
When a user performs a search, Elasticsearch is queried and the results are returned. At the same time, if the query is on the global watchlist, all other connected users are notified that someone has found one of those products. The notification includes the query.
The session_id param is used to avoid sending the notification back to the user who initiated the search.
@app.get("/search")
async def search_products(q: str, session_id: str = "unknown"):
    # List of search terms that should trigger a notification
    WATCH_LIST = ["iphone", "kindle"]

    try:
        query_body = {
            "query": {
                "bool": {
                    "should": [
                        {"match": {"product_name": q}},
                        {"match_phrase": {"description": q}},
                    ],
                    "minimum_should_match": 1,
                }
            },
            "size": 20,
        }

        response = es_client.search(index=PRODUCTS_INDEX, body=query_body)

        results = []
        for hit in response["hits"]["hits"]:
            product = hit["_source"]
            product["score"] = hit["_score"]
            results.append(product)

        results_count = response["hits"]["total"]["value"]

        # Only send notification if the search term matches
        if q.lower() in WATCH_LIST:
            notification = SearchNotification(
                session_id=session_id, query=q, results_count=results_count
            )

            for connection in connections.copy():
                try:
                    await connection.send_text(
                        json.dumps(
                            {
                                "type": "search",
                                "session_id": session_id,
                                "query": q,
                                "timestamp": notification.timestamp.isoformat(),
                            }
                        )
                    )
                except:
                    connections.remove(connection)

        return SearchResponse(query=q, results=results, total=results_count)

    except Exception as e:
        status_code = getattr(e, "status_code", 500)
        return HTTPException(status_code=status_code, detail=str(e))
Note: The session_id is based on the current timestamp just for simplicity—in production, you'd want something more robust.
Client-side
To show the application flow, create a frontend using a simple HTML page with a search input, a results area, and a dialog box for notifications.
<!DOCTYPE html>
<html lang="en">
  <body>
    <h1>🛍️ TechStore - Find Your Perfect Product</h1>

    <form onsubmit="event.preventDefault(); searchProducts();">
      <p>
        <label for="searchQuery">Search Products:</label><br />
        <input
          type="text"
          id="searchQuery"
          placeholder="Search for phones, laptops, headphones..."
          size="50"
          required />
        <button type="submit">🔍 Search</button>
      </p>
    </form>

    <!-- HTML Dialog for notifications -->
    <dialog id="notificationDialog">
      <div>
        <h2>🔔 Live Search Activity</h2>
        <p id="notificationMessage"></p>
        <p>
          <button onclick="closeNotification()" autofocus>OK</button>
        </p>
      </div>
    </dialog>

    <div id="searchResults">
      <h2>Search Results</h2>
    </div>

    <script>
     ...
    </script>
  </body>
</html>
The notification uses a <dialog> element for demo purposes, but in a real application, you’d likely show a toast or a small badge instead. In real-world scenarios, this type of notification can be used to show how many users are searching for certain products, provide real-time updates on remaining stock, or highlight popular search queries that are returning successful results.
Script tag
Within the <script> tags, include the logic that connects the frontend to the WebSocket endpoint on the backend. Let’s take a look at the code snippet below.
let ws = null;
let sessionId = null;


window.onload = function () {
  sessionId = "session_" + Date.now();
  connectWebSocket();
};
When the page loads, it generates a unique session ID and connects to the WebSocket.
function connectWebSocket() {
  ws = new WebSocket("ws://localhost:8000/ws");

  ws.onopen = function () {
    console.log("Connected to WebSocket");
  };

  ws.onmessage = function (event) {
    try {
      const notification = JSON.parse(event.data);
      if (notification.type === "search") {
        showSearchNotification(notification);
      }
    } catch (error) {
      console.error("Error parsing notification:", error);
    }
  };

  ws.onclose = function () {
    console.log("Disconnected from WebSocket");
  };

  ws.onerror = function (error) {
    console.error("WebSocket error:", error);
  };
}
The function connectWebSocket establishes the WebSocket connection using the line `ws = new WebSocket("ws://localhost:8000/ws"). The statement ws.onopen notifies the backend that a new connection has been created. Then, ws.onmessage listens for notifications from other users who are searching for something in the store.
function showSearchNotification(notification) {
   // Skip notifications from the same session (same browser window)
   if (notification.session_id === sessionId) {
      return;
   }

  const dialog = document.getElementById("notificationDialog");
  const messageElement = document.getElementById("notificationMessage");

  messageElement.innerHTML = `<p><strong>Hot search alert!</strong> Other users are looking for <em>"${notification.query}"</em> right now.</p>`;

  // Show the notification dialog
  dialog.showModal();
}

function closeNotification() {
  const dialog = document.getElementById("notificationDialog");
  dialog.close();
}
The function showSearchNotification displays the notification received via WebSockets on the screen, while the closeNotification function is used to close the message shown by showSearchNotification.
async function searchProducts() {
    const query = document.getElementById("searchQuery").value.trim();

    const response = await fetch(
            `/search?q=${encodeURIComponent(
              query
            )}&session_id=${encodeURIComponent(sessionId)}`
          );
    const data = await response.json();

    if (response.ok) {
      displaySearchResults(data);
    } else {
      throw new Error(data.error || "Search failed");
    }
}

function displaySearchResults(data) {
  const resultsDiv = document.getElementById("searchResults");

  let html = `<h2>Found ${data.total} products for "${data.query}"</h2>`;

  data.results.forEach((product) => {
    html += `
                    <ul>
  <li><strong>${product.product_name}</strong></li>
  <li>💰 $${product.price.toFixed(2)}</li>
  <li>${product.description}</li>
</ul>
                `;
  });

  resultsDiv.innerHTML = html;
}
The searchProducts() function sends the user’s query to the backend and updates the results area with the matching products by calling the displaySearchResults function.
Render the view and main method
Finally, render the HTML page when the app is accessed in the browser and start the server.
@app.get("/")
async def get_main_page():
    return FileResponse("index.html")

if __name__ == "__main__":
    uvicorn.run(app, host="0.0.0.0", port=8000)
Run the application
Run the FastAPI app using uvicorn.
uvicorn main:app --host 0.0.0.0 --port 8000Now the app is live!
INFO:     Started server process [61820]
INFO:     Waiting for application startup.
INFO:     Application startup complete.
Testing the application
Go to localhost:8000/ to render the view of the application and observe what happens in the console:
INFO:     127.0.0.1:53422 - "GET / HTTP/1.1" 200 OK
INFO:     ('127.0.0.1', 53425) - "WebSocket /ws" [accepted]
Client connected. Total connections: 1
INFO:     connection open
When a view is opened, the server receives one WebSocket connection. There will be one additional connection for each new page opened. For example, if you open the page in three different browser tabs, you’ll see three connections in the console:
INFO:     ('127.0.0.1', 53503) - "WebSocket /ws" [accepted]
Client connected. Total connections: 2
INFO:     connection open
INFO:     ('127.0.0.1', 53511) - "WebSocket /ws" [accepted]
Client connected. Total connections: 3
INFO:     connection open
If you close one tab, the corresponding connection is closed:
Client disconnected. Total connections: 2
INFO:     connection closed
With multiple active client connections, when one user searches for a product and if the term is on the watchlist, the notification will be received by the other connected clients in real-time.

An optional step is to apply some styles using Tailwind. This improves the UI and gives it a modern, visually appealing look. The full code with the updated UI can be found here.
Conclusion
In this article, we learned how to create real-time notifications based on search using Elasticsearch and FastAPI. We selected a fixed list of products to notify about, but you can explore more custom flows where users can choose their own products or queries to be notified about—or even configure notifications based on product specifications using Elasticsearch's percolate query.
We also experimented with a single pool of users who got notified. With WebSockets, you can choose to broadcast to all users or select specific users. A common pattern is defining “groups” of messages that users can subscribe to, just like group chats.
Ready to try this out on your own? Start a free trial.
Want to get Elastic certified? Find out when the next Elasticsearch Engineer training is running!
Related content

October 15, 2025
Training LTR models in Elasticsearch with judgement lists based on user behavior data
Learn how to use UBI data to create judgment lists to automate the training of your Learning to Rank (LTR) models in Elasticsearch.
September 19, 2025
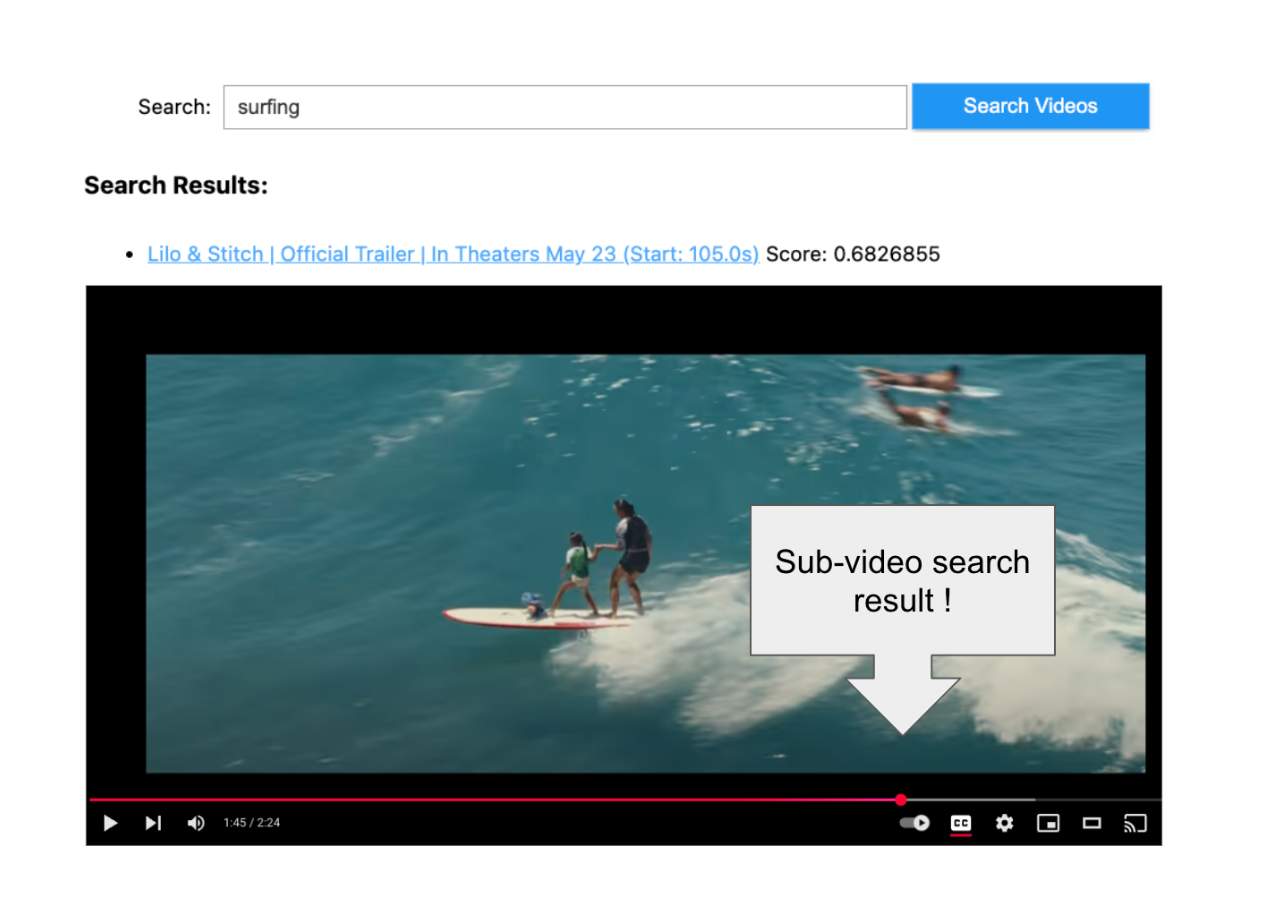
Using TwelveLabs’ Marengo video embedding model with Amazon Bedrock and Elasticsearch
Creating a small app to search video embeddings from TwelveLabs' Marengo model.
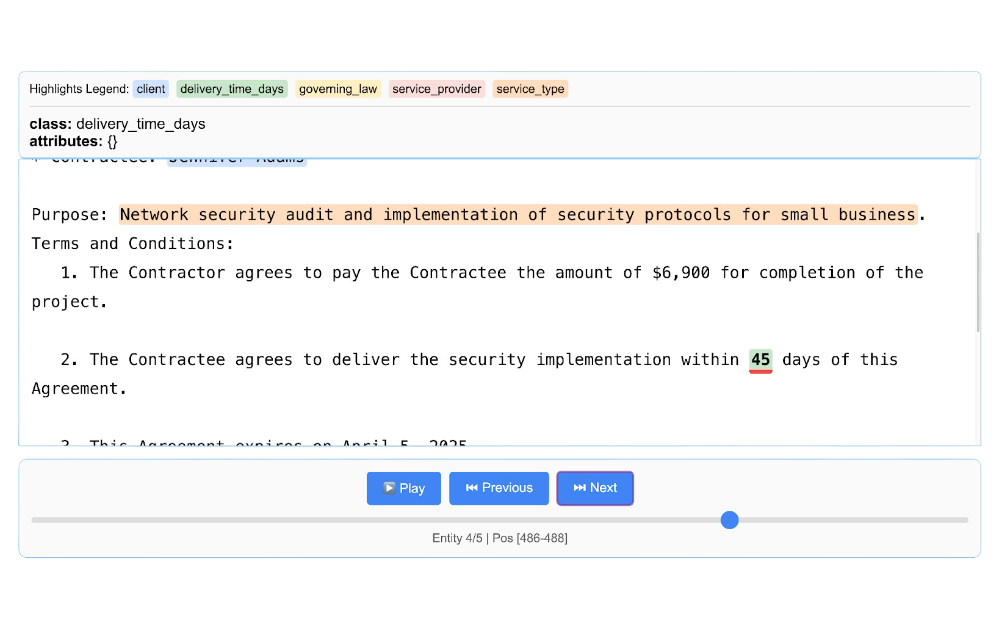
Using LangExtract and Elasticsearch
Learn how to extract structured data from free-form text using LangExtract and store it as fields in Elasticsearch.

Introducing the ES|QL query builder for the Python Elasticsearch Client
Learn how to use the ES|QL query builder, a new Python Elasticsearch client feature that makes it easier to construct ES|QL queries using a familiar Python syntax.
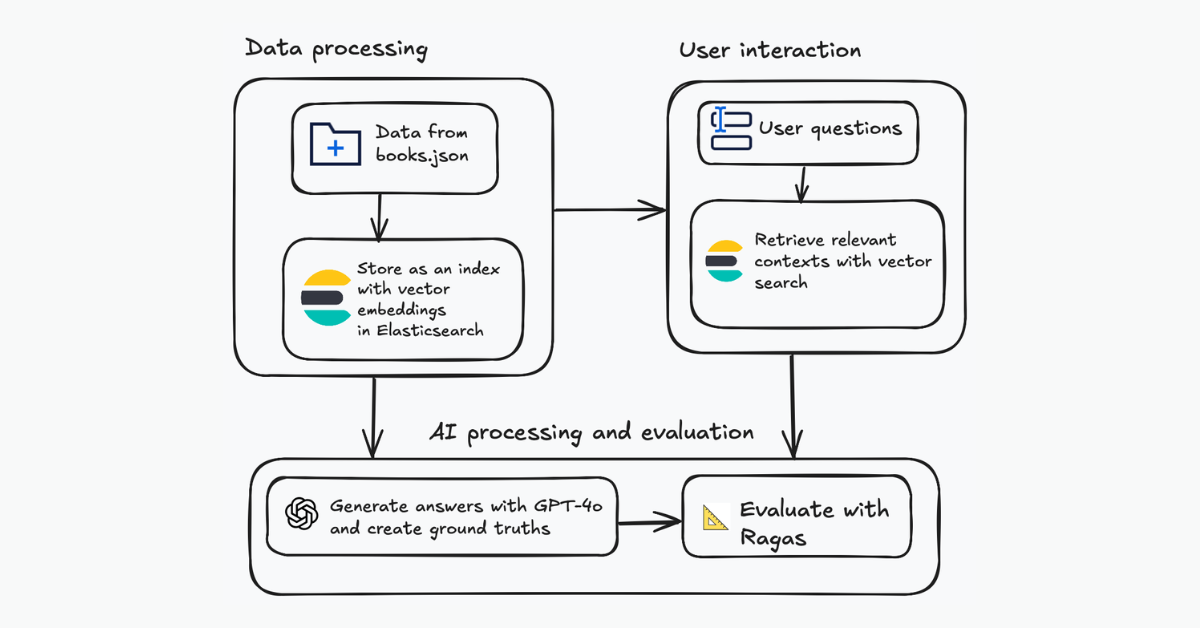
Evaluating your Elasticsearch LLM applications with Ragas
Assessing the quality of a RAG solution using Ragas metrics and Elasticsearch.