Background
An index inside Elasticsearch is where you can store your data in documents. While working with an index, the data can quickly grow old if you are working with a dynamic dataset. To avoid this issue, you can create a Python script to update your index and deploy it using Google Cloud Platform's (GCP) Cloud Functions and Cloud Scheduler in order to keep your index up-to-date automatically.
To keep your index current, you can first set up a Jupyter Notebook to test locally and create a framework of a script that will update your index if new information is present. You can adjust your script to make it more reusable and run it as a Cloud Function. With Cloud Scheduler, you can set the code in your Cloud Function to run on a schedule using a cron-type format.
Prerequisites for automating index updates
- This example uses Elasticsearch version 8.12; if you are new, check out our Quick Start on Elasticsearch.
- Download the latest version of Python if you don't have it installed on your machine. This example utilizes Python 3.12.1.
- An API key for NASA's APIs.
- You will use the Requests package to connect to a NASA API, Pandas to manipulate data, the Elasticsearch Python Client to load data into an index and keep it up to date, and Jupyter Notebooks to work with your data interactively while testing. You can run the following line to install these required packages:
pip3 install requests pandas elasticsearch notebookLoading and updating your dataset
Before you can run your update script inside of GCP, you will want to upload your data and test the process you will use to keep your script updated. You will first connect to data from an API, save it as a Pandas DataFrame, connect to Elasticsearch, upload the DataFrame into an index, check to see when the index is last updated, and update it if new data is available. You can find the complete code of this section in this search labs notebook.
Loading your data
Let's start testing locally with a Jupyter Notebook to work with your data interactively. To do so, you can run the following in your terminal.
jupyter notebookIn the right-hand corner, you can select where it says “New” to create a new Jupyter Notebook.
First, you will need to import the packages you will be using. You will import all the packages you installed earlier, plus getpass to work with secrets such as API keys and datetime to work with date objects.
import requests
from getpass import getpass
import pandas as pd
from datetime import datetime, timedelta
from elasticsearch import Elasticsearch, helpers
The dataset you will use is Near Earth Object Web Service (NeoWs), a RESTful web service that provides near-earth Asteroid information. This dataset lets you search for asteroids based on their closest approach date to Earth, look up a specific asteroid, and browse the overall dataset.
With the following function, you can connect to NASA's NeoWs API, get data from the past week, and convert your response to a JSON object.
def connect_to_nasa():
    url = "https://api.nasa.gov/neo/rest/v1/feed"
    nasa_api_key = getpass("NASA API Key: ")
    today = datetime.now()
    params = {
        "api_key": nasa_api_key,
        "start_date": today - timedelta(days=7),
        "end_date": datetime.now(),
    }
    return requests.get(url, params).json()
Now, you can save the results of your API call to a variable called response.
response = connect_to_nasa()To convert the JSON object into a pandas DataFrame, you must normalize the nested objects into one DataFrame and drop the column containing the nested JSON.
def create_df(response):
    all_objects = []
    for date, objects in response["near_earth_objects"].items():
        for obj in objects:
            obj["close_approach_date"] = date
            all_objects.append(obj)
    df = pd.json_normalize(all_objects)
    return df.drop("close_approach_data", axis=1)
To call this function and view the first five rows of your dataset, you can run the following:
df = create_df(response)
df.head()
Connecting to Elasticsearch
You can access Elasticsearch from the Python Client by providing your Elastic Cloud ID and API key for authentication.
def connect_to_elastic():
    elastic_cloud_id = getpass("Elastic Cloud ID: ")
    elastic_api_key = getpass("Elastic API Key: ")
    return Elasticsearch(cloud_id=elastic_cloud_id, api_key=elastic_api_key)
Now, you can save the results of your connection function to a variable called es.
es = connect_to_elastic()An index in Elasticsearch is the main container for your data. You can name your index called asteroid_data_set.
index_name = "asteroid_data_set"
es.indices.create(index=index_name)
The result you get back will look like the following:
ObjectApiResponse({'acknowledged': True, 'shards_acknowledged': True, 'index': 'asteroids_data'})Now, you can create a helper function that will allow you to convert your DataFrame to the correct format to upload into your index.
def doc_generator(df, index_name):
    for index, document in df.iterrows():
        yield {
            "_index": index_name,
            "_id": f"{document['id']}",
            "_source": document.to_dict(),
        }
Next, you can bulk upload the contents of your DataFrame into Elastic, calling the helper function you just created.
helpers.bulk(es, doc_generator(df, index_name))You should get a result that looks similar to the following, which tells you how many rows you’ve uploaded:
(146, [])When was the last time you updated your data?
Once you've uploaded data into Elastic, you can check the last time your index was updated and format the date so it can work with NASA API.
def updated_last(es, index_name):
    query = {
        "size": 0,
        "aggs": {"last_date": {"max": {"field": "close_approach_date"}}},
    }
    response = es.search(index=index_name, body=query)
    last_updated_date_string = response["aggregations"]["last_date"]["value_as_string"]
    datetime_obj = datetime.strptime(last_updated_date_string, "%Y-%m-%dT%H:%M:%S.%fZ")
    return datetime_obj.strftime("%Y-%m-%d")
You can save the date your index was last updated to a variable and print out the date.
last_update_date = updated_last(es, index_name)
print(last_update_date)
Updating your data
Now, you can create a function that checks to see if there is any new data since the last time the index was updated and the current date. If the object is valid and the data is not empty, it will update the index and let you know if there is no new data to update or if the DataFrame returns a type of None indicating that there may have been a problem.
def update_new_data(df, es, last_update_date, index_name):
    if isinstance(last_update_date, str):
        last_update_date = datetime.strptime(last_update_date, "%Y-%m-%d")

    last_update_date = pd.Timestamp(last_update_date).normalize()

    if not df.empty and "close_approach_date" in df.columns:
        df["close_approach_date"] = pd.to_datetime(df["close_approach_date"])

    today = pd.Timestamp(datetime.now().date()).normalize()

    if df is not None and not df.empty:
        update_range = df.loc[
            (df["close_approach_date"] > last_update_date)
            & (df["close_approach_date"] < today)
        ]
        if not update_range.empty:
            helpers.bulk(es, doc_generator(update_range, index_name))
        else:
            print("No new data to update.")
    else:
        print("The DataFrame is None.")
If the DataFrame is a valid object, it will call the function you wrote and update the index if applicable. It will also print out the date of the index's last update to help you debug if needed. If not, it will tell you there may be a problem.
try:
    if df is None:
        raise ValueError("DataFrame is None. There may be a problem.")
    update_new_data(df, es, last_update_date, index_name)
    print(updated_last(es, index_name))
except Exception as e:
    print(f"An error occurred: {e}")
Keeping your index current
Now that you've created a framework for local testing, you are ready to set up an environment where you can run your script daily to check to see if any new data is available and update your index accordingly.
Creating a Cloud Function
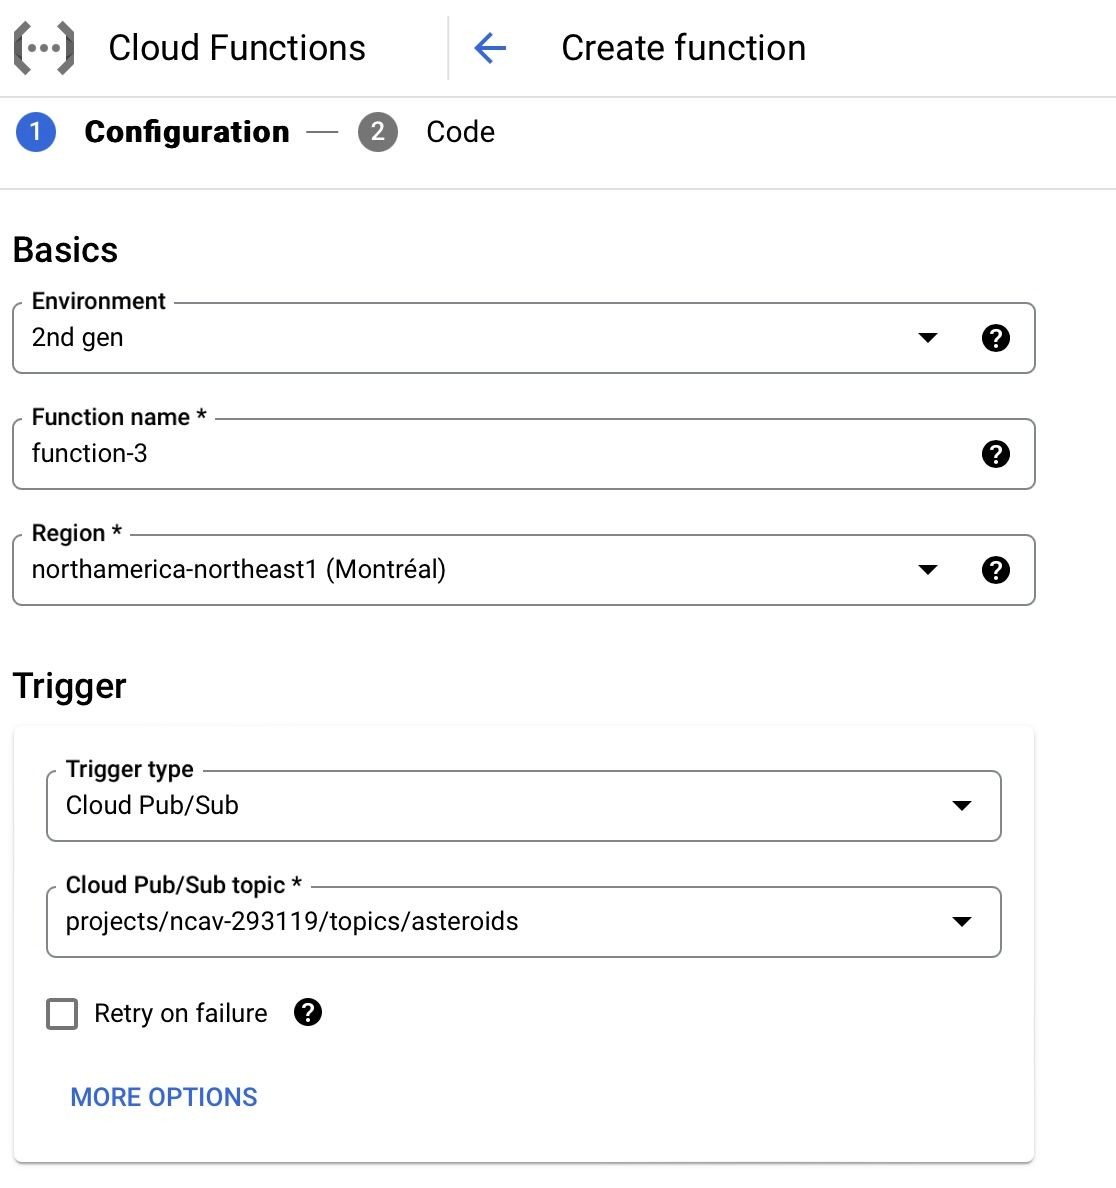
You are now ready to deploy your Cloud Function. To do so, you will want to select the environment as a 2nd gen function, name your function, and select a cloud region. You can also tie it to a Cloud Pub/Sub trigger and choose to create a new topic if you haven't made it already. You can check out the complete code for this section on GitHub.
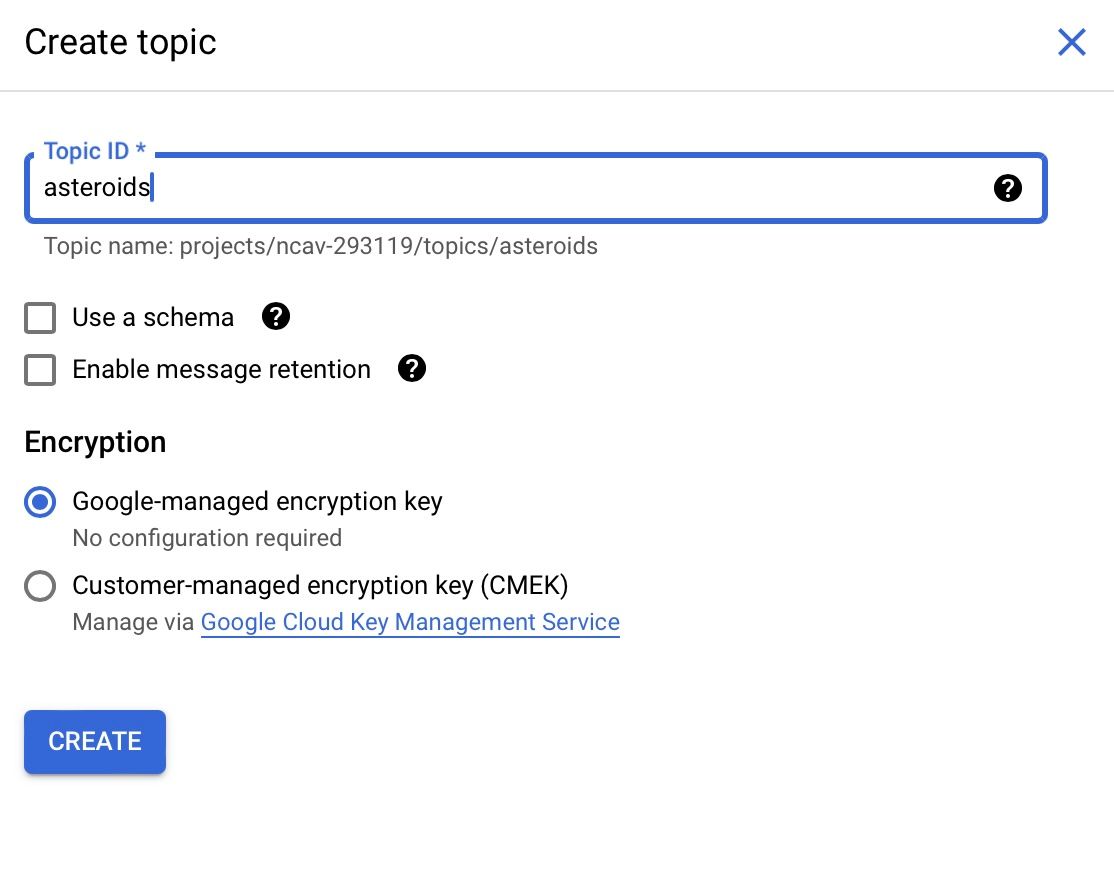
Creating a Pub/Sub topic
When creating a new topic, you can name your topic ID and select the encryption using a Google-managed encryption key.
Setting your Cloud Function's environment variables
Under where it says “Runtime environment variables,” you can add in the environment variables for your NASA_API_KEY, ELASTIC_CLOUD_ID, and ELASTIC_API_KEY. You will want to save these as the raw values without single quotes around them. So if you entered a value of 'xxxxlsdgzxxxxx' into your terminal earlier, you would want it to be xxxxlsdgzxxxxx.
Adjusting your code and adding it to your Cloud Function
After you enter your environment variables, you can press the button that says next, which will take you to a code editor. You will want to select the runtime of Python 3.12.1 or match the version of Python you are using. After that, update the entry point to update_index. The entry point serves a similar role to the main function in Python.
Instead of using getpass to retrieve secrets, you will want to use os to perform a more automated process. An example will look like the following:
elastic_cloud_id = os.getenv("ELASTIC_CLOUD_ID")
elastic_api_key = os.getenv("ELASTIC_API_KEY")
You will want to adjust the order of your script to have the function that connects to Elasticsearch first. Afterward, you will want to know when your index was last updated, connect to the NASA API you are using, save it to DataFrame, and load any new data that might be available.
You may notice a new function at the bottom called update_index that ties your code together. In this function, you define the name of your index, connect to Elastic, figure out the last date the index was updated, connect to the NASA API, save the results into a data frame, and update the index if needed. To indicate the entry point function is a cloud event, you can denote it with the decorator @functions_framework.cloud_event.
@functions_framework.cloud_event
def update_index(cloud_event):
    index_name = "asteroid_data_set"
    es = connect_to_elastic()
    last_update_date = updated_last(es, index_name)
    print(last_update_date)
    response = connect_to_nasa(last_update_date)
    df = create_df(response)
    if df is not None:
      update_new_data(df, es, last_update_date, index_name)
      print(updated_last(es, index_name))
    else:
      print("No new data was retrieved.")
Here is the full updated code sample:
import functions_framework
import requests
import os
import pandas as pd
from datetime import datetime
from elasticsearch import Elasticsearch, helpers


def connect_to_elastic():
    elastic_cloud_id = os.getenv("ELASTIC_CLOUD_ID")
    elastic_api_key = os.getenv("ELASTIC_API_KEY")
    return Elasticsearch(cloud_id=elastic_cloud_id, api_key=elastic_api_key)


def connect_to_nasa(last_update_date):
    url = "https://api.nasa.gov/neo/rest/v1/feed"
    nasa_api_key = os.getenv("NASA_API_KEY")
    params = {
        "api_key": nasa_api_key,
        "start_date": last_update_date,
        "end_date": datetime.now(),
    }
    return requests.get(url, params).json()


def create_df(response):
    all_objects = []
    for date, objects in response["near_earth_objects"].items():
        for obj in objects:
            obj["close_approach_date"] = date
            all_objects.append(obj)
    df = pd.json_normalize(all_objects)
    return df.drop("close_approach_data", axis=1)


def doc_generator(df, index_name):
    for index, document in df.iterrows():
        yield {
            "_index": index_name,
            "_id": f"{document['close_approach_date']}",
            "_source": document.to_dict(),
        }


def updated_last(es, index_name):
    query = {
        "size": 0,
        "aggs": {"last_date": {"max": {"field": "close_approach_date"}}},
    }
    response = es.search(index=index_name, body=query)
    last_updated_date_string = response["aggregations"]["last_date"]["value_as_string"]
    datetime_obj = datetime.strptime(last_updated_date_string, "%Y-%m-%dT%H:%M:%S.%fZ")
    return datetime_obj.strftime("%Y-%m-%d")


def update_new_data(df, es, last_update_date, index_name):
    if isinstance(last_update_date, str):
        last_update_date = datetime.strptime(last_update_date, "%Y-%m-%d")

    last_update_date = pd.Timestamp(last_update_date).normalize()

    if not df.empty and "close_approach_date" in df.columns:
        df["close_approach_date"] = pd.to_datetime(df["close_approach_date"])

    today = pd.Timestamp(datetime.now().date()).normalize()

    if df is not None and not df.empty:
        update_range = df.loc[
            (df["close_approach_date"] > last_update_date)
            & (df["close_approach_date"] < today)
        ]
        print(update_range)
        if not update_range.empty:
            helpers.bulk(es, doc_generator(update_range, index_name))
        else:
            print("No new data to update.")
    else:
        print("The DataFrame is empty or None.")


# Triggered from a message on a Cloud Pub/Sub topic.
@functions_framework.cloud_event
def hello_pubsub(cloud_event):
    index_name = "asteroid_data_set"
    es = connect_to_elastic()
    last_update_date = updated_last(es, index_name)
    print(last_update_date)
    response = connect_to_nasa(last_update_date)
    df = create_df(response)
    try:
        if df is None:
            raise ValueError("DataFrame is None. There may be a problem.")
        update_new_data(df, es, last_update_date, index_name)
        print(updated_last(es, index_name))
    except Exception as e:
        print(f"An error occurred: {e}")
Adding a requirements.txt file
You will also want to define a requirements.txt file with all the specified packages needed to run the code.
functions-framework==3.*
requests==2.31.0
elasticsearch==8.12.0
pandas==2.1.4
Scheduling your Cloud Function
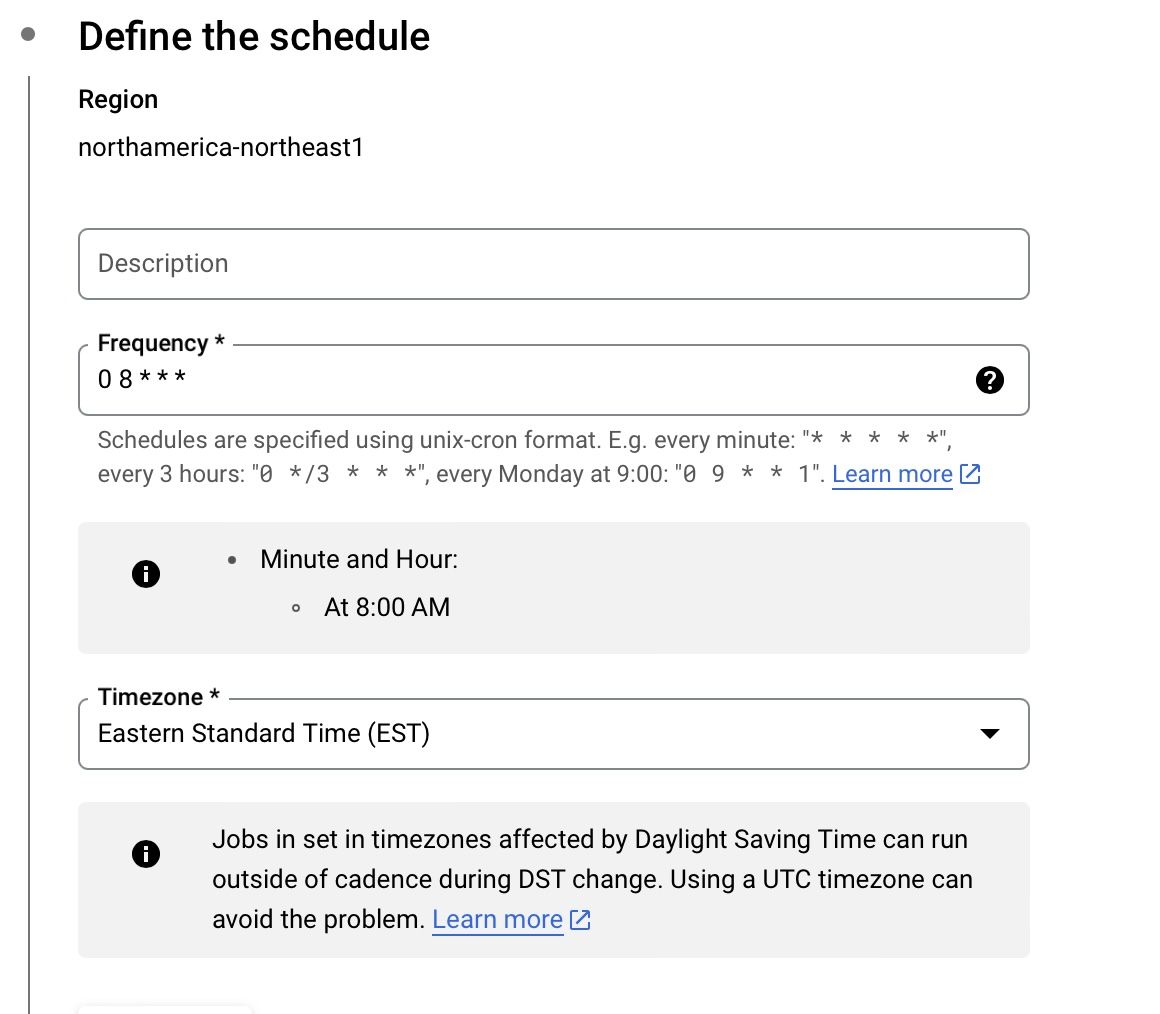
In Cloud Scheduler, you can set up your function to run at a regular interval using unix cron format. I have the code set to run every morning at 8 am in my timezone.
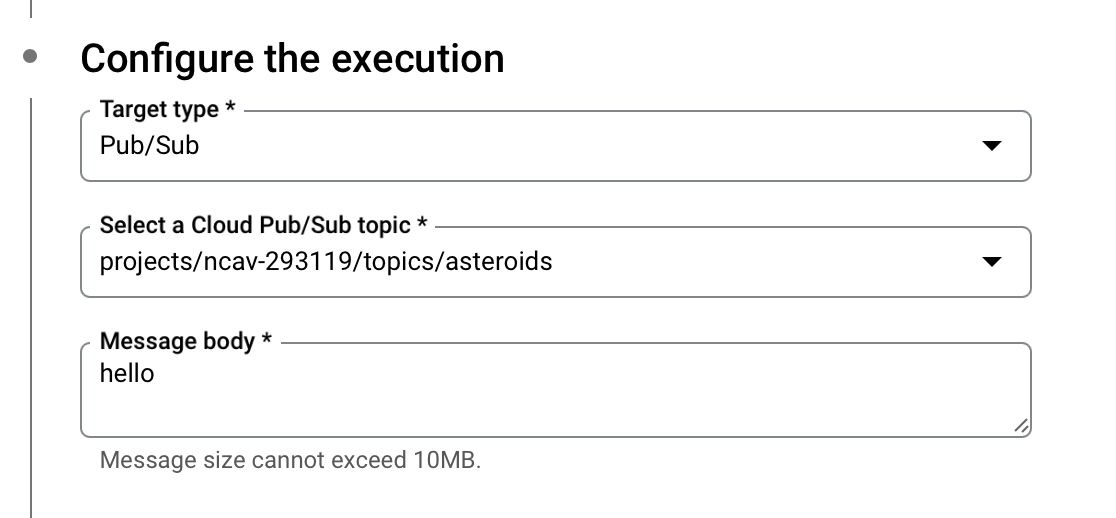
You will also want to configure the execution to connect to the Pub/Sub topic you created previously. I currently have the message body set to say “hello.”
Now that you have set up your Pub/Sub topic and your Cloud Function and set that Cloud Function to run on a schedule, your index should automatically update whenever new data is present.
Conclusion
Using Python, Google Cloud Platform Functions, and Google Cloud Scheduler you should be able to ensure that your index is updated regularly. You can find the complete code here and the search labs notebook for local testing. We are also running an on-demand webinar with Google Cloud which might be a good next step if you are looking to build search apps. Let us know if you built anything based on this blog or if you have questions on our Discuss forums and the community Slack channel.
Ready to try this out on your own? Start a free trial.
Want to get Elastic certified? Find out when the next Elasticsearch Engineer training is running!
Related content

October 15, 2025
Training LTR models in Elasticsearch with judgement lists based on user behavior data
Learn how to use UBI data to create judgment lists to automate the training of your Learning to Rank (LTR) models in Elasticsearch.

September 19, 2025
Using TwelveLabs’ Marengo video embedding model with Amazon Bedrock and Elasticsearch
Creating a small app to search video embeddings from TwelveLabs' Marengo model.
Using LangExtract and Elasticsearch
Learn how to extract structured data from free-form text using LangExtract and store it as fields in Elasticsearch.

Introducing the ES|QL query builder for the Python Elasticsearch Client
Learn how to use the ES|QL query builder, a new Python Elasticsearch client feature that makes it easier to construct ES|QL queries using a familiar Python syntax.
Evaluating your Elasticsearch LLM applications with Ragas
Assessing the quality of a RAG solution using Ragas metrics and Elasticsearch.