This idea came to me while in the midst of a heated, high-stakes fantasy basketball league. I wondered: Could I build an AI agent that would help me dominate my weekly matchups? Absolutely!
In this post, we’ll explore how to build an agentic RAG assistant using Mastra and a lightweight JavaScript web application to interact with it. By connecting this agent to Elasticsearch, we give it access to structured player data and the capability to run real-time statistical aggregations, in order to give you recommendations grounded in player statistics. Head over to the GitHub repo to follow along; the README provides instructions on how to clone and run the application on your own.
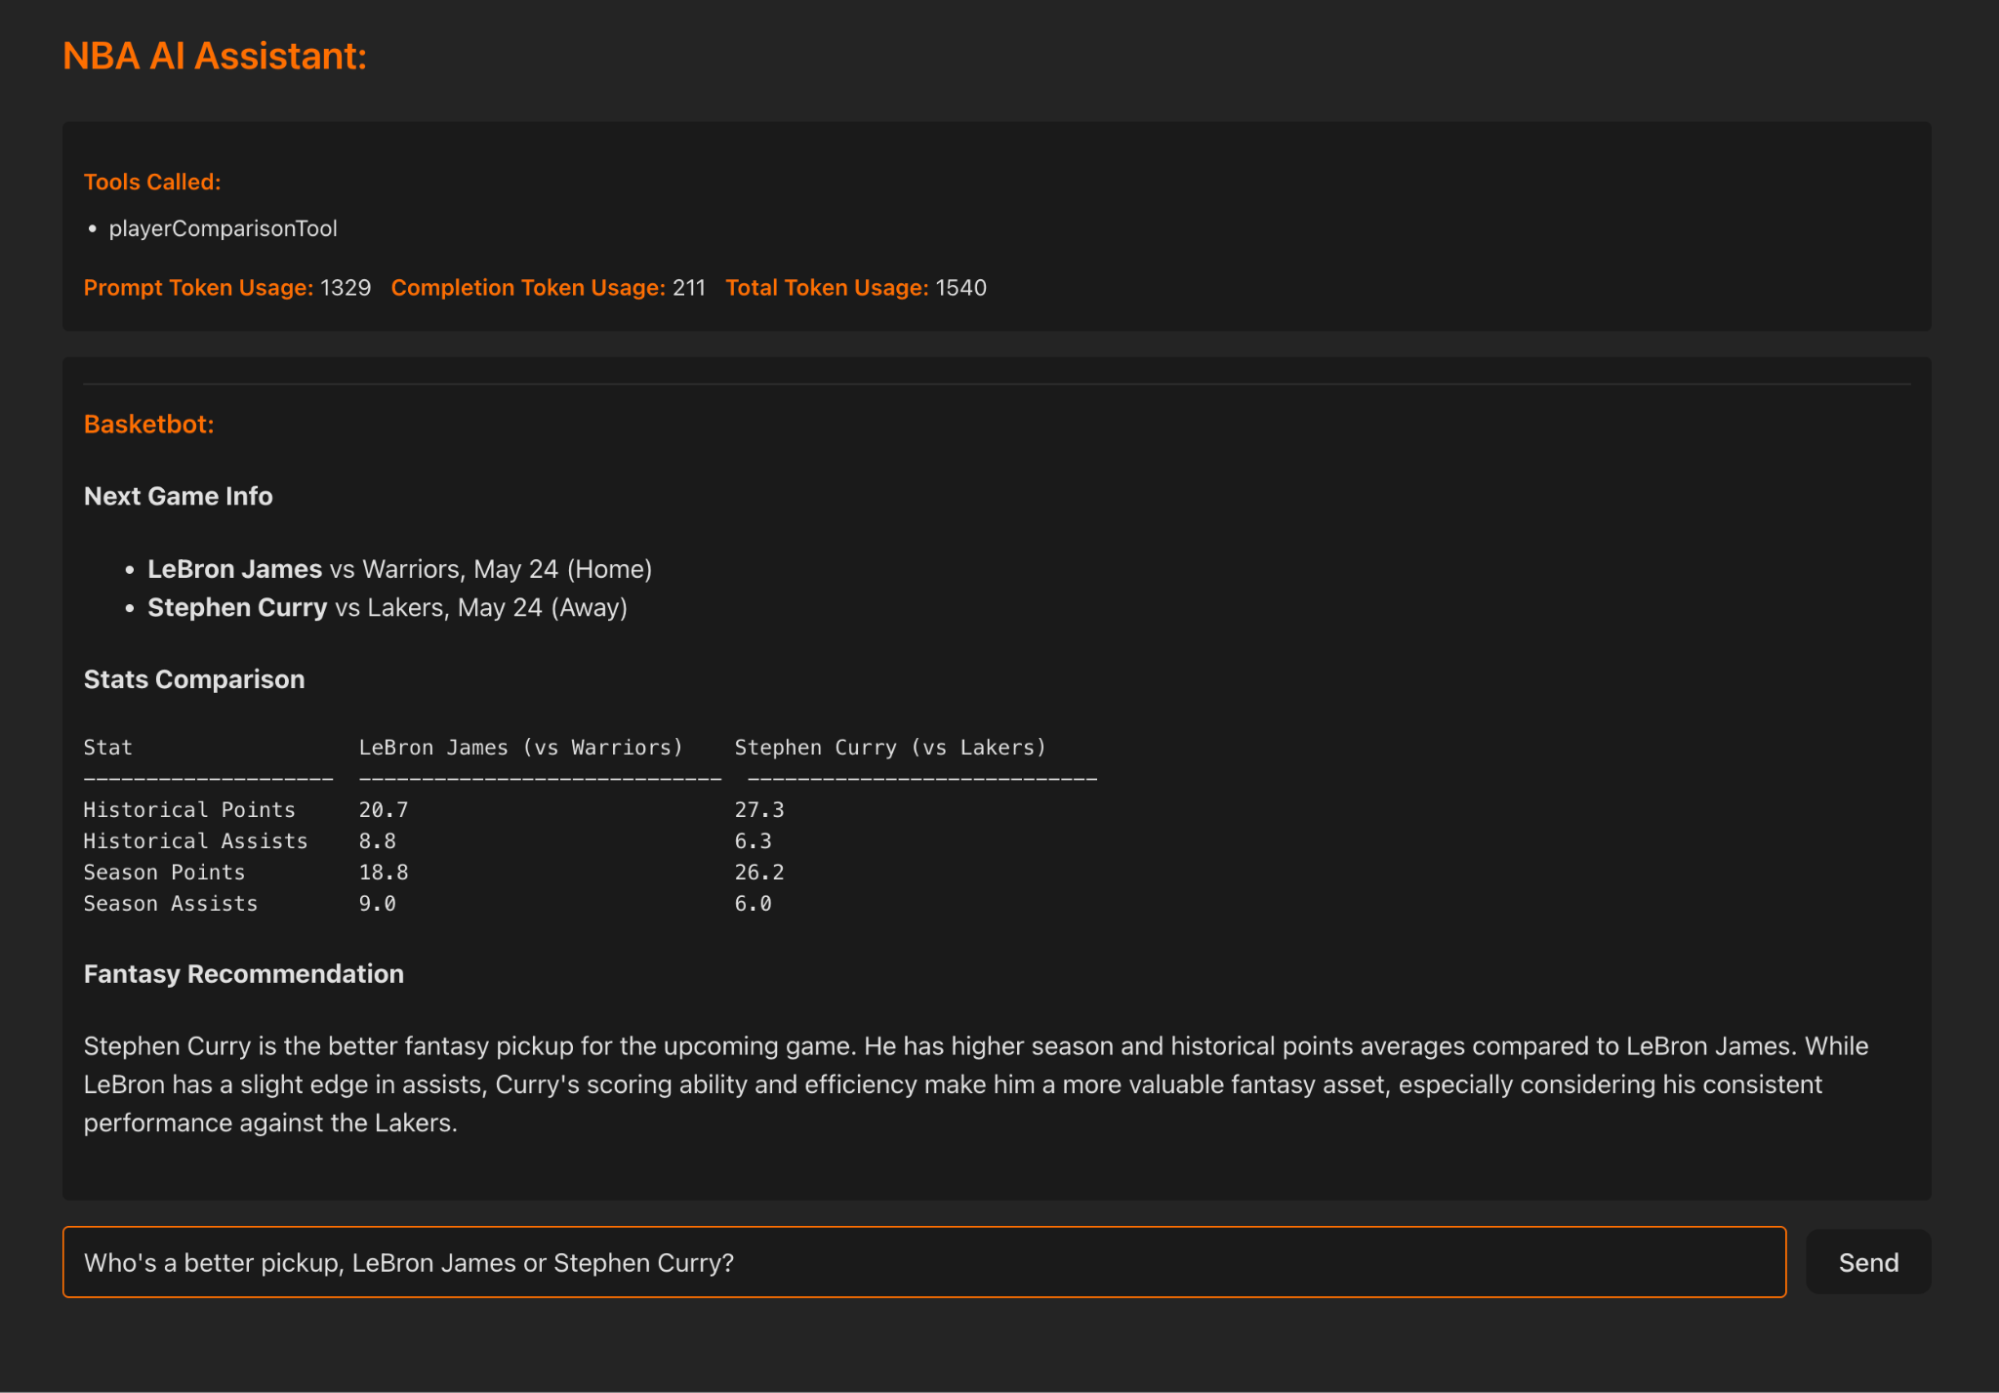
Here’s what it should look like when it’s all put together:
Note: This blog post builds upon “Building AI Agents with AI SDK and Elastic”. If you’re new to AI agents in general and what they could be used for, start there.
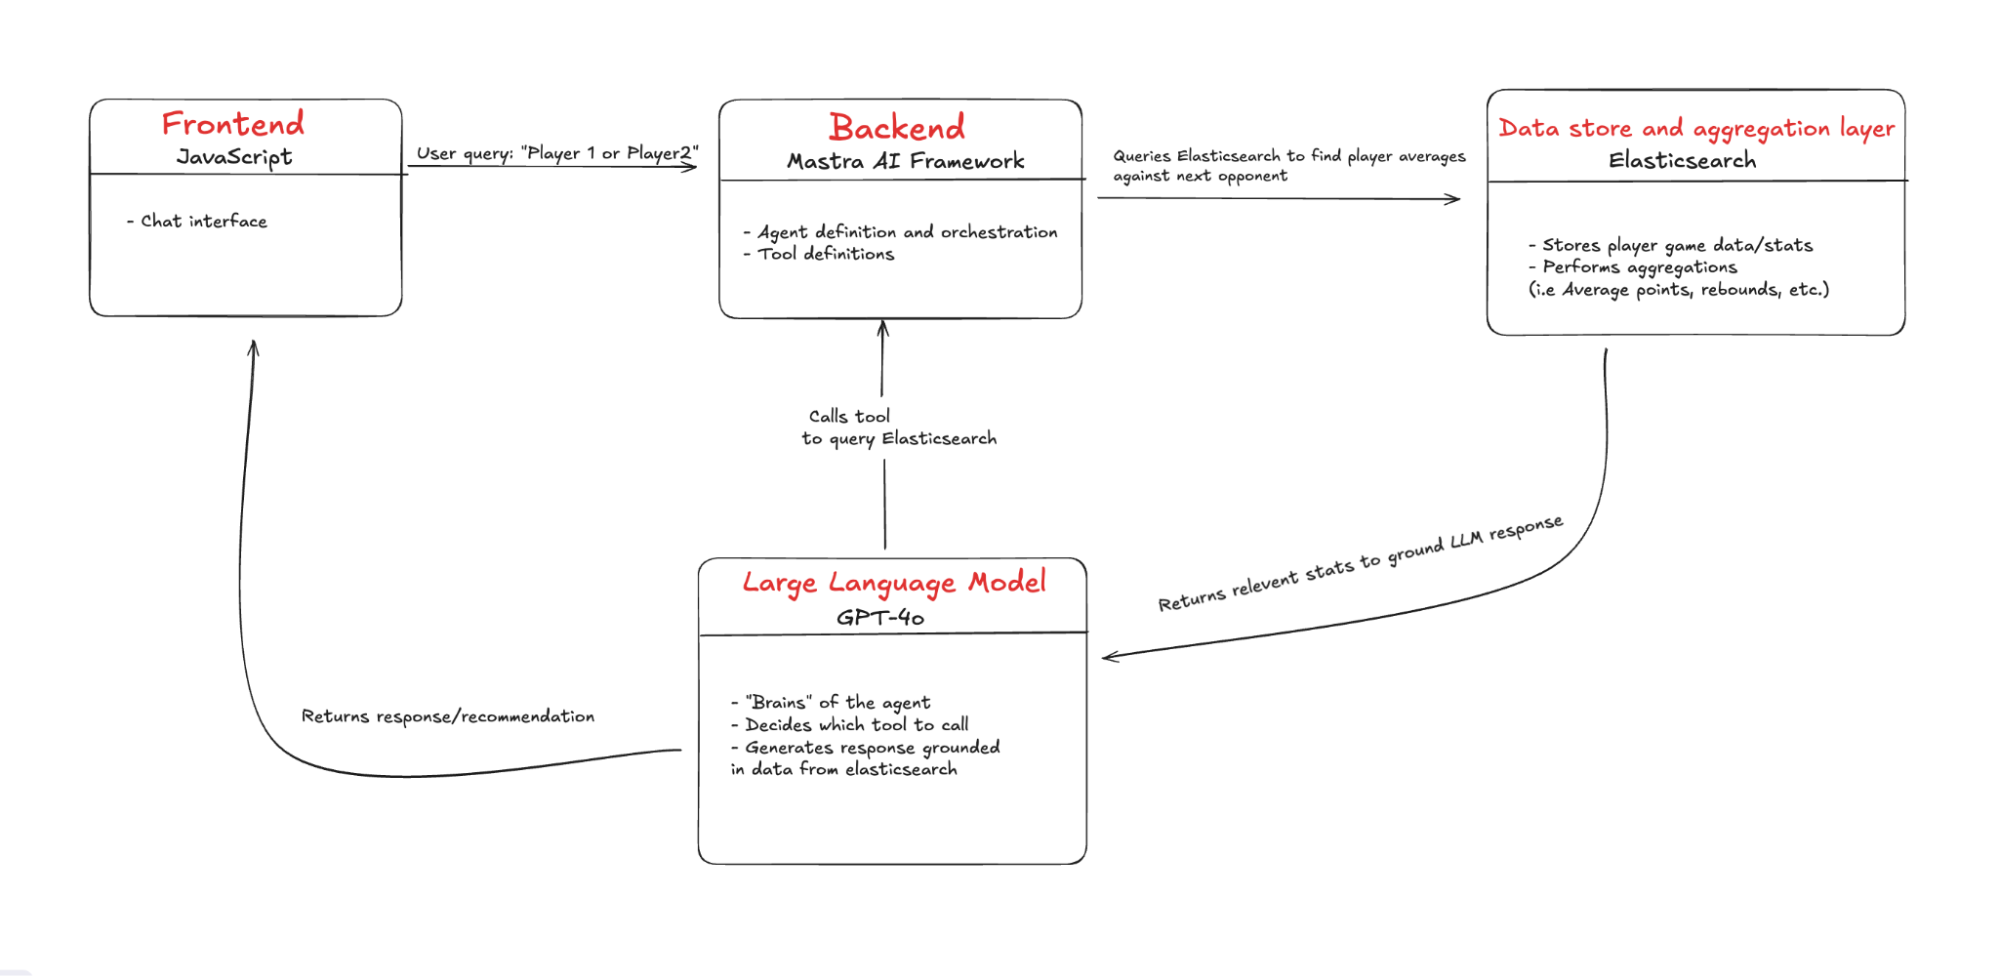
Architecture overview
At the core of the system is a large language model (LLM), which acts as the agent’s reasoning engine (the brain). It interprets user input, decides which tools to call, and orchestrates the steps needed to generate a relevant response.
The agent itself is scaffolded by Mastra, an agent framework in the JavaScript ecosystem. Mastra wraps the LLM with backend infrastructure, exposes it as an API endpoint, and provides an interface for defining tools, system prompts and agent behavior.
On the frontend, we use Vite to quickly scaffold a React web application that provides a chat interface for sending queries to the agent and receiving its responses.
Finally, we have Elasticsearch, which stores player statistics and matchup data that the agent can query and aggregate.
Background
Let’s go over a few fundamental concepts:
What is agentic RAG?
AI agents can interact with other systems, operate independently, and perform actions based on their defined parameters. Agentic RAG combines the autonomy of an AI Agent with the principles of retrieval augmented generation, enabling an LLM to choose what tools to call and which data to use as context to generate a response. Read more about RAG here.
Choosing a framework, why go beyond AI-SDK?
There are many AI agent frameworks available and you’ve probably heard of the more popular ones like CrewAI, AutoGen and LangGraph. Most of these frameworks share a common set of functionalities, including support for different models, tool usage, and memory management.
Here is a framework comparison sheet by Harrison Chase (CEO of LangChain).
What piqued my interest with Mastra is that it’s a JavaScript-first framework built for full-stack developers to easily integrate agents into their ecosystem. Vercel’s AI-SDK also does most of this, but where Mastra shines is when your projects include more complex agent workflows. Mastra enhances the base patterns set by the AI-SDK and in this project, we’ll be using them in tandem.
Frameworks and model choice considerations
While these frameworks can help you build AI agents quickly, there are some drawbacks to consider. For example, when using any other frameworks outside of AI agents or any abstraction layer in general, you lose a bit of control. If the LLM doesn’t use the tools correctly or does something you don’t want it to, the abstraction makes it harder to debug. Still, in my opinion, this tradeoff is worth the ease and speed you get when building, especially because these frameworks are gaining momentum and are being constantly iterated on.
Again, these frameworks are model agnostic, meaning you can plug and play different models, remember that models vary in the data sets they were trained on and in turn vary in the responses they give. Some models don’t even support tool calling. So it is possible to switch and test out different models to see which one gives you the best responses, but keep in mind you will most likely have to rewrite the system prompt for each one. For example, using Llama3.3 over GPT-4o, involves a lot more prompting and specific instructions to get the response you want.
NBA fantasy basketball
Fantasy basketball involves starting a league with a group of your friends (warning, depending on how competitive your group is, it could affect the status of your friendships), usually with some money at stake. Each of you then drafts a team of 10 players to compete against another friends’ 10 players alternating weekly. The points that contribute to your overall score are how each of your players does against their opponents in a given week.
If a player on your team gets injured, suspended, etc., there is a list of free agent players available to add to your team. This is where a lot of the hard thinking in fantasy sports occurs because you only have a limited number of pickups and everyone is constantly on the hunt to pick up the best player.
This is where our NBA AI assistant will shine, especially in situations where you quickly have to decide which player to pick up. Instead of having to manually look up how a player performs against a specific opponent, the assistant can find that data quickly and compare averages to give you an informed recommendation.
Now that you know some basics about agentic RAG and NBA fantasy basketball, let’s see it in practice.
Building the project
If you get stuck at any point or don’t want to build it from scratch, please refer to the repo.
What we’ll cover
- Scaffolding the project:
- Backend (Mastra): Use npx create mastra@latest to scaffold the backend and define the agent logic.
- Frontend (Vite + React): Use npm create vite@latest to build the frontend chat interface to interact with the agent.
- Setting up environment variables
- Install dotenv to manage environment variables.
- Create an .env file and provide the required variables.
- Setting up Elasticsearch
- Spin up an Elasticsearch cluster (either locally or on cloud).
- Install the official Elasticsearch client.
- Ensure environment variables are accessible.
- Establish connection to the client.
- Bulk ingesting NBA data into Elasticsearch
- Create an index with the appropriate mappings to enable aggregations.
- Bulk ingest player game statistics from a CSV file into an Elasticsearch index.
- Define Elasticsearch Aggregations
- Query to calculate historical averages against a specific opponent.
- Query to calculate season averages against a specific opponent.
- Player comparison utility file
- Consolidates helper functions and Elasticsearch aggregations.
- Building the agent
- Add the agent definition and system prompt.
- Install zod and define tools.
- Add middleware setup to handle CORS.
- Integrating the frontend
- Using AI-SDK’s useChat to interact with the agent.
- Create the UI to hold properly formatted conversations.
- Running the application
- Start both the backend (Mastra server) and frontend (React app).
- Sample queries and usage.
- What’s next: Making the agent more intelligent
- Adding semantic search capabilities to enable more insightful recommendations.
- Enable dynamic querying by moving the search logic to the Elasticsearch MCP (Model Context Protocol) server.
Prerequisites
- Node.js and npm: Both the backend and the frontend run on Node. Make sure you have Node 18+ and npm v9+ installed (which comes bundled with Node 18+).
- Elasticsearch cluster: An active Elasticsearch cluster, either locally or on cloud.
- OpenAI API Key: Generate one on the API keys page in OpenAI's developer portal.
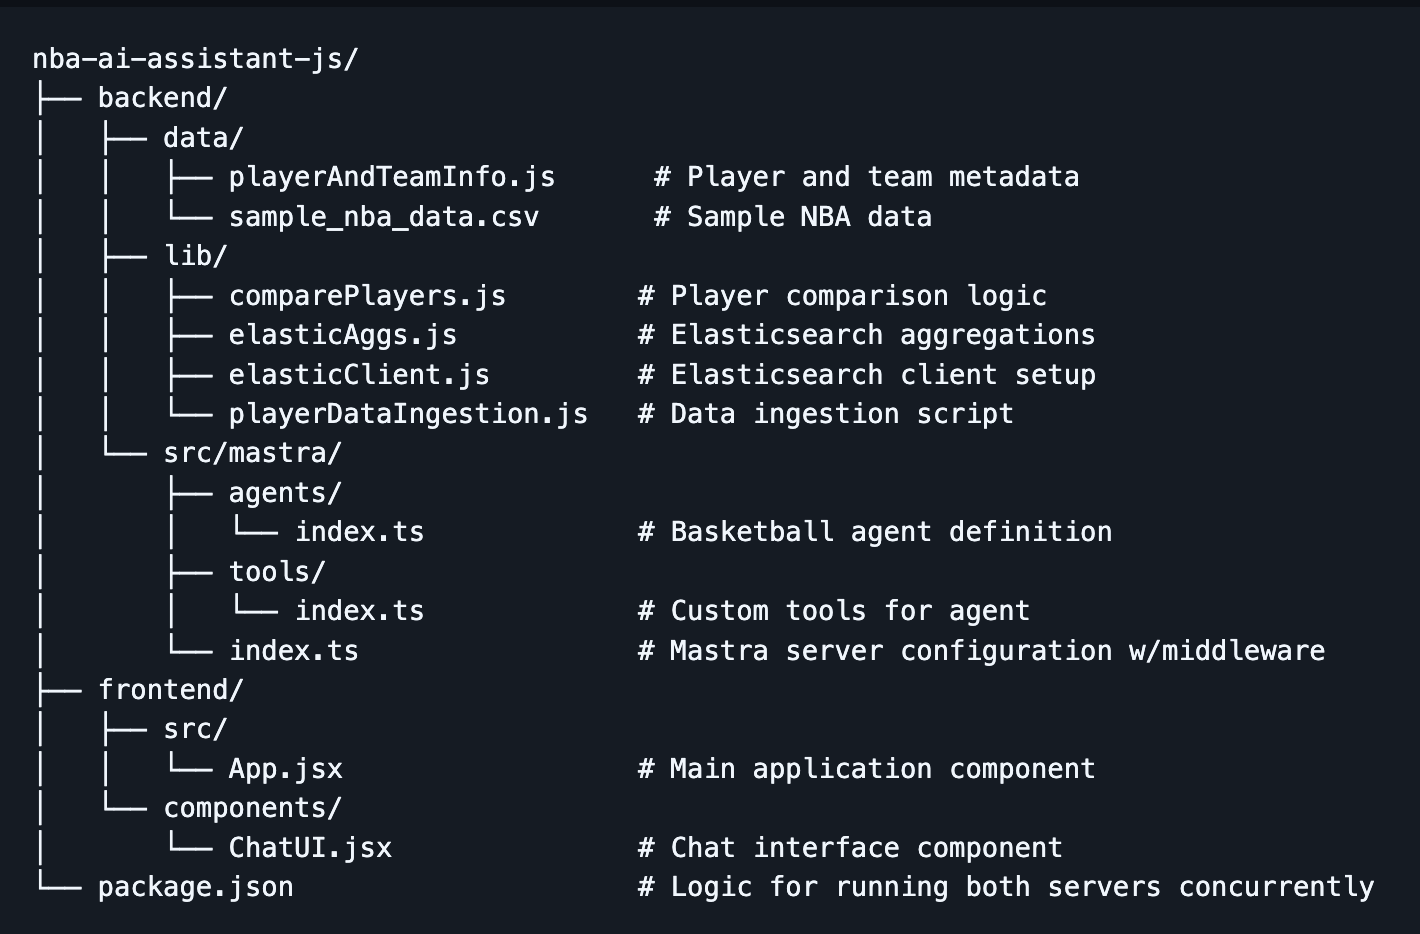
Project structure
Step 1: Scaffolding the project
- First, create the directory nba-ai-assistant-js and navigate inside using:
mkdir nba-ai-assistant-js && cd nba-ai-assistant-jsBackend:
- Use the Mastra create tool with the command:
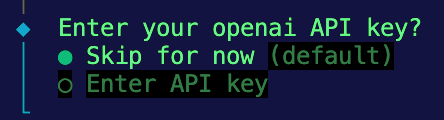
npx create-mastra@latest2. You should get some prompts in your terminal, for the first one, we’ll name the project backend:

3. Next, we’ll keep the default structure for storing the Mastra files, so input src/.

4. Then, we’ll choose OpenAI as our default LLM provider.
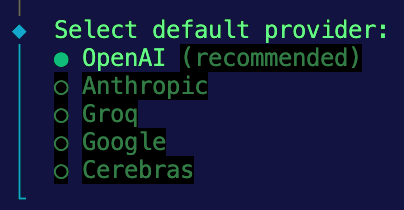
5. Finally, it will ask for your OpenAI API key. For now, we’ll choose the option to skip and provide it later in a .env file.
Frontend:
- Navigate back to the root directory and run the Vite create tool using this command:
npm create vite@latest frontend -- --template react
This should create a lightweight React app named frontend with a specific template for React.
If all goes well, inside your project directory, you should be looking at a backend directory that holds the Mastra code and a frontend directory with your React app.
Step 2: Setting up environment variables
- To manage sensitive keys, we’ll use the
dotenvpackage to load our environment variables from the .env file. Navigate to the backend directory and installdotenv:
cd backend
npm install dotenv --save
2. While in the backend directory, an example.env file is provided with the appropriate variables to fill in. If you create your own, be sure to include the following variables:
# OpenAI Configuration
OPENAI_API_KEY=your_openai_api_key_here

# Elasticsearch Configuration
ELASTIC_ENDPOINT=your_elasticsearch_endpoint_here
ELASTIC_API_KEY=your_elasticsearch_api_key_here
Note: Make sure this file is excluded from your version control by adding .env to .gitignore.
Step 3: Setting up Elasticsearch
First, you need an active Elasticsearch cluster. There are two options:
- Option A: Use Elasticsearch Cloud
- Sign up for Elastic Cloud
- Create a new deployment
- Get your endpoint URL and API key (encoded)
- Option B: Run Elasticsearch locally
- Install and run Elasticsearch locally
- Use http://localhost:9200 as your endpoint
- Generate an API key
Installing the Elasticsearch client on the backend:
- First, install the official Elasticsearch client in your backend directory:
npm install @elastic/elasticsearch2. Then create a directory lib to hold reusable functions and navigate into it:
mkdir lib && cd lib3. Inside, create a new file called elasticClient.js. This file will initialize the Elasticsearch client and expose it for use across your project.
4. Since we’re using ECMAScript modules (ESM), __dirname and __filename aren’t available. To ensure your environment variables are correctly loaded from the .env file in the backend folder, add this setup to the top of your file:
import { config } from 'dotenv';
import { fileURLToPath } from 'url';
import { dirname, join } from 'path';
import { Client } from '@elastic/elasticsearch';

// Grab current directory and load .env from backend folder
const __filename = fileURLToPath(import.meta.url);
const __dirname = dirname(__filename);
const envPath = join(__dirname, '../.env');

// Load environment variables from the correct path
config({ path: envPath });
5. Now, initialize the Elasticsearch client using your environment variables and check the connection:
//Elastic client Initialization, make sure environment variables are being loaded in correctly
const config= {
    node: `${process.env.ELASTIC_ENDPOINT}`,
    auth: {
        apiKey: `${process.env.ELASTIC_API_KEY}`,
    },
};

export const elasticClient = new Client(config);

//Check if the client is connected
async function checkConnection() {
    try {
        const info = await elasticClient.info();
        console.log('Elasticsearch is connected:', info);
    } catch (error) {
        console.error('Elasticsearch connection error:', error);
    }
}

checkConnection();
Now, we can import this client instance to any file that needs to interact with your Elasticsearch cluster.
Step 4: Bulk ingesting NBA data into Elasticsearch
Dataset:
For this project, we’ll reference the datasets available in the backend/data directory in the repo. Our NBA assistant will use this data as its knowledge base for running statistical comparisons and generating recommendations.
- sample_player_game_stats.csv - Sample player game statistics (e.g., points, rebounds, steals, etc, per game per player over their entire NBA career. We’ll use this dataset to perform aggregations. (Note: This is mock data, pre-generated for demo purposes and not sourced from official NBA sources.)
- playerAndTeamInfo.js - Substitute for player and team metadata that would normally be provided by an API call so the agent can match player and team names to IDs. Since we are using sample data, we don’t want the overhead of fetching from an external API, so we hardcoded some values the agent can reference.
Implementation:
- While in the
backend/libdirectory, create a file named playerDataIngestion.js. - Set up imports, resolve the CSV file path and set up parsing. Again, since we’re using ESM, we need to reconstruct
__dirnameto resolve the path to the sample CSV. Also, we’ll import Node.js’s built-in modules,fsandreadline, to parse through the given CSV file line by line.
import fs from 'fs';
import readline from 'readline';
import path from 'path';
import { fileURLToPath } from 'url';
import { elasticClient } from './elasticClient.js';

const indexName = 'sample-nba-player-data'; //Replace with your preferred index name

//Since we are using ES modules __dirname and __filename don't exist, so this is a workaround that allows us to use the absolute file path for our sample data.
const __filename = fileURLToPath(import.meta.url);
const __dirname = path.dirname(__filename);
const filePath = path.resolve(__dirname, '../data/sample_nba_data.csv');
This sets you up to efficiently read and parse the CSV when we get to the bulk ingestion step.
3. Create an index with the appropriate mapping. While Elasticsearch can automatically infer field types with dynamic mapping, we want to be explicit here so that each stat gets treated as a numerical field. This is important because we’ll use these fields for aggregations later on. We also want to use the type float for stats like points, rebounds, etc., to make sure we include decimal values. Finally, we want to add the mapping property dynamic: 'strict' so that Elasticsearch doesn’t dynamically map unrecognized fields.
// Function to create an index with mappings
async function createIndex() {
    try {
        // Check if the index already exists
        const exists = await elasticClient.indices.exists({ index: indexName });

        if (exists) {
            console.log(`Index "${indexName}" already exists, deleting it now.`);
            await elasticClient.indices.delete({ index: indexName });
            console.log(`Deleted index "${indexName}".`);
        }
        // Create the index with mappings
        const response = await elasticClient.indices.create({
            index: indexName,
            body: {
                mappings: {
                    dynamic: 'strict', // Prevent dynamic mapping
                    properties: {
                        game_id: { type: 'integer' },
                        game_date: { type: 'date' },
                        player_id: { type: 'integer' },
                        player_full_name: { type: 'text' },
                        player_team_id: { type: 'integer' },
                        player_team_name: { type: 'text' },
                        home_team: { type: 'boolean' },
                        opponent_team_id: { type: 'integer' },
                        opponent_team_name: { type: 'text' },
                        points: { type: 'float' },
                        rebounds: { type: 'float' },
                        assists: { type: 'float' },
                        steals: { type: 'float' },
                        blocks: { type: 'float' },
                        fg_percentage: { type: 'float' },
                        minutes_played: { type: 'float' },
                    },
                },
            },
        });

        console.log('Index created:', response);
        return true;
    } catch (error) {
        console.error('Error creating index:', error);
        return false;
    }
}
4. Add the function to bulk ingest the CSV data into your Elasticsearch index. Inside the code block, we skip the header line. Then, split each line item by a comma and push them into the document object. This step also cleans them up and ensures they are the proper type. Next, we push the documents into the bulkBody array along with the index info, which will serve as the payload for the bulk ingestion into Elasticsearch.
async function bulkIngestCsv(filePath) {
    const readStream = fs.createReadStream(filePath);
    const rl = readline.createInterface({
        input: readStream,
        crlfDelay: Infinity,
    });

    const bulkBody = [];
    let lineNum = 0;

    //Skip the header line
    let headerLine = true;
    for await (const line of rl) {
        if (headerLine) {
            headerLine = false;
            continue;
        }
        lineNum++;

        // Split the line by comma and remove whitespace
        const [
            game_id,
            game_date,
            player_id,
            player_full_name,
            player_team_id,
            player_team_name,
            home_team,
            opponent_team_id,
            opponent_team_name,
            points,
            rebounds,
            assists,
            steals,
            blocks,
            fg_percentage,
            minutes_played,
        ] = line.split(',');

        // Create a document object
        const document = {
            game_id: parseInt(game_id),
            game_date: game_date.trim(),
            player_id: parseInt(player_id),
            player_full_name: player_full_name.trim(),
            player_team_id: parseInt(player_team_id),
            player_team_name: player_team_name.trim(),
            home_team: home_team.trim() === 'True', // Converts True/False into a boolean
            opponent_team_id: parseInt(opponent_team_id),
            opponent_team_name: opponent_team_name.trim(),
            points: parseFloat(points),
            rebounds: parseFloat(rebounds),
            assists: parseFloat(assists),
            steals: parseFloat(steals),
            blocks: parseFloat(blocks),
            fg_percentage: parseFloat(fg_percentage),
            minutes_played: parseFloat(minutes_played),
        };

        // Prepare the bulk operation format
        bulkBody.push({ index: { _index: indexName } });
        bulkBody.push(document);
    }

    console.log(`Parsed ${lineNum} lines from CSV`);
5. Then, we can use Elasticsearch’s Bulk API with elasticClient.bulk() to ingest multiple documents in a single request. The error handling below is structured to give you a count of how many documents failed to be ingested and how many were successful.
try {
        // Perform the bulk request
        const response = await elasticClient.bulk({ body: bulkBody });

        if (response.errors) {
            console.log('Bulk Ingestion had some hiccups:');

            // Count successful vs failed operations
            let successCount = 0;
            let errorCount = 0;
            const errorDetails = [];

            response.items.forEach((item, index) => {
                const operation = item.index || item.create || item.update || item.delete;
                if (operation.error) {
                    errorCount++;
                    errorDetails.push({
                        document: index + 1,
                        error: operation.error,
                    });
                } else {
                    successCount++;
                }
            });

            console.log(`Successfully indexed: ${successCount} documents`);
            console.log(`Failed to index: ${errorCount} documents, here are the details`, errorDetails);

        } else {
            console.log(`Bulk Ingestion fully successful!`);
        }

    } catch (error) {
        console.error('Error performing bulk ingestion:', error);
    }
}
6. Run the main() function below to sequentially run the createIndex() and bulkIngestCsv() functions.
// Run this function
async function main() {
    const result = await createIndex();
    if (!result) {
        console.error('Index setup failed. Aborting.');
        return;
    }

    await bulkIngestCsv(filePath);
    console.log('Bulk ingestion completed!');
}

main();
If you see a console log saying the bulk ingestion was successful, perform a quick check on your Elasticsearch index to see if the documents were indeed successfully ingested.
Step 5: Defining Elasticsearch aggregations and consolidating
These will be the main functions that will be used when we define the tools for the AI Agent in order to compare players’ statistics against each other.
1. Navigate to the backend/lib directory and create a file called elasticAggs.js.
2. Add the query below to calculate historical averages for a player against a specific opponent. This query uses a bool filter with 2 conditions: one matching player_id and another matching the opponent_team_id, to retrieve only the relevant games. We don’t need to return any documents, we only care about the aggregations, so we set size:0. Under the aggs block, we run multiple metric aggregations in parallel on fields like points, rebounds, assists, steals, blocks and fg_percentage to calculate their average values. LLMs can be hit or miss with calculations and this offloads that process to Elasticsearch, ensuring our NBA AI assistant has access to accurate data.
export async function getHistoricalAveragesAgainstOpponent(player_id, opponent_team_id) {
    try {
        //Query for Historical Averages
        const historicalQuery = await elasticClient.search({
            index: 'sample-nba-player-data',
            size: 0,
            query: {
                bool: {
                    must: [
                        {
                            term: {
                                player_id: {
                                    value: player_id,
                                },
                            },
                        },
                        {
                            term: {
                                opponent_team_id: {
                                    value: opponent_team_id,
                                },
                            },
                        },
                    ],
                },
            },
            aggs: {
                avg_points: { avg: { field: 'points' } },
                avg_rebounds: { avg: { field: 'rebounds' } },
                avg_assists: { avg: { field: 'assists' } },
                avg_steals: { avg: { field: 'steals' } },
                avg_blocks: { avg: { field: 'blocks' } },
             avg_fg_percentage: { avg: { field: 'fg_percentage' } },
            },
        });

        return {
            points: historicalQuery.aggregations.avg_points.value || 0,
            rebounds: historicalQuery.aggregations.avg_rebounds.value || 0,
            assists: historicalQuery.aggregations.avg_assists.value || 0,
            steals: historicalQuery.aggregations.avg_steals.value || 0,
            blocks: historicalQuery.aggregations.avg_blocks.value || 0,
            fgPercentage: historicalQuery.aggregations.avg_fg_percentage.value || 0,
        };
    } catch (error) {
        console.error('Query error from getHistoricalAveragesAgainstOpponent function:', error);
        return { error: 'Queries failed in getting historical averages against opponent.' };
    }
}
3. To calculate the season averages for a player against a specific opponent, we’ll use virtually the same query as the historical one. The only difference in this query is that the bool filter has an additional condition for game_date. The field game_date has to fall within the range of the current NBA season. In this case, the range is between 2024-10-01 and 2025-06-30. This extra condition below ensures that the aggregations that follow will isolate just the games from this season.
        {
                            range: {
                    //Range for this season, change to match current season
                                game_date: {
                                    gte: '2024-10-01',
                                    lte: '2025-06-30',
                                },
                            },
Step 6: Player comparison utility
To keep our code modular and maintainable, we’ll create a utility file that consolidates metadata helper functions and Elasticsearch aggregations. This will power the main tool used by the agent. More on that later:
1. Create a new file comparePlayers.js in the backend/lib directory.
2. Add the function below to consolidate metadata helpers and Elasticsearch aggregation logic into a single function that powers the main tool used by the agent.
import { playersByName } from '../data/playerAndTeamInfo.js';
import { teamsByName } from '../data/playerAndTeamInfo.js';
import { upcomingMatchups } from '../data/playerAndTeamInfo.js';
import { getHistoricalAveragesAgainstOpponent } from './elasticAggs.js';
import { getSeasonAveragesAgainstOpponent } from './elasticAggs.js';

//Simple helper functions to simulate API calls for player and team metadata. These reference the hardcoded values from playerAndTeamInfo.js in the data directory
export function getPlayerInfo(playerFullName) {
    return playersByName[playerFullName];
}

export function getTeamID(teamFullName) {
    return teamsByName[teamFullName];
}

export function getUpcomingMatchups(teamId) {
    return upcomingMatchups[teamId];
}

//Main function used by the 'playerComparisonTool' agent tool
export async function comparePlayersForNextMatchup(player1Name, player2Name) {
    //Get Player Info
    const player1Info = getPlayerInfo(player1Name);
    const player2Info = getPlayerInfo(player2Name);

    //Get upcoming matchups
    const player1NextGame = getUpcomingMatchups(player1Info.team_id)[0];
    const player2NextGame = getUpcomingMatchups(player2Info.team_id)[0];

    //Get season and historical averages against next opponent for player 1
    const player1SeasonAverages = await getSeasonAveragesAgainstOpponent(
        player1Info.player_id,
        player1NextGame.opponent_team_id
    );
    const player1HistoricalAverages = await getHistoricalAveragesAgainstOpponent(
        player1Info.player_id,
        player1NextGame.opponent_team_id
    );

    //Get season and historical averages against next opponent for player 2
    const player2SeasonAverages = await getSeasonAveragesAgainstOpponent(
        player2Info.player_id,
        player2NextGame.opponent_team_id
    );
    const player2HistoricalAverages = await getHistoricalAveragesAgainstOpponent(
        player2Info.player_id,
        player2NextGame.opponent_team_id
    );

    const player1 = {
        name: player1Name,
        playerId: player1Info.player_id,
        teamId: player1Info.team_id,
        nextOpponent: {
            teamId: player1NextGame.opponent_team_id,
            teamName: player1NextGame.opponent_team_name,
            home: player1NextGame.home,
        },
        stats: {
            seasonAverages: player1SeasonAverages,
            historicalAverages: player1HistoricalAverages,
        },
    };

    const player2 = {
        name: player2Name,
        playerId: player2Info.player_id,
        teamId: player2Info.team_id,
        nextOpponent: {
            teamId: player2NextGame.opponent_team_id,
            teamName: player2NextGame.opponent_team_name,
            home: player2NextGame.home,
        },
        stats: {
            seasonAverages: player2SeasonAverages,
            historicalAverages: player2HistoricalAverages,
        },
    };

    return [player1, player2];
}
Step 7: Building the agent
Now that you’ve created the frontend and backend scaffolding, ingested NBA game data, and established a connection to Elasticsearch, we can start to put all the pieces together to build the agent.
Defining the agent
1. Navigate to the index.ts file within the backend/src/mastra/agents directory and add the agent definition. You can specify fields like:
- Name: Give your agent a name that will be used as a reference when called on the frontend.
- Instructions/system prompt: A system prompt gives the LLM the initial context and rules to follow during the interaction. It’s similar to the prompt users will send through the chat box, but this one is given before any user input. Again, this will change depending on the model you choose.
- Model: Which LLM to use (Mastra supports OpenAI, Anthropic, local models, etc.).
- Tools: A list of tool functions the agent can call.
- Memory: (Optional) if we want the agent to remember conversation history, etc. For simplicity, we can start without persistent memory, though Mastra supports it.
import { openai } from '@ai-sdk/openai';
import { Agent } from '@mastra/core/agent';
import { playerComparisonTool } from '../tools';

export const basketballAgent = new Agent({
    name: 'Basketball Agent',
    instructions: `
      You are a NBA Basketball expert.
      Your primary function is to compare two NBA players and recommend which one is the better fantasy pickup.

      Only compare players from the following list:
      - LeBron James
      - Stephen Curry
      - Jayson Tatum
      - Jaylen Brown
      - Nikola Jokic
      - Luka Doncic
      - Kyrie Irving
      - Anthony Davis
      - Kawhi Leonard
      - Russell Westbrook

      Input Handling Rules:
      - If the user asks about a player that is not on this list, respond with the list of available players for comparison.
      - If the user only inputs one player, ask the user to add another player from the list provided.
      - If the user inputs a player with the wrong spelling or capitalizations, infer from the list of available players provided.
      - IMPORTANT: If the user asks a question or asks you to generate a response about anything outside of basketball or the scope of this project, DO NOT answer and affirm you can only talk about basketball.

      Tool Usage:
      - Extract and standardize player names to match the list exactly.
      - Use the playerComparisonTool, passing both names as strings.
      - The tool will return an object with game information, stats, and analysis.

      Format your response using Markdown syntax. Use:

        Example output format:


        #### Next Game Info
        - ***LeBron James** vs Warriors, May 24 (Home)
        - ***Stephen Curry** vs Lakers, May 24 (Away)


        #### Stats Comparison
        \`\`\`
        Stat                  LeBron James (vs Warriors)    Stephen Curry (vs Lakers)
        --------------------  -----------------------------  ----------------------------
        Historical Points     28.3                          30.3
        Historical Assists    6.7                           8.7
        Season Points         28.8                          23.3
        Season Assists        6.2                           4.7
        \`\`\`

        #### Fantasy Recommendation
        Explain which player is the better fantasy pickup and why.

    `,
    model: openai('gpt-4o'),
    tools: { playerComparisonTool },
});
Defining tools
- Navigate to the index.ts file within the
backend/src/mastra/toolsdirectory. - Install Zod using the command:
npm install zod3. Add tool definitions. Note that we import the function within the comparePlayers.js file as the main function the agent will use when calling this tool. Using Mastra’s createTool() function, we will register our playerComparisonTool. The fields include:
id: This is a natural language description to help the agent understand what the tool does.input schema: To define the shape of the input for the tool, Mastra uses the Zod schema, which is a TypeScript schema validation library. Zod helps by making sure the agent inputs correctly structured input and prevents the tool from executing if the input structure doesn’t match.description: This is a natural language description to help the agent understand when to call and use the tool.execute: The logic that runs when the tool is called. In our case, we are using an imported helper function to return performance stats.
import { comparePlayersForNextMatchup } from '../../../lib/comparePlayers.js'
import { createTool } from "@mastra/core/tools";
import { z } from "zod";

export const playerComparisonTool = createTool({
    id: "Compare two NBA players",
    inputSchema: z.object({
        player1:z.string(),
        player2:z.string()
    }),
    description: "Use this tool to compare two players given in the user prompt.",
    execute: async ({ context: { player1, player2 } }) => {
        return await comparePlayersForNextMatchup(player1, player2);
      },
})
Adding middleware to handle CORS
Add middleware in the Mastra server to handle CORS. They say there are three things in life you can’t avoid: death, taxes, and for web devs it’s CORS. In short, Cross-Origin Resource Sharing is a browser security feature that blocks the frontend from making requests to a backend running on a different domain or port. Even though we run both the backend and frontend on localhost, they use different ports, triggering the CORS policy. We need to add the middleware specified in the Mastra docs so that our backend allows those requests from the frontend.
1. Navigate to the index.ts file within the backend/src/mastra directory and add the config for CORS:
origin: ['http://localhost:5173']- Allows requests from only this address (Vite default address)
allowMethods: ["GET", "POST"]- HTTP methods that are allowed. Most of the time, it will be using POST.
allowHeaders: ["Content-Type", "Authorization", "x-mastra-client-type, "x-highlight-request", "traceparent"],- These decide which custom headers can be used in requests
import { Mastra } from '@mastra/core/mastra';
import { basketballAgent } from './agents';

console.log('Starting Mastra server...');

export const mastra = new Mastra({
  agents: { basketballAgent },
  server:{
    timeout: 10 * 60 * 1000, // 10 minutes
    cors: {
      origin: ['http://localhost:5173'],
      allowMethods: ["GET", "POST"],
      allowHeaders: [
        "Content-Type",
        "Authorization",
        "x-mastra-client-type",
        "x-highlight-request",
        "traceparent",
      ],
      exposeHeaders: ["Content-Length", "X-Requested-With"],
      credentials: false,
    },
  },

});

console.log('Mastra server configured.'); // Log after server configuration
Step 8: Integrating the frontend
This React component provides a simple chat interface that connects to the Mastra AI agent using the useChat() hook from @ai-sdk/react. We are also going to use this hook to display token usage, tool calls and to render the conversation. In the system prompt above, we also ask the agent to output the response in markdown, so we’ll use react-markdown to properly format the response.
1. While in the frontend directory, install the @ai-sdk/react package to use the useChat() hook.
npm install @ai-sdk/react2. While in the same directory, install React Markdown so we can properly format the response the agent generates.
npm install react-markdown3. Implement useChat(). This hook will manage the interaction between your frontend and your AI agent backend. It handles message state, user input, status and gives you lifecycle hooks for observability purposes. The options we pass in include:
api:This defines the endpoint of your Mastra AI Agent. It defaults to port 4111 and we also want to add the route that supports streaming responses.onToolCall: This executes anytime the agent calls a tool; we are using it to track which tools our agent is calling.onFinish: This executes after the agent completes a full response. Even though we enabled streaming,onFinishwill still be run after the full message is received and not after each chunk. Here, we are using it to track our token usage. This can be helpful when monitoring LLM costs and optimizing them.
4. Finally, head over to the ChatUI.jsx component in the frontend/components directory to create the UI to hold our conversation. Next, wrap the response in a ReactMarkdown component in order to properly format the response from the agent.
import React, { useState } from 'react';
import { useChat } from '@ai-sdk/react';
import ReactMarkdown from 'react-markdown';

export default function ChatUI() {
    const [totalTokenUsage, setTotalTokenUsage] = useState(0);
    const [promptTokenUsage, setPromptTokenUsage] = useState(0);
    const [completionTokenUsage, setCompletionTokenUsage] = useState(0);
    const [toolsCalled, setToolsCalled] = useState([]);

    const { messages, input, handleInputChange, handleSubmit, status } = useChat({
        api: 'http://localhost:4111/api/agents/basketballAgent/stream', //Replace with your own endpoint for your agent
        id: 'my-chat-session',

        //Optional parameter to check agent tool calls
        onToolCall: ({ toolCall }) => {
            setToolsCalled((prev) => [...prev, toolCall.toolName]);
        },

        //Optional parameter to check token usages
        onFinish: (message, { usage }) => {
            setTotalTokenUsage((prev) => prev + usage.totalTokens);
            setPromptTokenUsage((prev) => prev + usage.promptTokens);
            setCompletionTokenUsage((prev) => prev + usage.completionTokens);
        },

        //Optional parameter for error handling
        onError: (error) => {
            console.error('Agent error:', error);
        },
    });

    return (
        <div>
            <div className="agent-info">
                <h4 className="stats-title">What's My Agent Doing?</h4>

                <div className="stats-box">
                    <strong className="stats-sub-title">Tools Called:</strong>
                    <ul className="tool-list">
                        {toolsCalled.map((tool, idx) => (
                            <li key={idx}>{tool}</li>
                        ))}
                        {toolsCalled.length === 0 && <li>No tools called yet.</li>}
                    </ul>

                    <div className="usage-stats">
                        <p>Prompt Token Usage: {promptTokenUsage}</p>
                        <p>Completion Token Usage: {completionTokenUsage}</p>
                        <p>Total Token Usage: {totalTokenUsage}</p>
                    </div>
                </div>
            </div>

            <strong>Conversation:</strong>
            <div className="convo-box">
                {messages.map((msg) => (
                    <div key={msg.id} className="message-item">
                        <strong className="message-role">{msg.role === 'assistant' ? 'Basketbot' : 'You'}:</strong>
                        <ReactMarkdown>{msg.content}</ReactMarkdown>
                    </div>
                ))}
            </div>

            <form onSubmit={handleSubmit}>
                <input
                    type="text"
                    value={input}
                    onChange={handleInputChange}
                    placeholder="Input two players you want to compare."
                    className="input-box"
                />
                <button type="submit" disabled={status === 'streaming'}>
                    {status === 'streaming' ? 'Thinking...' : 'Send'}
                </button>
            </form>
        </div>
    );
}
Step 9: Running the application
Congrats! You are now ready to run the application. Follow these steps to start both the backend and frontend.
- In a terminal window, starting from the root directory, navigate to the backend directory and start the Mastra server:
cd backend

npm run dev
2. In another terminal window, starting from the root directory, navigate to the frontend directory and start the React app:
cd frontend

npm run dev
3. Head over to your browser and navigate to:
You should be able to see the chat interface. Try out these sample prompts:
- "Compare LeBron James and Stephen Curry"
- "Who should I pick between Jayson Tatum and Luka Doncic?"
What’s next: Making the agent more intelligent
To make the assistant more agentic and the recommendations more insightful, I’ll be adding a few key upgrades in the next iteration.
Semantic search for NBA news
There are a ton of factors that can affect player performance, a lot of which don’t show up in raw stats. Things like injury reports, lineup changes, or even a post-game analysis, you can only find in news articles. To capture this additional context, I’ll be adding semantic search capabilities so the agent can retrieve relevant NBA articles and factor that narrative into its recommendations.
Dynamic search with the Elasticsearch MCP server
MCP (Model Context Protocol) is quickly becoming the standard for how agents connect to data sources. I’ll be migrating the search logic into the Elasticsearch MCP server, which allows the agent to dynamically build queries rather than relying on predefined search functions we provide. This enables us to use more natural language workflows and reduces the need to manually write every single search query. Learn more about the Elasticsearch MCP server and the current state of the ecosystem here.
These changes are already in progress, stay tuned!
Conclusion
In this blog, we built an agentic RAG assistant that provides tailored recommendations for your fantasy basketball team using JavaScript, Mastra and Elasticsearch. We covered:
- Agentic RAG fundamentals and how combining the autonomy of an AI agent with the tools to effectively use RAG can lead to more nuanced and dynamic agents.
- Elasticsearch and how its data storage capabilities and powerful native aggregations make it a great partner as a knowledge base for an LLM.
- The Mastra framework and how it simplifies building these agents for developers in the javaScript ecosystem.
Whether you’re a basketball fanatic, exploring how to build AI agents, or both like me, I hope this blog gave you some building blocks to get started. The full repo is available on GitHub, feel free to clone and tinker. Now, go win that fantasy league!
Ready to try this out on your own? Start a free trial.
Want to get Elastic certified? Find out when the next Elasticsearch Engineer training is running!
Related content

October 30, 2025
Context engineering using Mistral Chat completions in Elasticsearch
Learn how to utilize context engineering with Mistral Chat completions in Elasticsearch to ground LLM responses in domain-specific knowledge for accurate outputs.
October 27, 2025
Building agentic applications with Elasticsearch and Microsoft’s Agent Framework
Learn how to use Microsoft Agent Framework with Elasticsearch to build an agentic application that extracts ecommerce data from Elasticsearch client libraries using ES|QL.

October 21, 2025
Introducing Elastic’s Agent Builder
Introducing Elastic Agent Builder, a framework to easily build reliable, context-driven AI agents in Elasticsearch with your data.

October 20, 2025
Elastic MCP server: Expose Agent Builder tools to any AI agent
Discover how to use the built-in Elastic MCP server in Agent Builder to securely extend any AI agent with access to your private data and custom tools.
How to use the Synonyms UI to upload and manage Elasticsearch synonyms
Learn how to use the Synonyms UI in Kibana to create synonym sets and assign them to indices.