Large Language Models (LLMs) are revolutionary tools, but their true potential is unlocked when they have real-time context and the ability to interact with the world. Model Context Protocol (MCP) acts as a bridge, connecting your LLMs to real data and external tools. By providing this context, LLMs can deliver more relevant and factual responses.
Although traditional RAG (Retrieval Augmented Generation) provides context to LLMs, it usually relies on static information pre-stored in databases or private datasets. In contrast, MCP allows you to incorporate context from dynamic, real-time information sourced from various systems, including databases, APIs, sensors, and other data streams.
In this blog, you'll learn how to build an MCP server using FastMCP and Elasticsearch to manage and search data. To illustrate, we'll use Apple Watch data as a tangible example of how to transform raw information into intelligent insights.
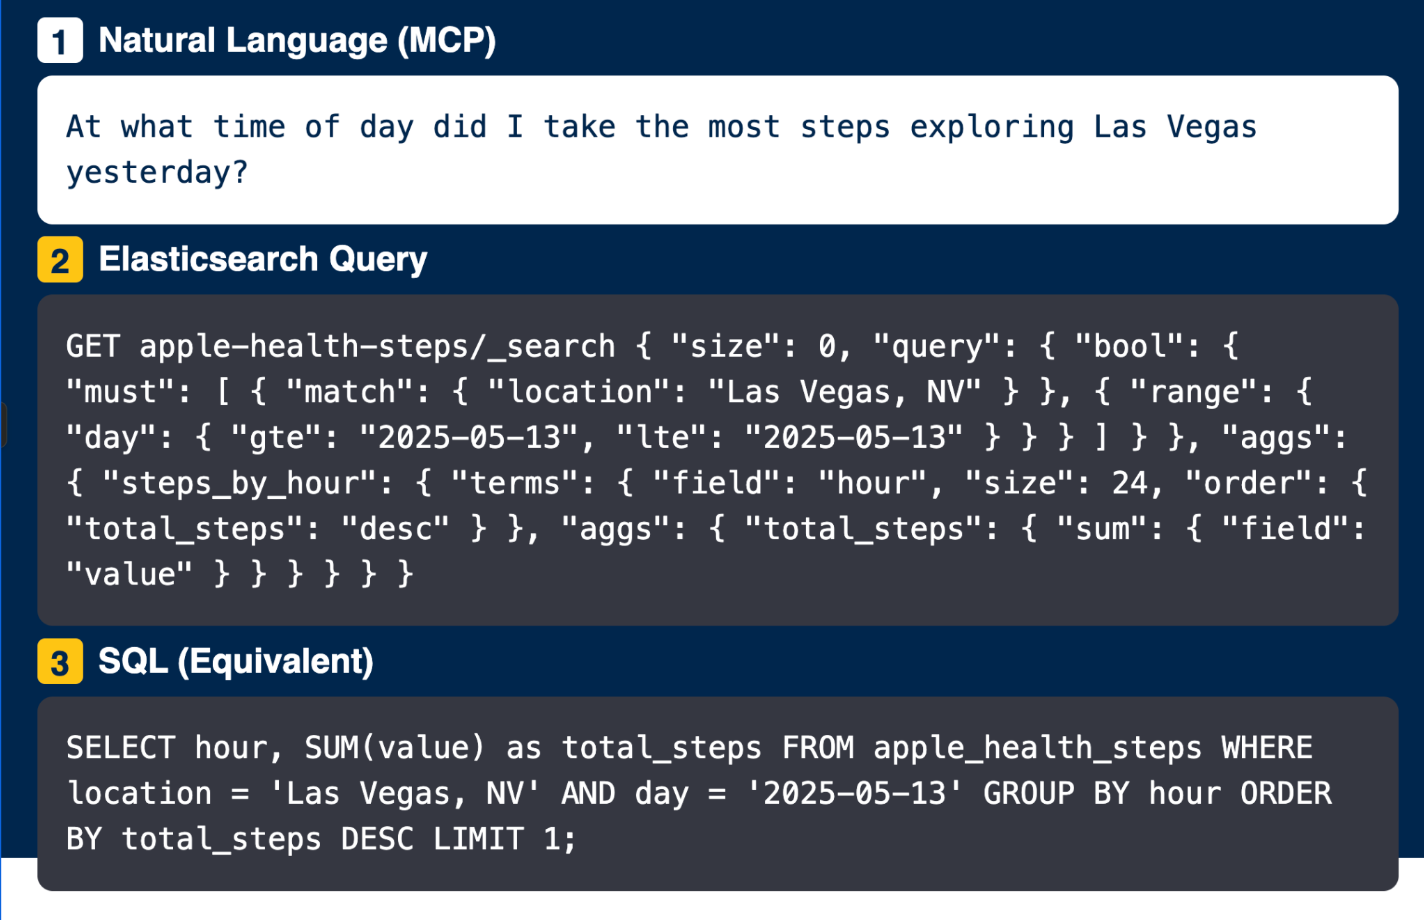
Asking complex questions about your data in English, Portuguese or Chinese using natural language.
Why MCP?
MCP is an open protocol that standardizes how LLMs interact with external data sources and tools. For a detailed introduction, see JD Armada's article: The current state of MCP.
Benefits of MCP for LLM agent development
Using MCP brings several benefits for developers working with LLM-based agents:
- Separation of concerns: MCP separates context logic (data and tools) from LLM interaction, making development more organized.
- Standardization: By following a standard protocol, developers can create tools that work with any MCP client, regardless of the LLM used.
- Reusability: Created tools and resources can be easily reused across different projects and contexts.
- Scalability: With MCP, it's possible to scale horizontally by adding more servers to handle different knowledge domains or functionalities.
The three core MCP primitives
MCP defines three main components that establish a standard for interactions between LLMs and external systems:
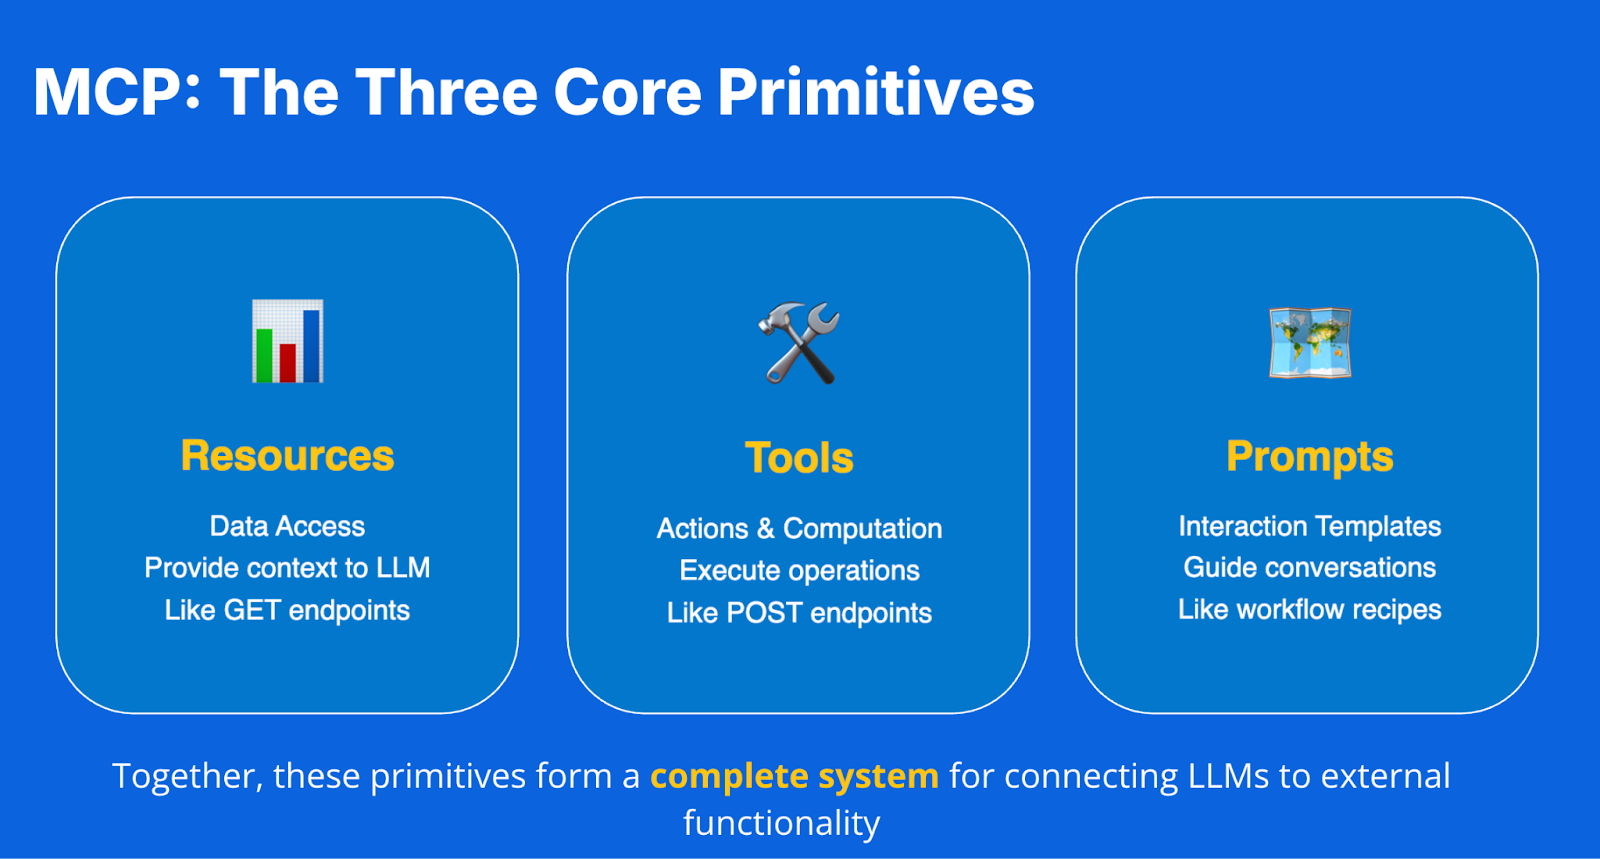
1. Resources: The LLM's eyes
- Function: To provide context by exposing your data directly to the LLM
- Behavior: Like GET endpoints in REST APIs, they retrieve data without modification
- Example:
health://steps/latest- gets the most recent step records - URI Pattern: Use domain-namespaced patterns
2. Tools: The LLM's hands
- Function: To enable action and computation - essential for complex queries and analyses
- Behavior: Like POST endpoints in REST APIs, they execute operations and can have side effects
- Characteristics:
- Accept structured parameters
- Dynamic logic based on parameters
- Active processing and data manipulation, not just data retrieval
3. Prompts: The maps for the LLM (MCP-specific)
- Function: To provide reusable command templates for common tasks, which differs from traditional LLM prompts combining user input with task instructions
- Behavior: Registered templates that appear as slash commands
- Example:
/daily_report- triggers a pre-configured analysis workflow - Purpose: Standardize common interactions and workflows
Building your custom MCP server
Solution architecture
Before we start coding, let's understand what we're building:
Our MCP server acts as the bridge between LLM agents and your Elasticsearch data, enabling natural language queries on structured health data.
Prerequisites
This blog assumes you have the following technologies installed:
- Python 3.10+
- Elasticsearch (quick setup guide)
- Claude Desktop (free download)
- Python uv package manager (see installation instructions)
Complete project on GitHub
The entire project is available in this GitHub repository, including scripts and sample data. If you prefer, follow the instructions in the README.md file to get everything up and running quickly.
Clone the repository in your terminal and use the helper scripts, such as ingest_data.py, to prepare the database before moving on to the next section.
git clone https://github.com/salgado/apple-watch-health-mcp.git
cd apple-watch-health-mcp
When you list the folder contents (ls command), you should see the following files:
apple_watch_mcp.py: The complete script for the MCP server, with all implemented Resources, Tools, and Prompts.ingest_data.py: A helper script that populates your Elasticsearch instance with sample data.sample_data.json: A sample JSON file containing fictional Apple Health step count data.README.md: Instructions to run the complete solution.
Setting up the FastMCP framework in Python
Now, let's set up an environment for our MCP server. FastMCP is a Python framework that makes it easy to create complete MCP servers compatible with the protocol.
Two approaches for MCP + Elasticsearch
Before building our custom server, it's important to understand that there are two approaches to integrating MCP with Elasticsearch:
Official approach using Elastic MCP Server
- General purpose: Works for most use cases
- Easy configuration: Quick and simple setup
- Limited customization: Less flexibility for specific cases
- Limited operations: At time of writing, the official server supports only basic query operations
- Blog: Connect Agents to Elasticsearch with Model Context Protocol
Custom approach: Building your own MCP server (our focus)
- Domain-specific: Optimized for particular use cases
- Requires programming: More initial development work
- Complete control: Flexibility over functionalities
First, navigate to the project folder and use uv to manage dependencies:
# Navigate to the repository folder
cd apple-watch-health-mcp


# Create and initialize a new project
uv init

# Create and activate a virtual environment
uv venv
source .venv/bin/activate

# Install required dependencies
uv add "mcp[cli]" "elasticsearch>=8.0.0,<9.0.0" aiohttp pydantic

# Set up environment variable for API key (after creating it in Elasticsearch)
export ES_API_KEY="your_encoded_api_key_here"
* Note that we are specifying a compatible version for the Elasticsearch library to match the v8.x server used in this blog.
Use case: Knowledge base assistant with Apple HealthKit data
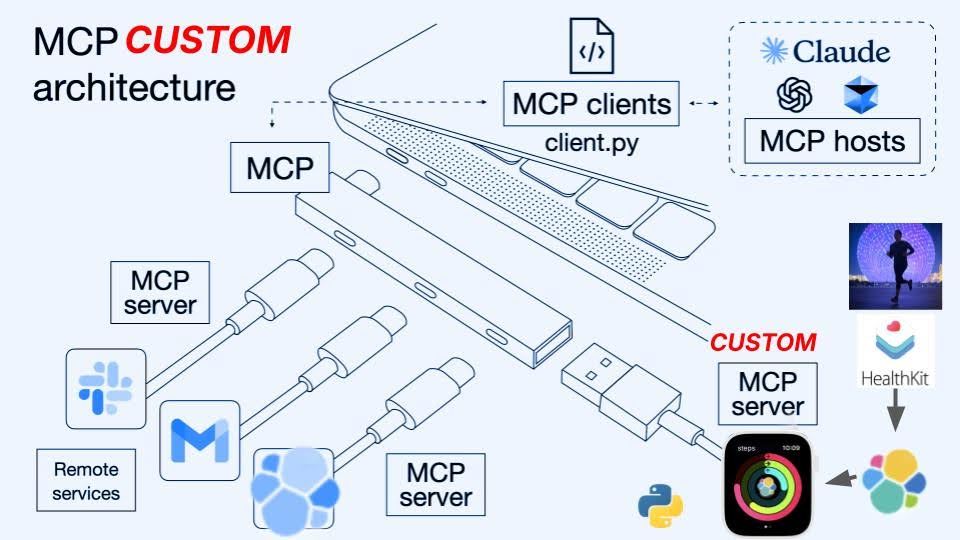
Image adapted from Norah Sakal: https://norahsakal.com/blog/mcp-vs-api-model-context-protocol-explained/
Exporting Apple Watch data
To obtain the Apple HealthKit data, see Apple's official export guide. The export creates an XML file containing all health records.

Setting up Elasticsearch with sample data
Before creating our MCP server, we need to prepare Elasticsearch with sample data. We've already included in the repository a file with Apple Health step data (sample_data.json) and an ingestion script (ingest_data.py). To prepare Elasticsearch, run the following command in your terminal:
# Set the environment variable with Elasticsearch API KEY
export ES_API_KEY="ES_API_KEY"
python ingest_data.py
This script will:
- Connect to Elasticsearch at
http://localhost:9200 - Create the index with the correct mapping
- Insert the data from the JSON
If you wish to use other connection options such as Elastic Cloud, please consult the documentation. The default configuration uses:
ES_HOST = "http://localhost:9200"
ES_INDEX = "apple-health-steps"
ES_API_KEY = os.getenv('ES_API_KEY')
You should see a success message at the end of the process.
Connecting to Elasticsearch at http://localhost:9200...
Connection successful!
Index 'apple-health-steps' found. Deleting...
Index deleted.
Creating index 'apple-health-steps' with the specified mapping...
Index created successfully.
Reading data from 'sample_data.json' for ingestion...
Ingestion complete. Documents successfully ingested: 68
Final check: The index 'apple-health-steps' now contains 68 documents.
After the script executes, we'll have the index created and populated with sample data. The index follows this schema, which corresponds to the fields obtained when exporting the XML file with the steps data from Apple Watch:
GET /apple-health-steps/_mapping
{
  "apple-health-steps": {
    "mappings": {
      "properties": {
        "creationDate": { "type": "date", "format": "yyyy-MM-dd HH:mm:ss||yyyy-MM-dd||epoch_millis" },
        "day": { "type": "date", "format": "yyyy-MM-dd" },
        "dayOfWeek": { "type": "keyword" },
        "deviceInfo": {
          "properties": {
            "hardware": { "type": "keyword" },
            "manufacturer": { "type": "keyword" },
            "model": { "type": "keyword" },
            "name": { "type": "keyword" },
            "software": { "type": "keyword" }
          }
        },
        "duration": { "type": "float" },
        "endDate": { "type": "date", "format": "yyyy-MM-dd HH:mm:ss||yyyy-MM-dd||epoch_millis" },
        "hour": { "type": "integer" },
        "sourceName": { "type": "keyword" },
        "startDate": { "type": "date", "format": "yyyy-MM-dd HH:mm:ss||yyyy-MM-dd||epoch_millis" },
        "type": { "type": "keyword" },
        "unit": { "type": "keyword" },
        "value": { "type": "float" }
      }
    }
  }
}
Here's a sample of the data that gets inserted:
{
  "type": "HKQuantityTypeIdentifierStepCount",
  "sourceName": "Apple Watch",
  "deviceInfo": {
    "name": "Apple Watch",
    "manufacturer": "Apple Inc.",
    "model": "Watch",
    "hardware": "Watch7,1",
    "software": "11.3.1"
  },
  "unit": "count",
  "creationDate": "2025-06-01 08:11:04",
  "startDate": "2025-06-01 07:58:42",
  "endDate": "2025-06-01 07:59:10",
  "value": 340,
  "day": "2025-06-01",
  "dayOfWeek": "Sunday",
  "hour": 8,
  "duration": 583
}
The data includes step counts from both Apple Watch and iPhone sources, with detailed timestamps and device information for each recording.
Now that the database is created and populated, we can start building our MCP server to access this data.
Building the MCP server for health data
Initial configuration with FastMCP and Pydantic
Let's create an apple_watch_mcp.py file with the basic structure of our MCP server:
# apple_watch_health_mcp.py
import os
from typing import Any, Optional
import json
from datetime import datetime
from pydantic import BaseModel, field_validator, ValidationError
from mcp.server.fastmcp import FastMCP
from elasticsearch import AsyncElasticsearch
from contextlib import asynccontextmanager

# Initialize FastMCP server
mcp = FastMCP("apple-watch-steps")

# Constants
ES_HOST = "http://localhost:9200"
ES_INDEX = "apple-health-steps"

# API key from environment variable or fallback for development
ES_API_KEY = os.getenv('ES_API_KEY')

# Pydantic model for parameter validation
class QueryStepDataParams(BaseModel):
    start_date: Optional[str] = None
    end_date: Optional[str] = None
    aggregation: Optional[str] = None
    device: Optional[str] = None

    @field_validator('start_date', 'end_date')
    def validate_date_format(cls, value):
        if value is None:
            return value
        try:
            datetime.strptime(value, "%Y-%m-%d")
            return value
        except ValueError:
            raise ValueError("Invalid date format. Use YYYY-MM-DD")

    @field_validator('aggregation')
    def validate_aggregation(cls, value):
        valid_aggregations = ["hourly", "daily", "weekly", "monthly", None]
        if value not in valid_aggregations:
            raise ValueError(f"Invalid aggregation. Use one of: {valid_aggregations[:-1]}")
        return value

# Main function to run the server
if __name__ == "__main__":
    mcp.run()
This initial code sets up an MCP server named "apple-watch-steps" and defines a Pydantic model to validate the parameters that will be used in the tools. The server will be connected to our local Elasticsearch cluster, using the "apple-health-steps" index.
Connecting to Elasticsearch: Our data bridge
To interact with Elasticsearch, let's add a helper function to our code:
@asynccontextmanager
async def get_es_client():
    """Context manager for Elasticsearch client."""
    client = AsyncElasticsearch([ES_HOST], api_key=ES_API_KEY)
    try:
        yield client
    finally:
        await client.close()

# Elasticsearch helper function
async def query_elasticsearch(query: dict) -> dict[str, Any] | None:
    """Makes a request to Elasticsearch with proper error handling."""
    print(f"Sending query to Elasticsearch: {json.dumps(query)}")

    # Use context manager
    async with get_es_client() as client:
        try:
            response = await client.search(
                index=ES_INDEX,
                body=query
            )
            return response
        except Exception as e:
            print(f"Error querying Elasticsearch: {e}")
            return None
This implementation uses the official Elasticsearch Python client with the AsyncElasticsearch class, which provides full async/await support. Using the asynchronous approach over the traditional synchronous client operations prevents long-running tasks from blocking the main thread, making our server more responsive. The context manager pattern ensures that connections are properly opened and closed for each operation, preventing resource leaks and connection warnings. It receives a query dictionary, sends it to Elasticsearch, and returns the result in JSON format, or None if an error occurs.
The three MCP pillars: Resources, tools, and prompts
Let's now implement the MCP resources, tools, and prompts. Each of these components play a specific role.
Example resource:
@mcp.resource("health://steps/latest")
async def get_latest_steps() -> str:
    """Gets the most recent step records"""
    query = {
        "query": {
            "match_all": {}
        },
        "sort": [
            {"endDate": {"order": "desc"}}
        ],
        "size": 10
    }

    data = await query_elasticsearch(query)
    if not data:
        return json.dumps({"error": "Unable to query Elasticsearch"}, indent=2)

    results = []
    for hit in data["hits"]["hits"]:
        source = hit["_source"]
        results.append({
            "startDate": source.get("startDate"),
            "endDate": source.get("endDate"),
            "value": source.get("value"),
            "device": source.get("device"),
            "sourceName": source.get("sourceName"),
            "dayOfWeek": source.get("dayOfWeek"),
            "hour": source.get("hour")
        })

    return json.dumps({
        "latest_steps": results
    }, indent=2)
This resource will query Elasticsearch to get the 10 most recent step records, ordered by end date. The output format and real examples of this data in action are demonstrated later in the piece, where we show actual Claude Desktop interactions.
Intelligent assistant for health data
Our use case is to create a knowledge base assistant that allows LLM agents to interact with Apple HealthKit health data. Specifically, we're focusing on step count data, but the same approach can be extended to other types of health data.
This assistant will allow users to:
- Query their step data conversationally
- Get personalized analyses and visualizations
- Compare data from different devices
- Identify trends and patterns over time
Implementing resources: Read endpoints for step data
Our MCP server will implement three main resources:
- Data type listing: To show which data types are available in the database
- Most recent data retrieval: To get the most current step records
- Statistical summary: To provide an overview of the data
Let's implement these resources:
# Resources
@mcp.resource("health://steps/types")
async def list_step_types() -> str:
    """List all available step types in the database"""
    query = {
        "size": 0,
        "aggs": {
            "step_types": {
                "terms": {
                    "field": "type",
                    "size": 100
                }
            }
        }
    }

    data = await query_elasticsearch(query)
    if not data:
        return json.dumps({"error": "Unable to query Elasticsearch"}, indent=2)

    step_types = [bucket["key"] for bucket in
                  data["aggregations"]["step_types"]["buckets"]]

    return json.dumps({
        "available_types": step_types,
        "count": len(step_types)
    }, indent=2)

@mcp.resource("health://steps/summary")
async def get_steps_summary() -> str:
    """Get summary statistics for step counts"""
    query = {
        "aggs": {
            "all_time": {
                "stats": {
                    "field": "value"
                }
            }
        },
        "size": 0
    }

    data = await query_elasticsearch(query)
    if not data:
        return json.dumps({"error": "Unable to query Elasticsearch"}, indent=2)

    return json.dumps(data["aggregations"], indent=2)
Integrating with agentic RAG applications
Tools: Connecting MCP to RAG workflows
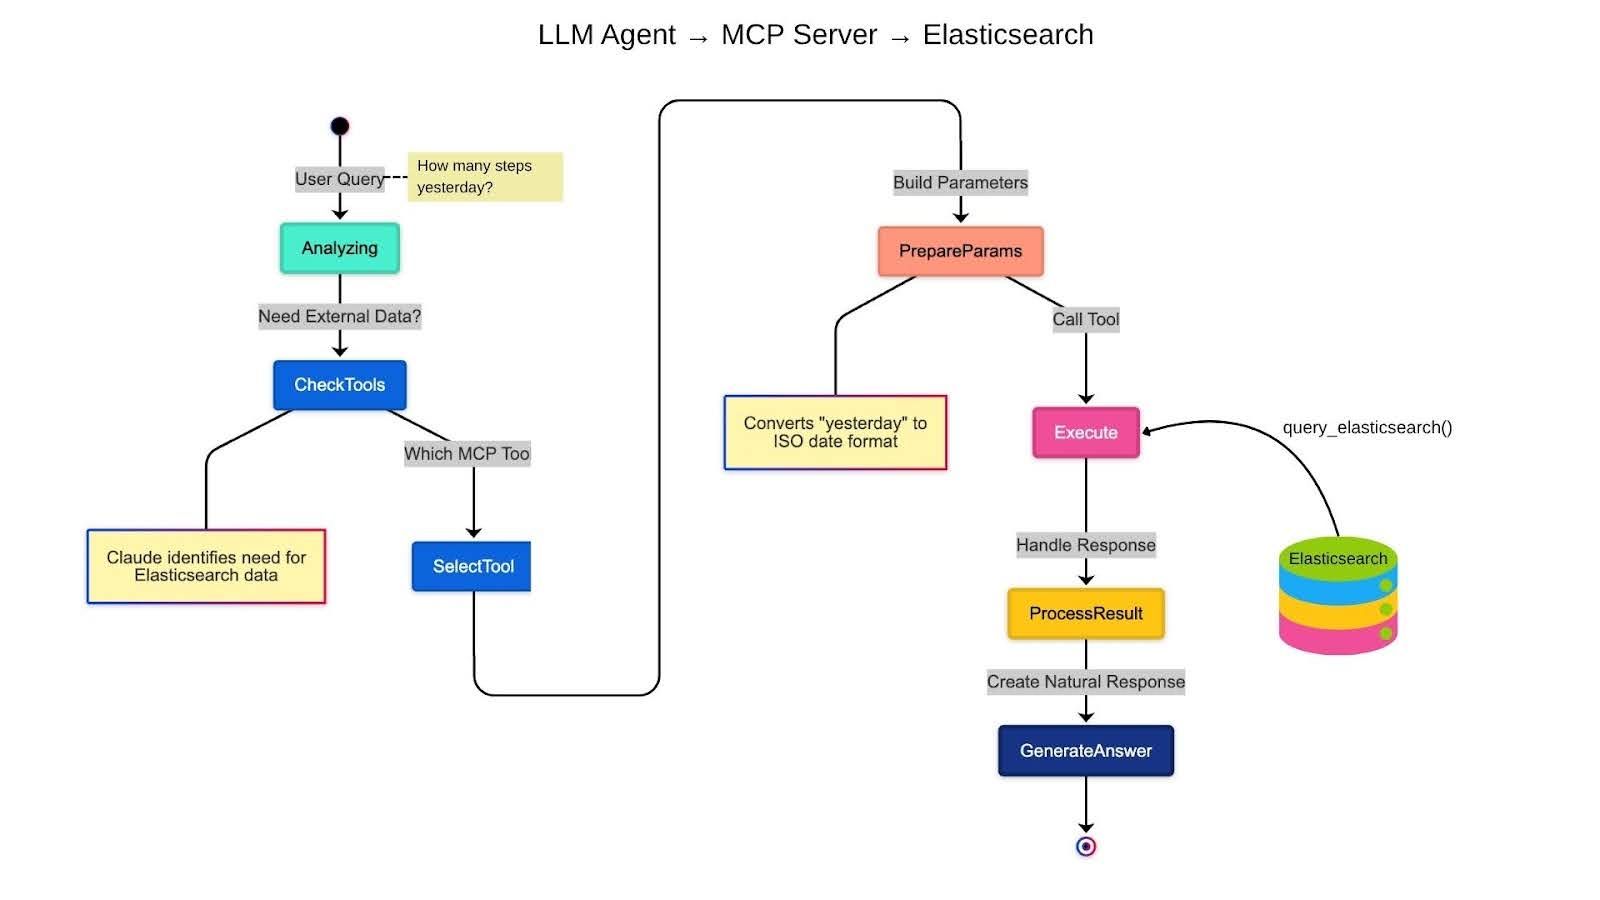
To integrate our MCP server with RAG (Retrieval-Augmented Generation) workflows, we need to implement tools that allow custom and complex queries. The illustration below shows how MCP integrates into a complete RAG flow:
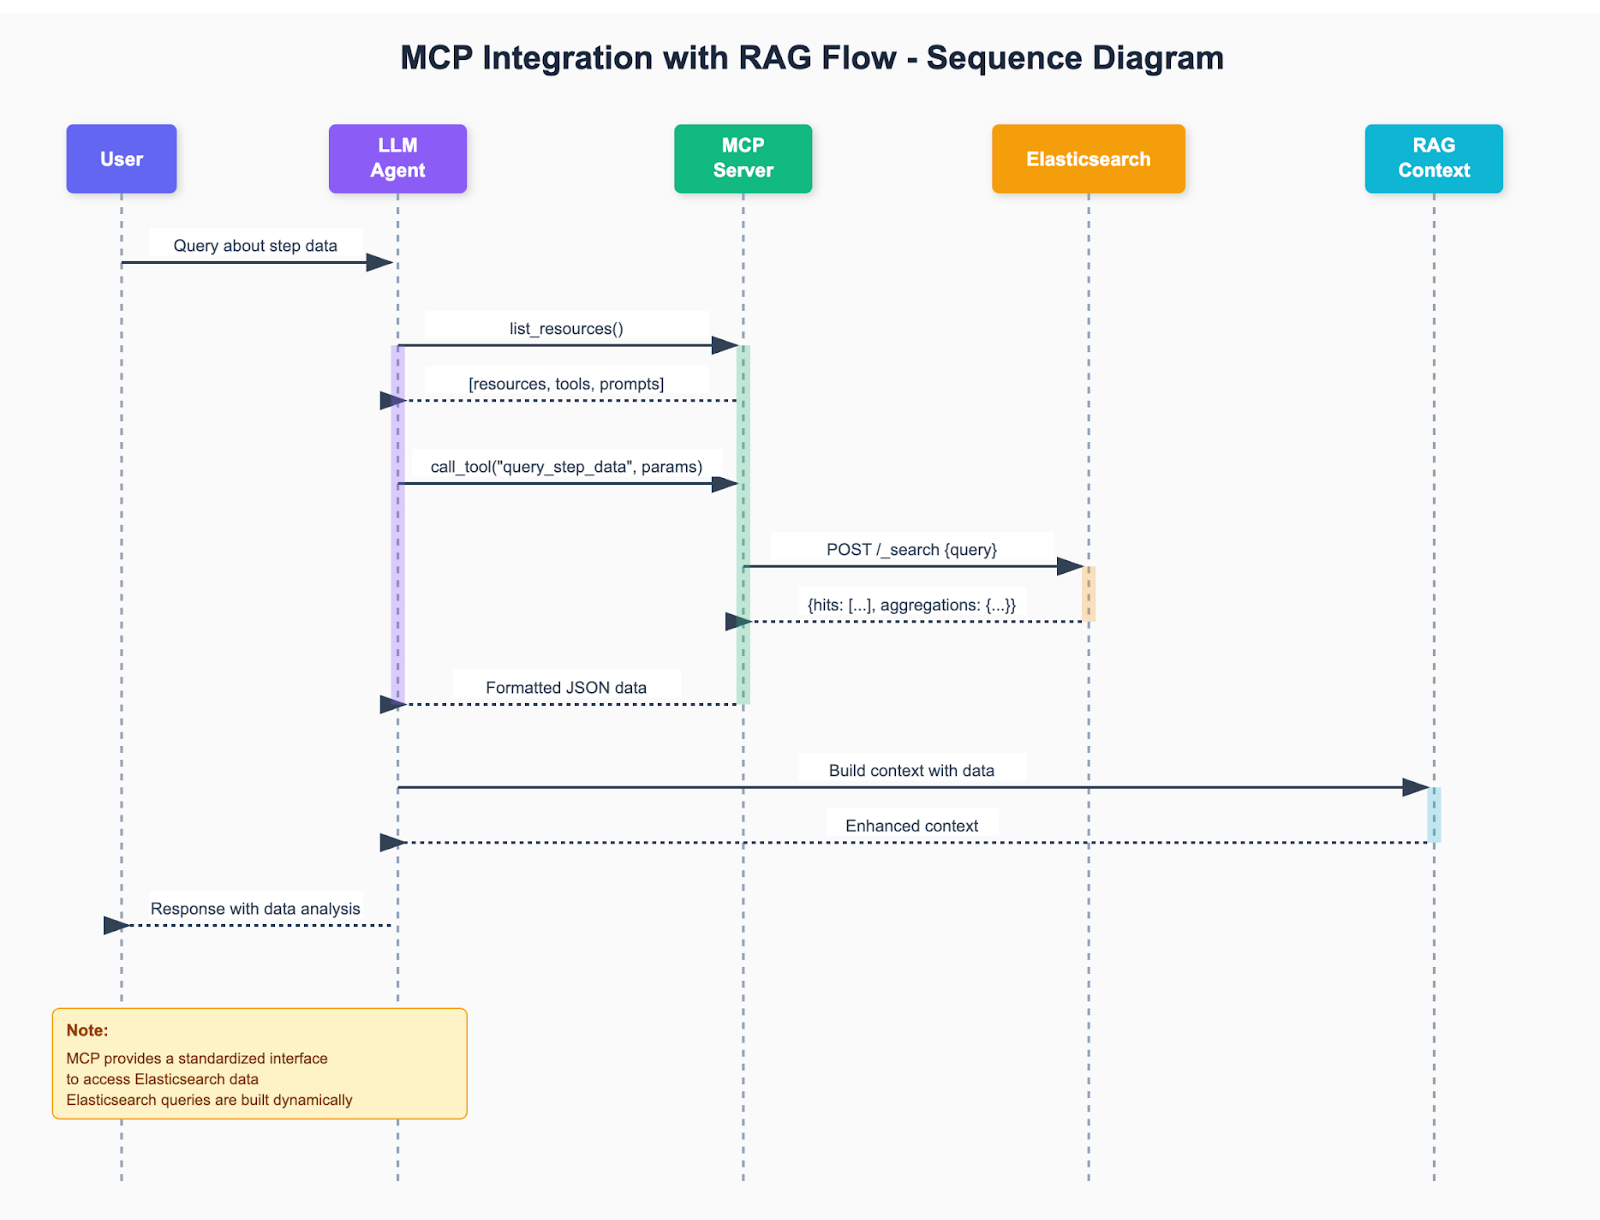
This diagram shows how our MCP server fits perfectly into the RAG process:
- The user asks a question about their health data
- The query is processed by the RAG system
- The retrieval stage uses
the query_step_datatool from MCP to search for relevant data in Elasticsearch - The retrieved data is used to build context and enrich the response
- The LLM generates a final response based on the data and context
Let's implement the necessary tools for this flow:
# Tools
@mcp.tool()
async def query_step_data(params: QueryStepDataParams) -> str:
    """
    Query step data with customizable parameters

    Args:
        start_date: Start date in YYYY-MM-DD format
        end_date: End date in YYYY-MM-DD format
        aggregation: Aggregation interval (hourly, daily, weekly, monthly)
        device: Filter by specific device name
    """
    # Extract parameters from model
    start_date = params.start_date or ""
    end_date = params.end_date or ""
    aggregation = params.aggregation or ""
    device = params.device or ""

    query = {"query": {"match_all": {}}}
    filters = []

    # Date filters
    date_ranges = []
    if start_date:
        date_ranges.append({"gte": start_date})
    if end_date:
        date_ranges.append({"lte": end_date})

    if date_ranges:
        filters.append({
            "range": {
                "day": {**{k: v for d in date_ranges for k, v in d.items()}}
            }
        })

    # Device filter
    if device:
        filters.append({
            "wildcard": {
                "device": f"*{device}*"
            }
        })

    if filters:
        query["query"] = {"bool": {"must": filters}}

    # Aggregation handling
    if aggregation:
        interval_mapping = {
            "hourly": "1h",
            "daily": "1d",
            "weekly": "1w",
            "monthly": "1M"
        }
        interval = interval_mapping.get(aggregation, "1d")
        date_field = "startDate" if aggregation == "hourly" else "day"

        query["aggs"] = {
            "time_series": {
                "date_histogram": {
                    "field": date_field,
                    "calendar_interval": interval,
                    "min_doc_count": 0
                },
                "aggs": {
                    "total_steps": {"sum": {"field": "value"}},
                    "avg_steps": {"avg": {"field": "value"}},
                    "max_steps": {"max": {"field": "value"}},
                    "min_steps": {"min": {"field": "value"}}
                }
            }
        }
        query["size"] = 0
    else:
        query.update({
            "sort": [{"startDate": "desc"}],
            "size": 10
        })

    data = await query_elasticsearch(query)
    if not data:
        return json.dumps({
            "error": "Unable to query Elasticsearch",
            "query": query
        }, indent=2)

    # Process results
    results = []
    if aggregation and "time_series" in data.get("aggregations", {}):
        for bucket in data["aggregations"]["time_series"]["buckets"]:
            results.append({
                "date": bucket["key_as_string"],
                "total_steps": bucket["total_steps"]["value"],
                "average_steps": bucket["avg_steps"]["value"],
                "max_steps": bucket["max_steps"]["value"],
                "min_steps": bucket["min_steps"]["value"],
                "records": bucket["doc_count"]
            })
    else:
        for hit in data["hits"]["hits"]:
            source = hit["_source"]
            results.append({
                "startDate": source.get("startDate"),
                "endDate": source.get("endDate"),
                "day": source.get("day"),
                "dayOfWeek": source.get("dayOfWeek"),
                "hour": source.get("hour"),
                "value": source.get("value"),
                "device": source.get("device"),
                "sourceName": source.get("sourceName")
            })

    return json.dumps({
        "aggregation": aggregation,
        "total_records": data["hits"]["total"]["value"],
        "data": results,
        "query": query
    }, indent=2)

@mcp.tool()
async def get_all_steps() -> str:
    """Get all steps without any filtering"""
    query = {
        "query": {
            "match_all": {}
        },
        "size": 10,
        "sort": [{"startDate": "desc"}]
    }

    data = await query_elasticsearch(query)
    if not data:
        return json.dumps({"error": "Unable to query Elasticsearch"}, indent=2)

    results = []
    for hit in data["hits"]["hits"]:
        source = hit["_source"]
        results.append({
            "startDate": source.get("startDate"),
            "value": source.get("value"),
            "device": source.get("device")
        })

    return json.dumps({
        "total_records": data["hits"]["total"]["value"],
        "data": results
    }, indent=2)
These tools allow:
- Custom queries with date, device, and aggregation filters
- Quick retrieval of recent data without filters
Prompts: Configuration for different LLM providers
Our MCP server can be used with different LLM providers. To facilitate these integrations, let's implement prompts that help LLMs use our resources and tools effectively:
@mcp.prompt()
def daily_report(date: str = None) -> str:
    """Create a daily step report for a specific date"""
    if date:
        return f"""Please analyze the step data for {date}.
Provide:
1. Total steps
2. Average steps per active hour
3. Most active periods of the day
4. Comparison with weekly average
5. Graphical visualization of the data, if possible"""
    else:
        return """Please analyze the step data for today.
Provide:
1. Total steps so far
2. Average steps per active hour
3. Most active periods of the day
4. Comparison with weekly average
5. Graphical visualization of the data, if possible"""

@mcp.prompt()
def trend_analysis(start_date: str, end_date: str) -> str:
    """Analyze step trends over a specific period"""
    return f"""Analyze step trends between {start_date} and {end_date}.
Please include:
1. Daily step trend graph
2. Identification of weekly patterns
3. Days with highest and lowest activity
4. Progression over time
5. Recommendations based on the data"""

@mcp.prompt()
def device_comparison() -> str:
    """Compare step data recorded by different devices"""
    return """Compare step data recorded by Apple Watch and iPhone:
1. Which device records more steps on average?
2. Are there notable differences in usage patterns?
3. Times when each device is used more
4. Apparent accuracy of each device
5. Recommendations on which device to prioritize for tracking"""
Testing your server with MCP Inspector
Before connecting our server to a real LLM client, in our case Claude, it's good to test it in a controlled environment. The mcp library comes with a powerful web-based debugging tool called MCP Inspector. It allows us to interactively test our server, view requests and responses in real-time, and validate our logic before deployment.
How to start the Inspector
In your terminal, with the virtual environment activated, run the mcp dev command followed by the name of your script:
mcp dev apple_watch_mcp.pyThe first time you run this, mcp may ask for permission to install the Inspector's web components. This is a one-time setup. Simply type y and press Enter.
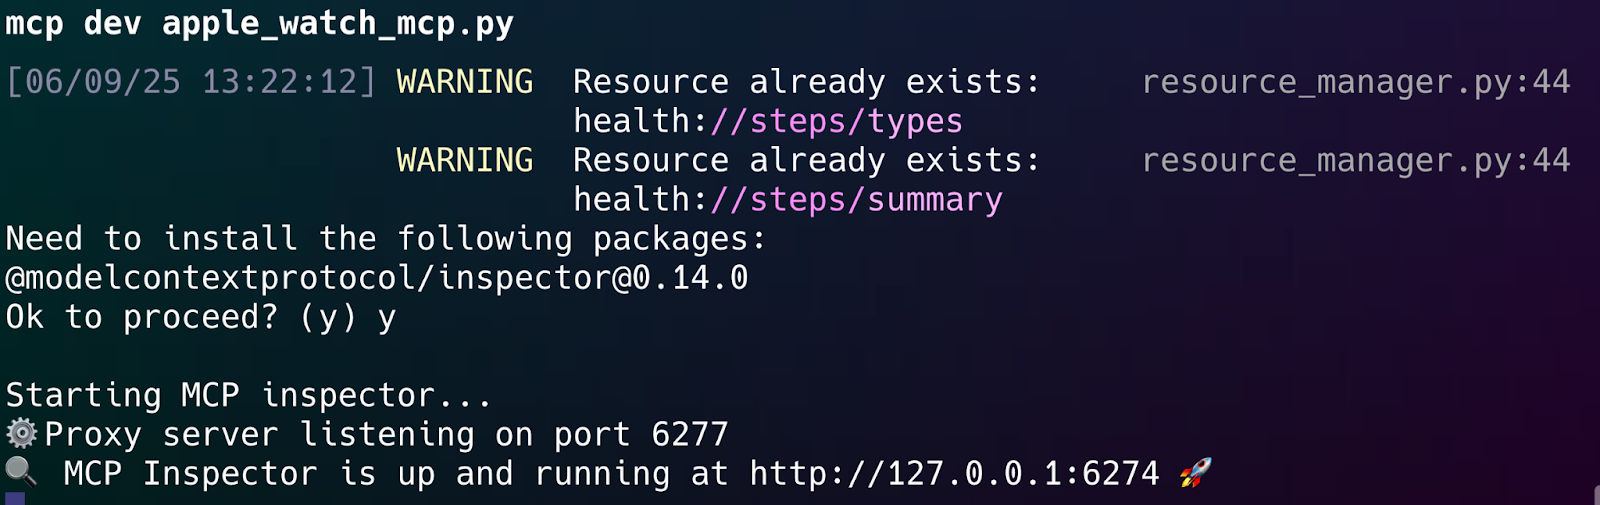
Once you confirm, the tool will start a local proxy server and automatically open the MCP Inspector interface in your default web browser, usually at http://127.0.0.1:6274.
Authentication note: Recent versions of the MCP Inspector may require authentication for security. If the Inspector doesn't open automatically, look for a message in your terminal like:
Session token: xxxxx...
Open inspector with token pre-filled:
   http://localhost:6274/?MCP_PROXY_AUTH_TOKEN=xxxxx...
Use the complete URL with the token to access the Inspector. This token ensures secure access to your server during testing.
Exploring the interface
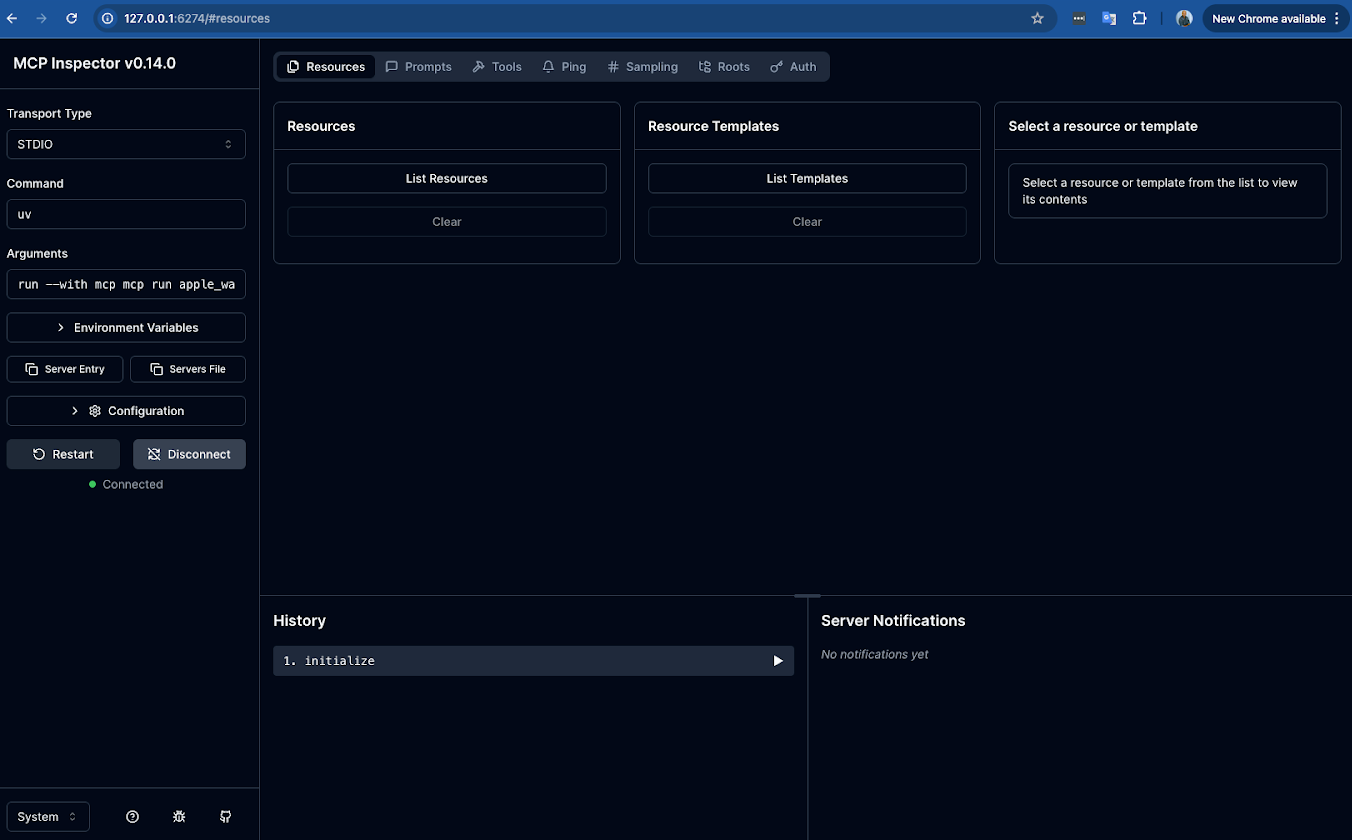
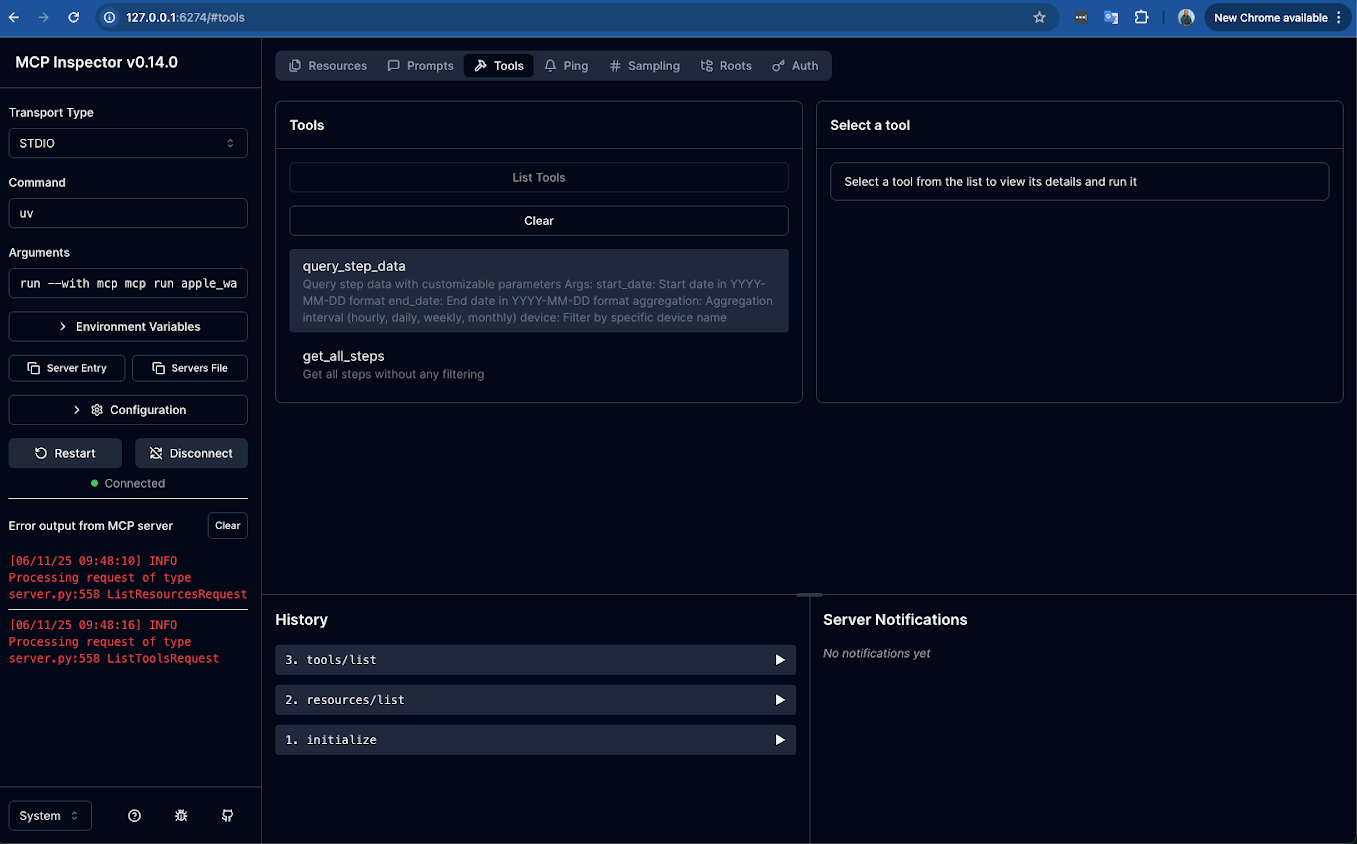
The MCP Inspector provides a clean interface to explore and interact with your server's capabilities.
1. The initial connection
When the page loads, it will automatically connect to your running apple_watch_mcp.py script. You'll see the status on the left change from disconnected to a "Restart | Disconnect" state, and the "History" panel will show an initialize event.
2. Discovering your capabilities
The core of the Inspector lies in the tabs at the top: Resources, Prompts, and Tools.
- Resources: Click on the "Resources" tab. To see all the data endpoints you've created, click the "List Resources" button. They will appear in the panel below.
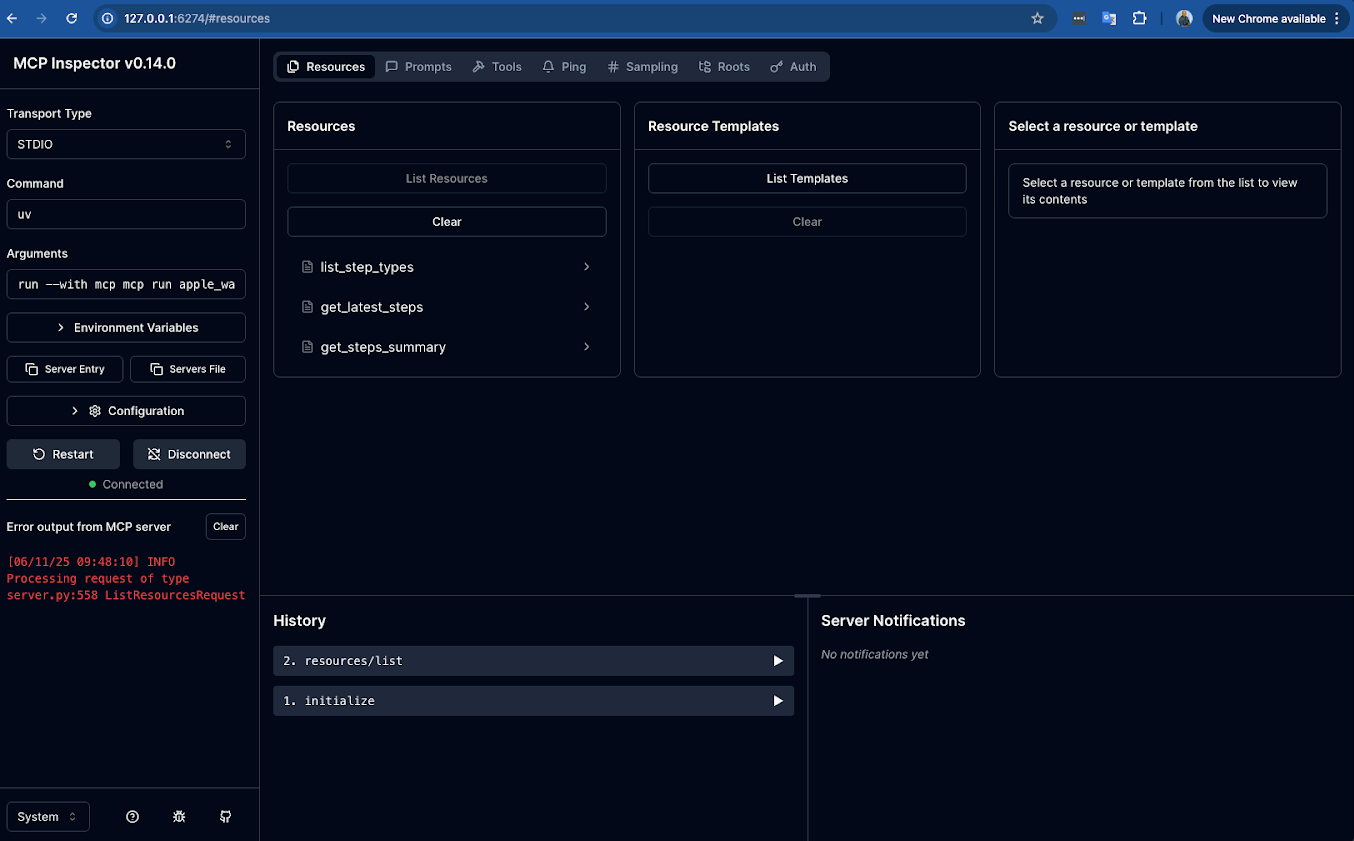
- Tools & prompts: You can do the same for the other tabs. Clicking on "Tools" and then "List Tools" will show your
query_step_dataandget_all_stepsfunctions. The "Prompts" tab will list your predefined prompt templates.
3. Running a test
Let's test a simple tool to see it in action.
- Navigate to the Tools tab
- Click on a tool from the list, for example,
get_all_steps. - The right-hand panel will now show the details for that tool. Since
get_all_stepsdoesn't require any parameters; you can simply click the "Run Tool" button.
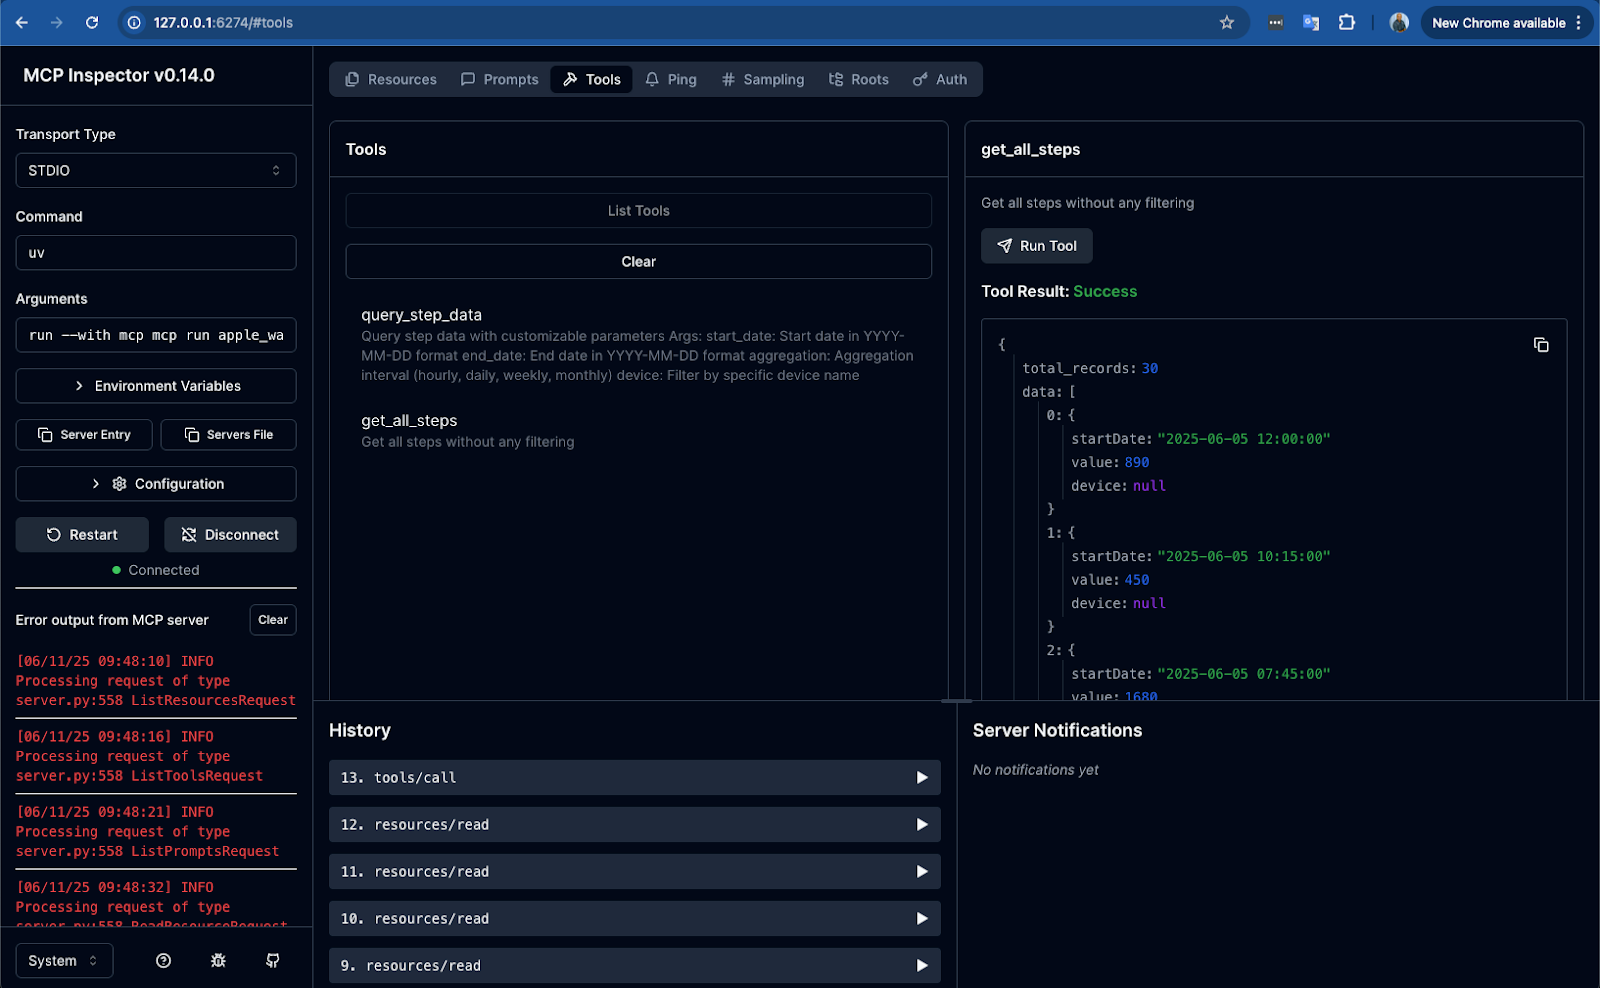
After clicking "Run Tool", the JSON response from your server will appear in this same right-hand panel. Here, you can verify if the data is correct, if the format is as you expect, and check for any errors. You can do the same for tools that require parameters (like query_step_data) by filling in the arguments before clicking "Run".
By following these steps, you can test every part of your MCP server, ensuring it's robust and ready before integrating it with Claude Desktop.
Stopping the test server
The mcp dev command starts a local development server designed for debugging. After validating in MCP Inspector that the Resources, Tools, and Prompts function as expected, the test server can be stopped.
To do this, return to the terminal window where the process is running and press Ctrl+C.
...
Connected MCP client to backing server transport
Created client/server transports
Set up MCP proxy
^C
With the server tested, the next step is to install it in Claude Desktop, which will then manage the server's execution.
Adding to LLM clients: Final step
What is Claude Desktop?
To interact with our MCP server in a practical and intuitive way, we'll use Claude Desktop as our MCP client. Unlike traditional CLI tools, MCP servers require a compatible client that speaks the Model Context Protocol - you cannot simply run commands against them directly. Claude Desktop provides this client interface, allowing us to send natural language queries that the MCP server can process.
Installation: You can download Claude Desktop for free at https://www.anthropic.com/claude. The free version is completely sufficient for testing in this blog.
Installing the Server in Claude
With Claude Desktop installed, let's register our MCP server:
# Install the server for Claude Desktop
mcp install apple_watch_mcp.py --name "Apple Health Steps"
Verify that the installation worked
Now, let's confirm that the command did what we expected. The mcp install command adds an entry to a JSON configuration file. If you were using an API key, the configuration will include the environment variable. Run the command below to view the contents of this file.
cat ~/Library/Application\ Support/Claude/claude_desktop_config.jsonYou should see a structure similar to this inside the file, under the "mcpServers" key:
{
  "mcpServers": {
    "Apple Health Steps": {
      "command": "/full/path/to/your/uv",
      "args": [
        "--directory",
        "/path/to/repository/apple-watch-health-mcp",
        "run",
        "apple_watch_mcp.py"
        // Other arguments may appear depending on your setup
      ],
      "env": {
        "ES_API_KEY": "YOUR_ES_API_KEY"
      }
    }
    // ... other servers might be listed here
  }
}
If you found the "Apple Health Steps" block, congratulations! Your server has been configured successfully.
Restart required
Important: After installing the server, restart Claude Desktop for it to load the new configuration.
- The server will only start when Claude is opened.
- If execution errors occur, you can view the logs directly in Claude Desktop.
Interaction examples with Claude
With all the setup complete, we're ready for the most rewarding part: conversing with your own MCP server using natural language.
Before you begin: Get your environment ready
To interact with your new server, you need to be in the client interface. Open the Claude Desktop application and make sure you are looking at the main chat screen.
This is where you will ask all your questions. Your screen should be ready to go, as shown in the image below, with our first question already in the text box.
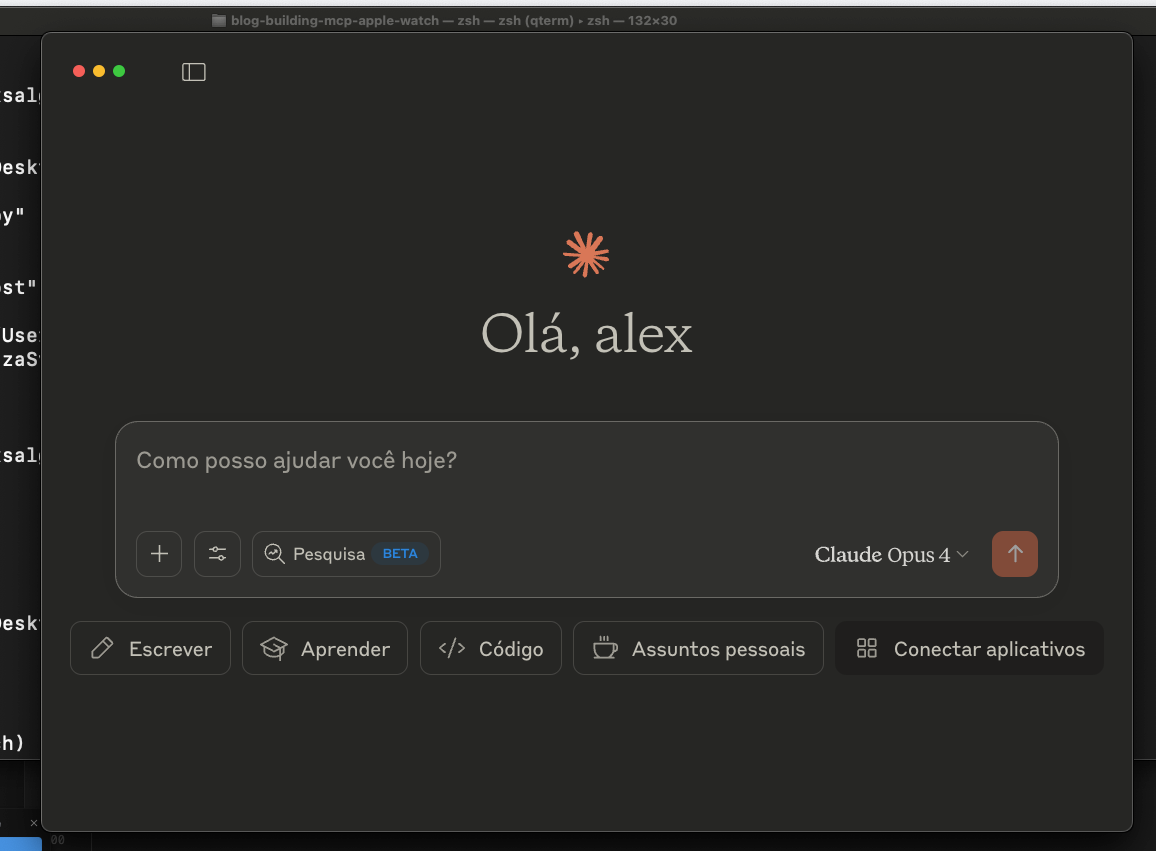
With everything in place, let's proceed.
Example 1: The basic conversation (RAG in action)
Now, simply press "Enter" to send the question you've typed. This is a great example of RAG, where the model retrieves a specific piece of data to answer.
You type: How many steps did I take last Thursday?
Expected response: Last Thursday (June 5th), you took 5,360 steps total. Your step count ranged from 450 to 2,340 steps across 4 different recordings throughout the day.
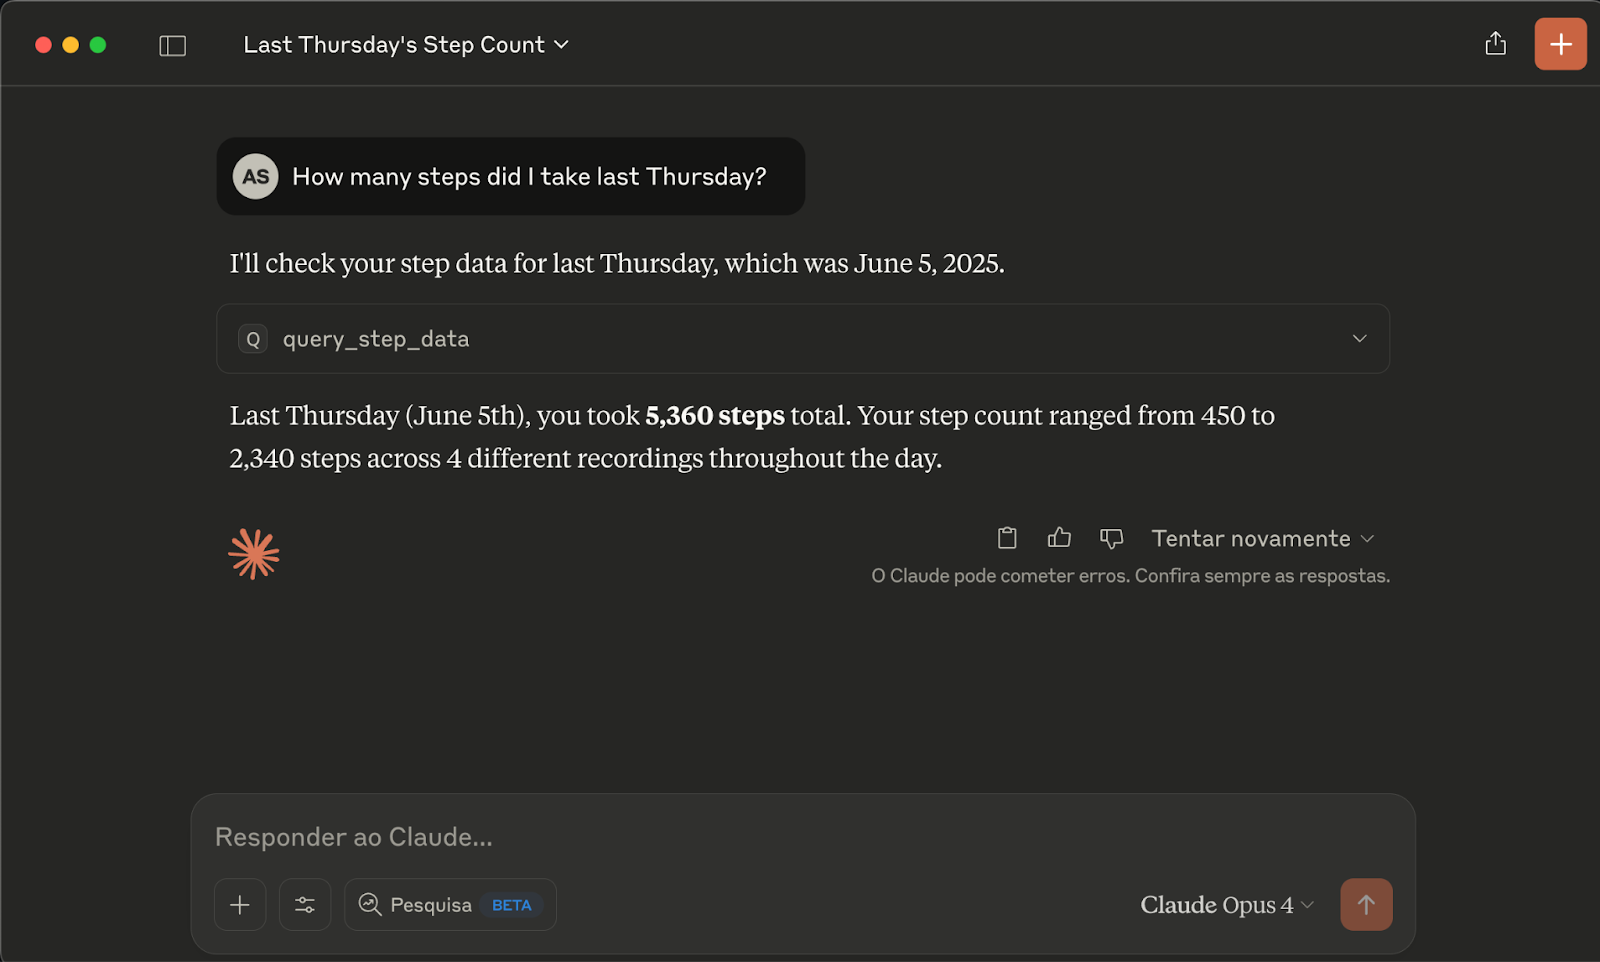
This is useful, but the real power of MCP is its ability to do more than just return text.
Example 2: Visualizing your activity (the power of MCP)
Now, let's ask for something that requires the server to process the data and return it in a structured format, like a bar chart.
You type: Show me a summary of my step count from the last 7 days as a bar chart, including some insights on it.
Because your server understands the intent and has a tool to aggregate the data, it doesn't just return a sentence. It generates the structured data so the client (Claude) can render a visualization.

Congratulations!
You've successfully created a functional MCP server that connects Claude to your health data, using Elasticsearch as a backend and enabling natural language interactions.
Conclusion
In this blog, we explored how to create an MCP server that integrates Apple HealthKit data with LLM agents, using FastMCP and Elasticsearch. We’ve also shown how to locally test our server using MCP Inspector and Claude Desktop. The code is available here.
This approach allows AI assistants to access and analyze health data in a contextual, secure, and intuitive way.
Additional resources:
- MCP Python SDK Documentation
- MCP Specification
- Elasticsearch Documentation
- Apple HealthKit Documentation
- Official Elasticsearch MCP Server
- FastMCP Documentation
- Using asyncio
Ready to try this out on your own? Start a free trial.
Want to get Elastic certified? Find out when the next Elasticsearch Engineer training is running!
Related content

October 30, 2025
Context engineering using Mistral Chat completions in Elasticsearch
Learn how to utilize context engineering with Mistral Chat completions in Elasticsearch to ground LLM responses in domain-specific knowledge for accurate outputs.
October 27, 2025
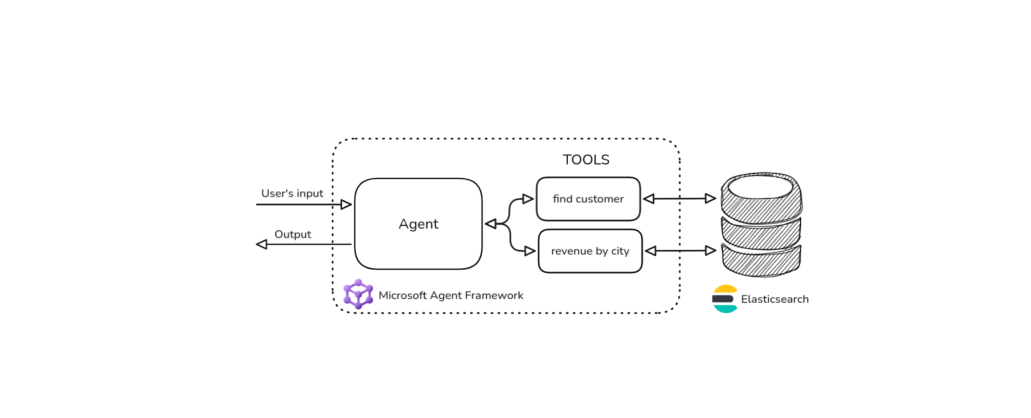
Building agentic applications with Elasticsearch and Microsoft’s Agent Framework
Learn how to use Microsoft Agent Framework with Elasticsearch to build an agentic application that extracts ecommerce data from Elasticsearch client libraries using ES|QL.
October 21, 2025
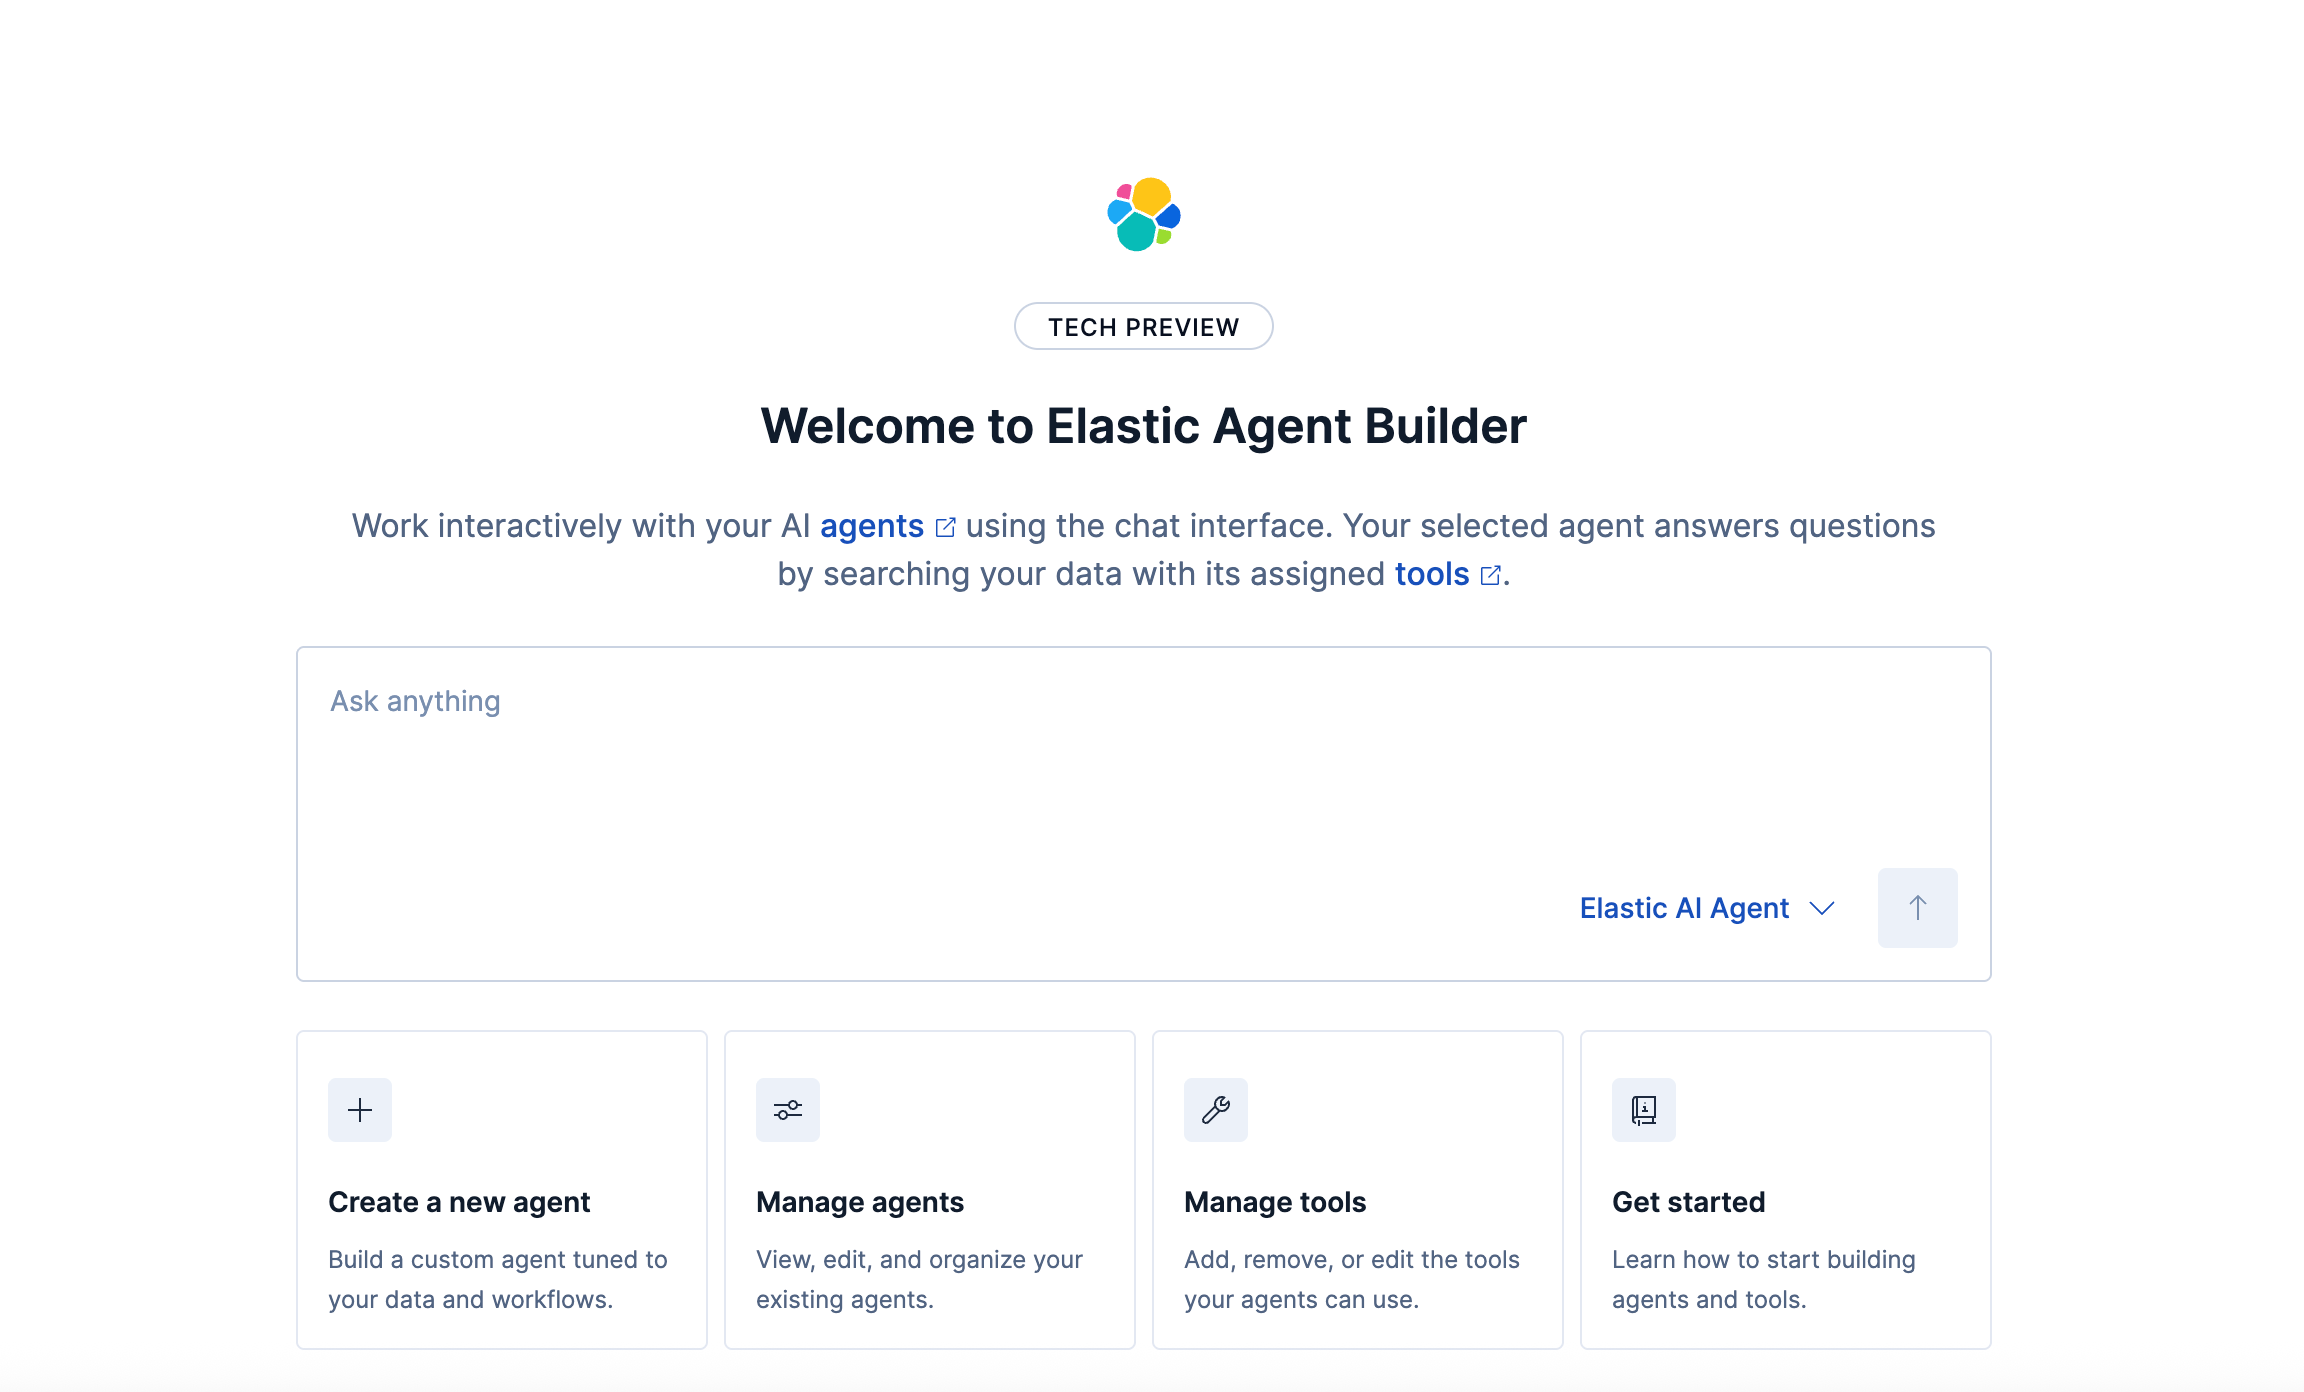
Introducing Elastic’s Agent Builder
Introducing Elastic Agent Builder, a framework to easily build reliable, context-driven AI agents in Elasticsearch with your data.

October 20, 2025
Elastic MCP server: Expose Agent Builder tools to any AI agent
Discover how to use the built-in Elastic MCP server in Agent Builder to securely extend any AI agent with access to your private data and custom tools.
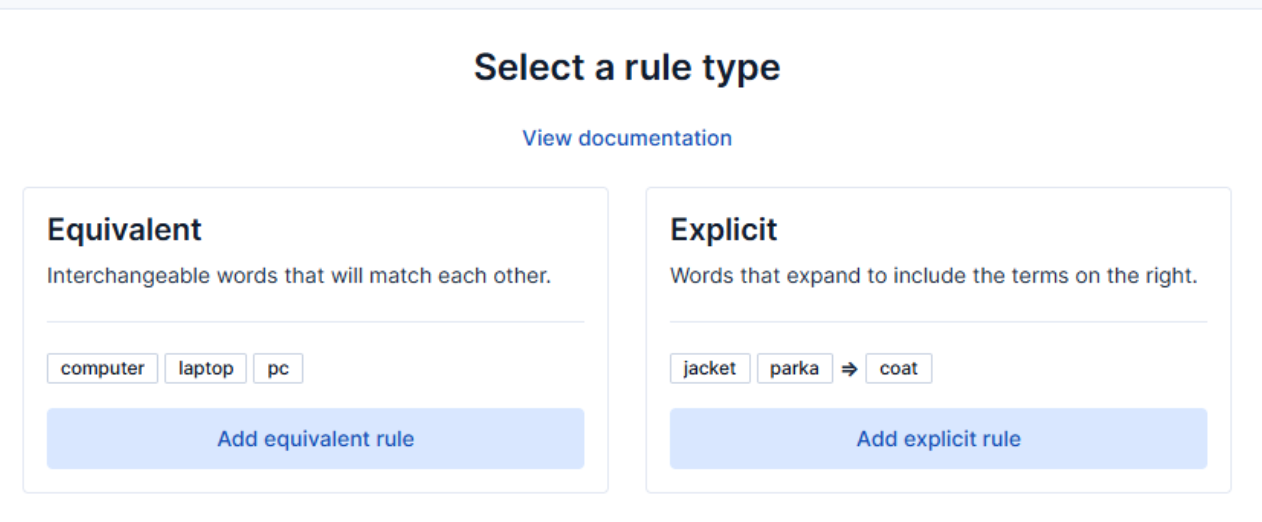
How to use the Synonyms UI to upload and manage Elasticsearch synonyms
Learn how to use the Synonyms UI in Kibana to create synonym sets and assign them to indices.