In this article, we will create a sample app to collect user behavior data to show how the UBI extension can be integrated with search-ui. We will also customize the data that is being collected to show the flexibility of the UBI standard and how it can cover different needs.
The sample app is a simple search engine for books and the goal here is to be able to capture events from the users and index them on Elasticsearch based on their activity, like search and clicks.
Requirements
This application requires having the UBI plugin for Elasticsearch installed. You can read our blog post about it for more information here.
Load sample data
We need to have some data on Elasticsearch first. Run the following command on Kibana DevTools Console to load a list of products to display in our UI. This will create a new index named “books” to work with this example.
POST /_bulk
{ "index" : { "_index" : "books" } }
{"name": "Snow Crash", "author": "Neal Stephenson", "release_date": "1992-06-01", "page_count": 470, "price": 14.99, "url": "https://www.amazon.com/Snow-Crash-Neal-Stephenson/dp/0553380958/", "image_url": "https://m.media-amazon.com/images/I/81p4Y+0HzbL._SY522_.jpg" }
{ "index" : { "_index" : "books" } }
{"name": "Revelation Space", "author": "Alastair Reynolds", "release_date": "2000-03-15", "page_count": 585, "price": 16.99, "url": "https://www.amazon.com/Revelation-Space-Alastair-Reynolds/dp/0441009425/", "image_url": "https://m.media-amazon.com/images/I/61nC2ExeTvL._SY522_.jpg"}
{ "index" : { "_index" : "books" } }
{"name": "1984", "author": "George Orwell", "release_date": "1985-06-01", "page_count": 328, "price": 12.99, "url": "https://www.amazon.com/1984-Signet-Classics-George-Orwell/dp/0451524934/", "image_url": "https://m.media-amazon.com/images/I/71rpa1-kyvL._SY522_.jpg"}
{ "index" : { "_index" : "books" } }
{"name": "Fahrenheit 451", "author": "Ray Bradbury", "release_date": "1953-10-15", "page_count": 227, "price": 11.99, "url": "https://www.amazon.com/Fahrenheit-451-Ray-Bradbury/dp/1451673310/", "image_url": "https://m.media-amazon.com/images/I/61sKsbPb5GL._SY522_.jpg"}
{ "index" : { "_index" : "books" } }
{"name": "Brave New World", "author": "Aldous Huxley", "release_date": "1932-06-01", "page_count": 268, "price": 12.99, "url": "https://www.amazon.com/Brave-New-World-Aldous-Huxley/dp/0060850523/", "image_url": "https://m.media-amazon.com/images/I/71GNqqXuN3L._SY522_.jpg"}
{ "index" : { "_index" : "books" } }
{"name": "The Handmaid's Tale", "author": "Margaret Atwood", "release_date": "1985-06-01", "page_count": 311, "price": 13.99, "url": "https://www.amazon.com/Handmaids-Tale-Margaret-Atwood/dp/038549081X/", "image_url": "https://m.media-amazon.com/images/I/61su39k8NUL._SY522_.jpg"}
Create sample app
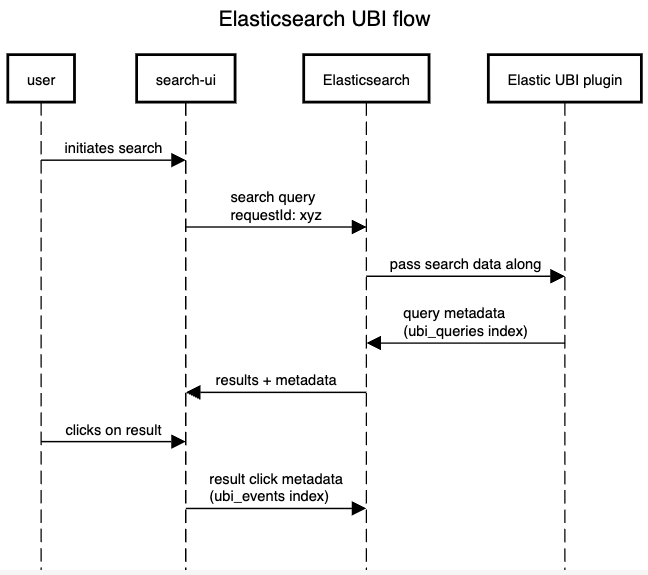
We are going to use search-ui to create a UI application that sends UBI events to Elasticsearch. search-ui is Elastic’s JavaScript library to create UIs with built-in React components.
Search UI is Elastic’s React-based framework for building search applications. It provides components for all the essential parts of a search experience—such as search bars, facets, pagination, and autosuggestions. Customizing its behavior, including adding UBI, is straightforward.
Elasticsearch connector
To get started, we need to install the Elasticsearch connector, using the steps adapted from the connector tutorial.
1. Download the search-ui starter app from GitHub:
curl https://codeload.github.com/elastic/app-search-reference-ui-react/tar.gz/master | tar -xz2. Navigate to the new directory called app-search-reference-ui-react-main and install the dependencies:
cd app-search-reference-ui-react-main
npm install
3. Install the Elasticsearch connector via the npm package manager:
npm install @elastic/search-ui-elasticsearch-connectorBackend server
To adhere to best practices and ensure that the Elasticsearch calls are made via a middle-tier service, let’s create a backend to invoke our connector:
1. We start by creating a new directory and a new JavaScript file:
mkdir server
touch server/index.js
2. In the new index.js file, write:
import express from "express";
import ElasticsearchAPIConnector from "@elastic/search-ui-elasticsearch-connector";
import { Client } from "@elastic/elasticsearch";
import "dotenv/config";

const app = express();
app.use(express.json());

const connector = new ElasticsearchAPIConnector({
  host: process.env.ELASTICSEARCH_HOST,
  index: process.env.ELASTICSEARCH_INDEX,
  apiKey: process.env.ELASTICSEARCH_API_KEY
});

const esClient = new Client({
  node: process.env.ELASTICSEARCH_HOST,
  auth: {
    apiKey: process.env.ELASTICSEARCH_API_KEY,
  },
});

app.post("/api/search", async (req, res) => {
  const { state, queryConfig } = req.body;
  const response = await connector.onSearch(state, queryConfig);
  res.json(response);
});

app.post("/api/autocomplete", async (req, res) => {
  const { state, queryConfig } = req.body;
  const response = await connector.onAutocomplete(state, queryConfig);
  res.json(response);
});

app.post("/api/analytics", async (req, res, next) => {
  try {
    console.log(`Sending analytics for query_id: ${req.body.query_id}`)
    req.body.client_id = clientId;
    await esClient.index({
      index: "ubi_events",
      body: req.body,
    });


    console.log(req.body);
    res.status(200).json({ message: "Analytics event saved successfully" });
  } catch (error) {
    next(error);
  }
});


app.listen(3001);
This will create a server to proxy the requests to Elasticsearch with endpoints for search and autocomplete queries.
3. On the App.js file update:
import { ApiProxyConnector } from "@elastic/search-ui-elasticsearch-connector/api-proxy";
const connector = new ApiProxyConnector({
  basePath: "http://localhost:3001/api"
  // fetchOptions: {}
});

const config = {
  apiConnector: connector
  // other Search UI config options
};
With this change, we replace the default behavior, which is calling Elasticsearch from the browser, with calling our backend. This approach is more suitable for a production environment.
At the end of the file, replace the export default function with this definition:
export default function App() {
return (
<SearchProvider config={config}>
<Layout
header={<SearchBox autocompleteSuggestions={false} />}
bodyContent={
<Results
titleField={"author"}
urlField={"url"}
thumbnailField={"image_url"}
shouldTrackClickThrough={true}
/>
}
/>
</SearchProvider>
);
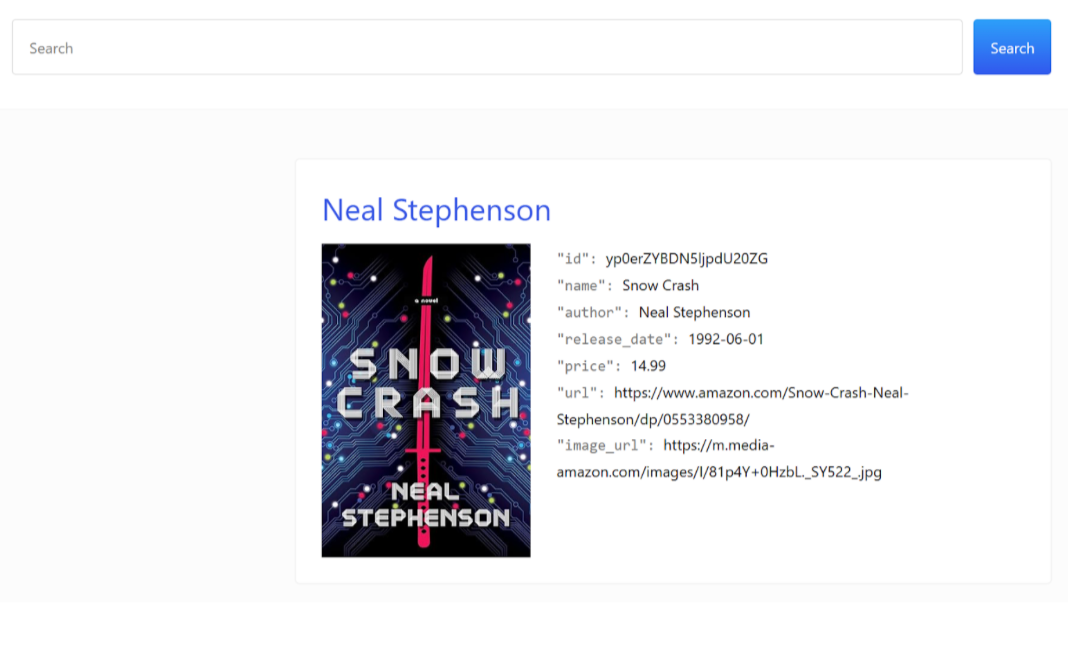
}This will allow us to display the book’s images and have a link to click on.

To see the full tutorial, visit this documentation.
After following the steps, you will end up with a client-side index.js and a server-side server/index.js related file.
Configure connector
We are going to configure onSearch and onResultClick handlers to set the UBI query_id. Then, we’ll send UBI events when a search is executed and a result is clicked.
Configure onSearch: intercepts search requests, assigns each one a unique requestId using UUID v4, and then passes the request along to the next handler in the processing chain. We will use this ID as the UBI query_id to group searches and clicks.
Go to the server/index.js file and extend the connector to configure the onSearch method:
const clientId = uuidv4(); // to maintain a constant client id
class UBIConnector extends ElasticsearchAPIConnector {
  async onSearch(requestState, queryConfig) {
    const result = await super.onSearch(requestState, queryConfig);
    result.requestId = uuidv4();
    result.clientId = clientId;
    return result;
  }
}
After that, declare the connector and customize the search request to send the generated ID to the UBI plugin via the ext.ubi search parameter.
const connector = new UBIConnector(
  {
    host: process.env.ELASTICSEARCH_HOST,
    index: process.env.ELASTICSEARCH_INDEX,
    apiKey: process.env.ELASTICSEARCH_API_KEY,
  },
  (requestBody, requestState, queryConfig) => {
    requestBody.ext = {
      ubi: {
        query_id: requestState.requestId,
        client_id: requestState.clientId || clientId,
        user_query: requestState.searchTerm || "",
      },
    };
    if (!requestState.searchTerm) return requestBody;
    requestBody.query = {
      multi_match: {
        query: requestState.searchTerm,
        fields: Object.keys(queryConfig.search_fields),
      },
    };
    return requestBody;
  }
);
Don’t forget to add new imports. Also, since our front-end is running on localhost:3000 and our backend is running on localhost:3001, they are considered different origins. An ‘origin’ is defined by the combination of scheme, domain and port, so even if both are running in the same host and use the HTTP protocol the different ports make them separate origins and so we need CORS. To learn more about CORS, visit this guide.
import cors from "cors";
import { v4 as uuidv4 } from "uuid";
...
app.use(cors({
  origin: "http://localhost:3000", // Your React app URL
  credentials: true
}));
Go to the client’s side client/App.js file (click to open the whole finished file).
Add an onResultClick event handler in the config object declaration to send analytics data to the backend whenever a user clicks a search result, capturing information like the query ID, result details, and user interaction specifics such as clicked document attributes, document position, and page number. Here you can add any other information the user consents to share. Make sure to follow privacy laws (like GDPR in Europe for example).
const config = {
  apiConnector: connector,
onResultClick: async (r) => {
    const locationData = await getLocationData();
    const payload = {
      application: "search-ui",
      action_name: "click",
      query_id: r.requestId || "",
      client_id: r.clientId || "",
      timestamp: new Date().toISOString(),
      message_type: "CLICK_THROUGH",
      message: `Clicked ${r.result.name.raw}`,
      user_query: r.query,
      event_attributes: {
        object: {
          device: getDeviceType(),
          object_id: r.result.id.raw,
          description: `${r.result.name.raw}(${r.result.release_date.raw}) by ${r.result.author.raw}`,
          position: {
            ordinal: r.resultIndexOnPage,
            page_depth: r.page,
          },user: {
          ip: locationData.ip,
          city: locationData.city,
          region: locationData.region,
          country: locationData.country,
          location: {
            lat:locationData.latitude,
            lon:locationData.longitude
          }
        }
        },
      },
    };
    fetch(`http://localhost:3001/api/analytics`, {
      method: "POST",
      headers: {
        "Content-Type": "application/json",
      },
      body: JSON.stringify(payload),
    })
      .then((r) => console.log(r))
      .catch((error) => {
        console.error("Error:", error);
      });
  }


  // other Search UI config options
};
The complete event hooks in SearchUI reference can be found here.
Next, change search_fields and result_fields to align with the dataset. We are going to search through the book's name and author and return the name, author, image_url, url, and price.
const config = {
...
  searchQuery: {
    search_fields: {
      name: {},
      author: {},
    },
    result_fields: {
      name: { raw: {} },
      author: { raw: {} },
      image_url: { raw: {} },
      url: { raw: {} },
      price: { raw: {} },
      release_date: { raw: {} }
    },
  },
};
Finally, we are going to add a couple of helper functions to define the device type and user data:
const getDeviceType = () => {
  const userAgent = navigator.userAgent.toLowerCase();

  if (/tablet|ipad|playbook|silk/.test(userAgent)) {
    return 'tablet';
  }
  if (/mobile|iphone|ipod|android|blackberry|opera|mini|windows\sce|palm|smartphone|iemobile/.test(userAgent)) {
    return 'mobile';
  }
  return 'desktop';
};

const getLocationData = async () => {
  const response = await fetch('https://ipapi.co/json/');
  const data = await response.json();
  return {
    ip: data.ip,
    city: data.city,
    region: data.region,
    country: data.country_name,
    latitude: data.latitude,
    longitude: data.longitude
  };
};
You can keep the rest of the config object as is.
We put together a repo you can find here. It includes a more complete version of the project. It can be cloned using:
git clone https://github.com/llermaly/search-ui-ubi.gitIf you are using the GitHub repo, you need to provide these environment variables required for the server:
ELASTICSEARCH_HOST=your_elasticsearch_url
ELASTICSEARCH_API_KEY=your_api_key
ELASTICSEARCH_INDEX=books
Running the app
Now you can spin up the server:
cd server
npm install && node index.js
You might have to install CORS specifically if you encounter an error regarding that library:
npm install corsAnd in another terminal:
cd client
npm install && npm start
Then go to http://localhost:3000 in your browser.
The end result will look like this:
On the Elasticsearch side, we can create a (rather simple) mapping for the ubi_events index so the user location is treated as such:
PUT ubi_events
{
  "mappings": {
    "properties": {
      "event_attributes.object.user.location": {
        "type": "geo_point"
      }
    }
  }
}
On each search, a ubi_queries event will be generated, and on clickthrough, a ubi_events of type click will be generated.
This is what a ubi_queries event looks like:
{
        "_index": "ubi_queries",
        "_id": "aCXqW5gB87F1AivbVvHI",
        "_score": null,
        "_ignored": [
          "query.keyword"
        ],
        "_source": {
          "query_response_id": "a8aca3d9-1cbc-4800-8853-fd1889172b9b",
          "user_query": "snow",
          "query_id": "d198c517-7d3b-49dd-be11-f573728d578e",
          "query_response_object_ids": [
            "0",
            "6"
          ],
          "query": """{"from":0,"size":20,"query":{"multi_match":{"query":"snow","fields":["author^1.0","name^1.0"]}},"_source":{"includes":["name","author","image_url","url","price","release_date"],"excludes":[]},"sort":[{"_score":{"order":"desc"}}],"ext":{"query_id":"d198c517-7d3b-49dd-be11-f573728d578e","user_query":"snow","client_id":"8a5de3a1-7a1b-47ed-b64f-5be0537829be","object_id_field":null,"query_attributes":{}}}""",
          "query_attributes": {},
          "client_id": "8a5de3a1-7a1b-47ed-b64f-5be0537829be",
          "timestamp": 1753888741063
        },
        "sort": [
          1753888741063
        ]
      }
And this is a sample ubi_events document:
{
        "_index": "ubi_events",
        "_id": "fiDqW5gBftHcGY9PXtao",
        "_score": null,
        "_source": {
          "application": "search-ui",
          "action_name": "click",
          "query_id": "3850340e-0e72-4f20-a06e-27a52d983b39",
          "client_id": "8a5de3a1-7a1b-47ed-b64f-5be0537829be",
          "timestamp": "2025-07-30T15:19:02.659Z",
          "message_type": "CLICK_THROUGH",
          "message": "Clicked Snow Crash",
          "user_query": "snow",
          "event_attributes": {
            "object": {
              "device": "desktop",
              "object_id": "vrFBK5gBZjU2lCOmiNSX",
              "description": "Snow Crash(1992-06-01) by Neal Stephenson",
              "position": {
                "ordinal": 0,
                "page_depth": 1
              },
              "user": {
                "ip": "2800:bf0:108:18:d5ca:fa84:416f:99e0",
                "city": "Quito",
                "region": "Pichincha",
                "country": "Ecuador",
                "location": {
                  "lat": -0.2309,
                  "lon": -78.5211
                }
              }
            }
          }
        },
        "sort": [
          1753888742659
        ]
      }
From here, we can see useful information already, like actions performed linked to a particular query.
Conclusion
Integrating search-ui with the UBI extension is a process that allows us to collect valuable insights into our users’ actions and extend them with other metadata, such as the user location and device type. This information is automatically indexed in two separate indices for queries and actions that can be related by unique IDs. This information enables the developer to better understand how the user uses the app and prioritize any problems that might impact their experience.
Ready to try this out on your own? Start a free trial.
Want to get Elastic certified? Find out when the next Elasticsearch Engineer training is running!
Related content

October 31, 2025
How to install and configure Elasticsearch on AWS EC2
Learn how to deploy Elasticsearch and Kibana on an Amazon EC2 instance in this step-by-step guide.
October 29, 2025
How to deploy Elasticsearch on an Azure Virtual Machine
Learn how to deploy Elasticsearch on Azure VM with Kibana for full control over your Elasticsearch setup configuration.
How to use the Synonyms UI to upload and manage Elasticsearch synonyms
Learn how to use the Synonyms UI in Kibana to create synonym sets and assign them to indices.

October 8, 2025
How to reduce the number of shards in an Elasticsearch Cluster
Learn how Elasticsearch shards affect cluster performance in this comprehensive guide, including how to get the shard count, change it from default, and reduce it if needed.
October 3, 2025
How to deploy Elasticsearch on AWS Marketplace
Learn how to set up and run Elasticsearch using Elastic Cloud Service on AWS Marketplace in this step-by-step guide.